> ## Documentation Index
> Fetch the complete documentation index at: https://www.vibecodeapp.com/docs/llms.txt
> Use this file to discover all available pages before exploring further.
# Stripe Setup
> Learn how to integrate Stripe payments with your Vibecode web app
Stripe integration is only available for **web apps**. For native mobile apps (iOS/Android), use [RevenueCat](/monetization/revenuecat-setup) instead.
## Before You Start
You'll need the following:
* [**Vibecode Account**](https://vibecodeapp.com) (sign up if you haven't already)
* [**Stripe Account**](https://stripe.com) (sign up for free)
* A **deployed Vibecode web app** ready to accept payments
## Step 1: Create a Stripe Account
Visit [stripe.com](https://stripe.com) and sign up. Complete all verification steps in the Stripe Dashboard, including confirming your email, verifying your identity, and setting up your business information.
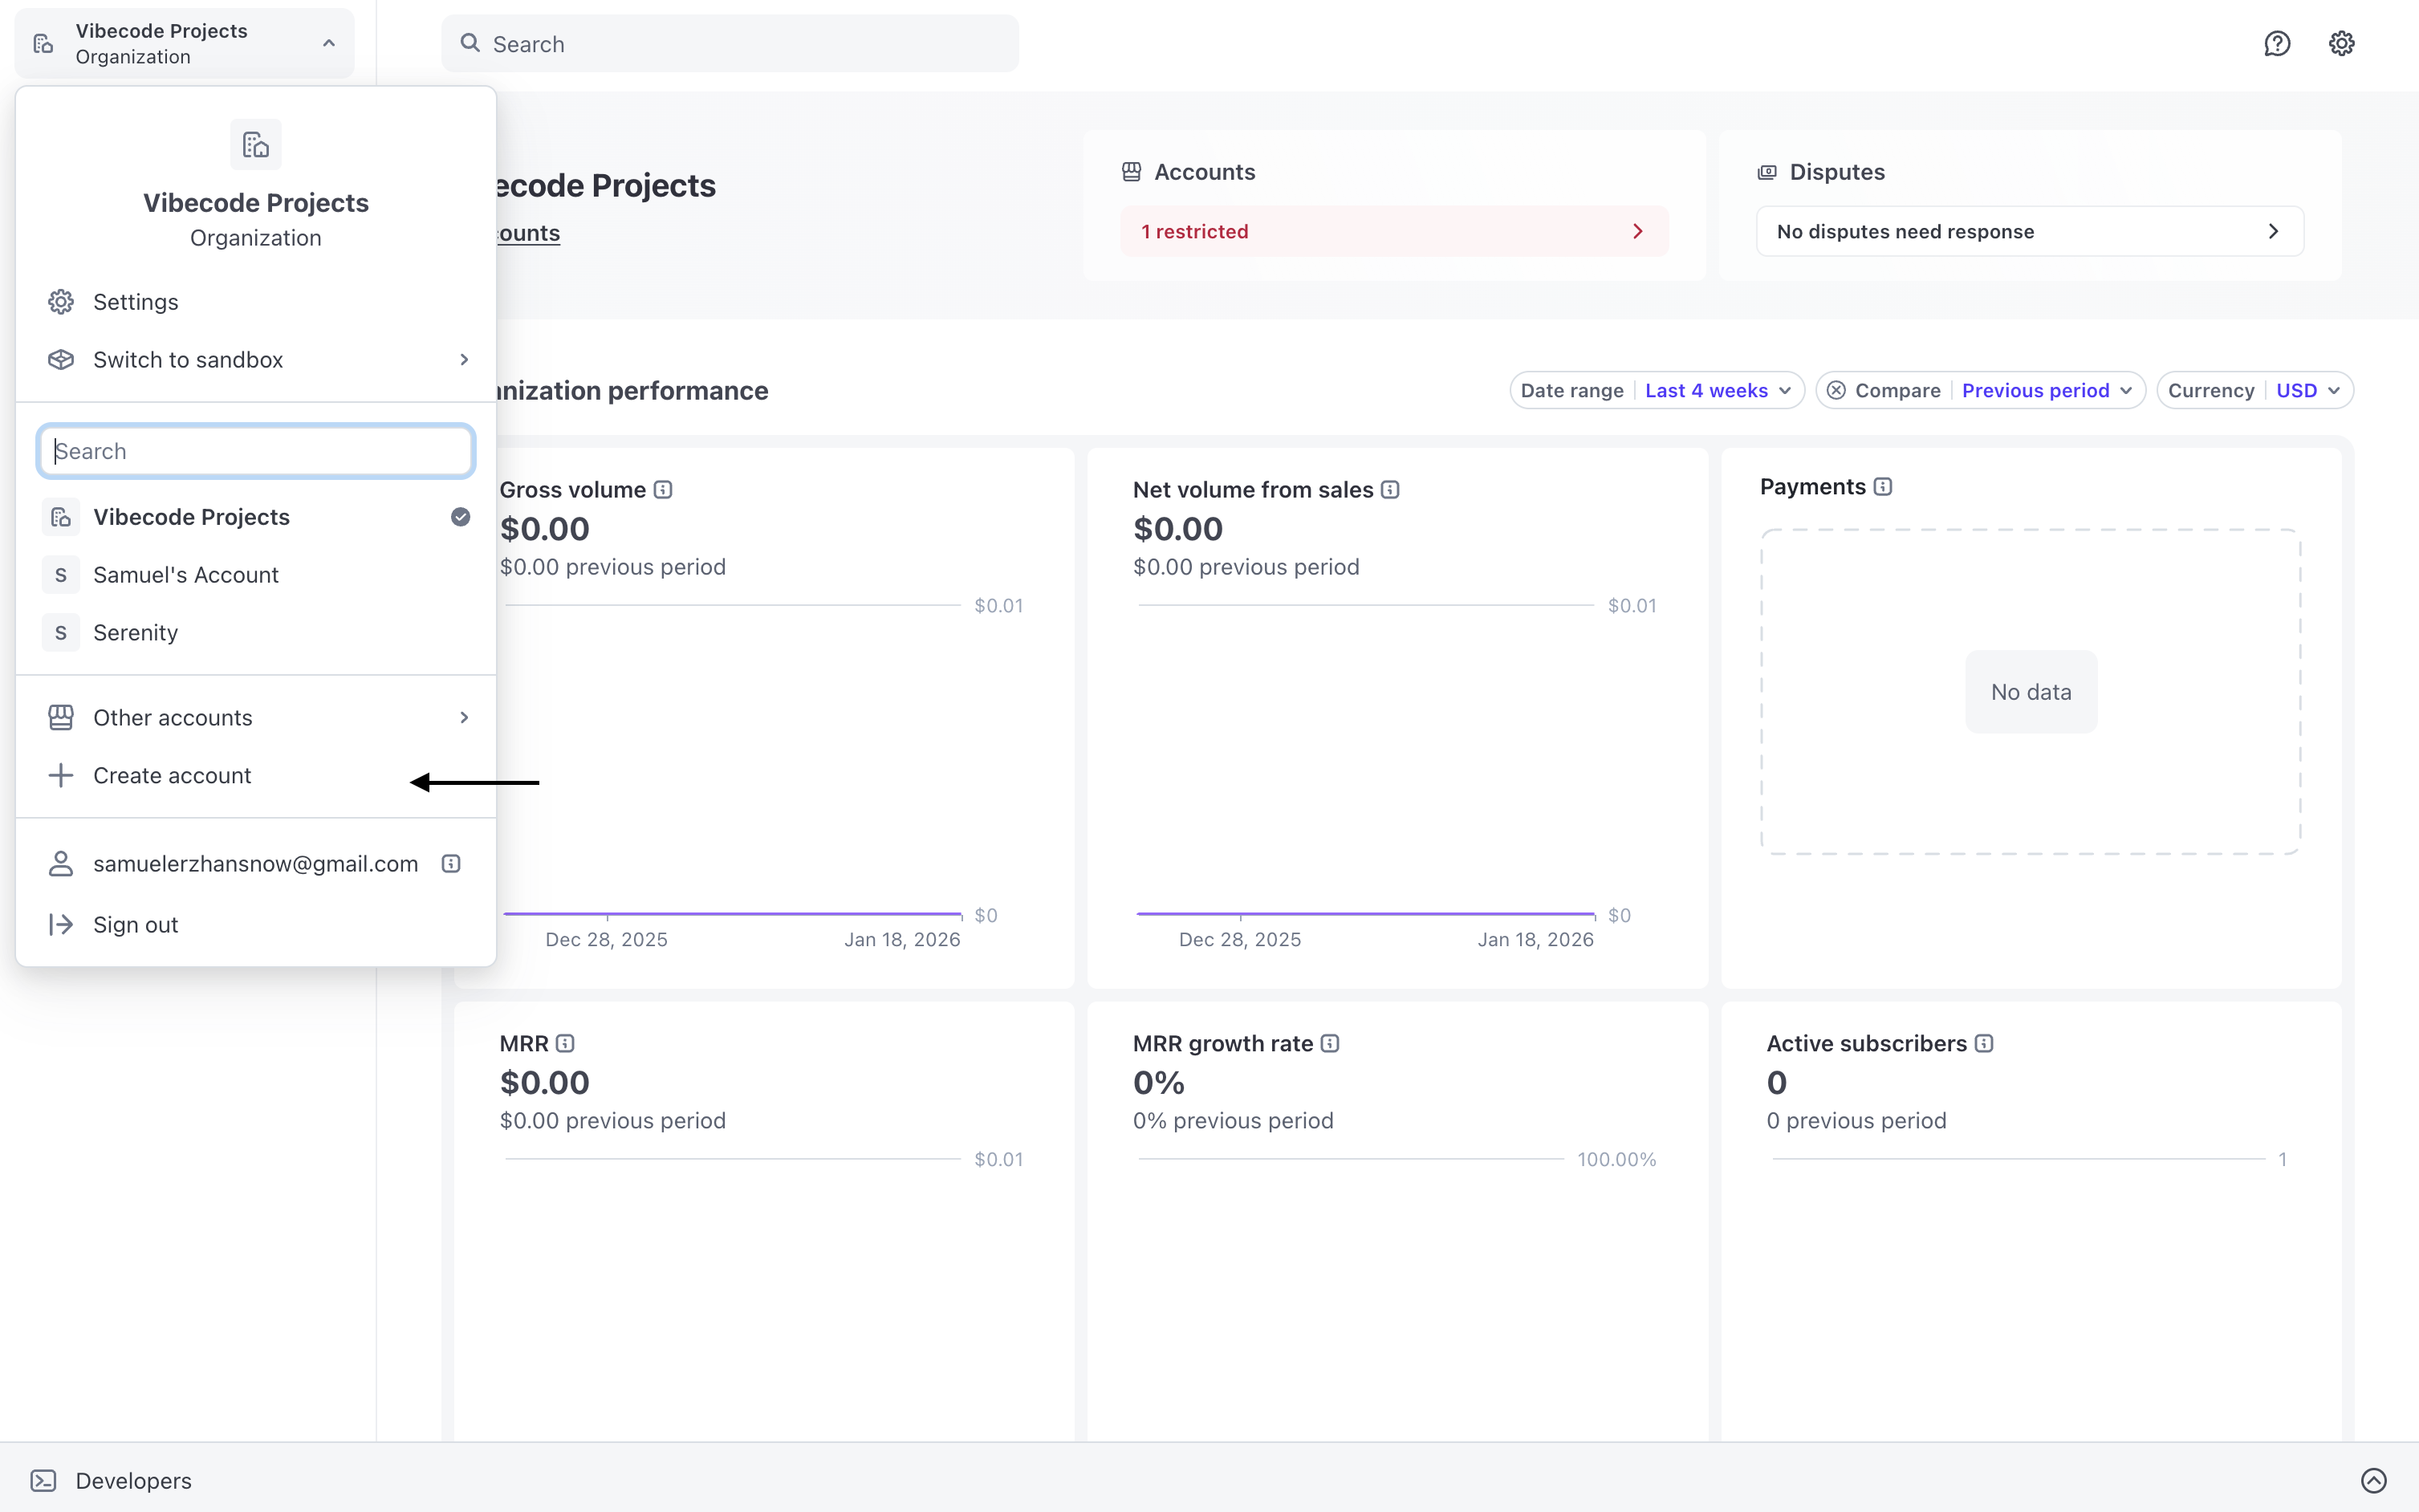
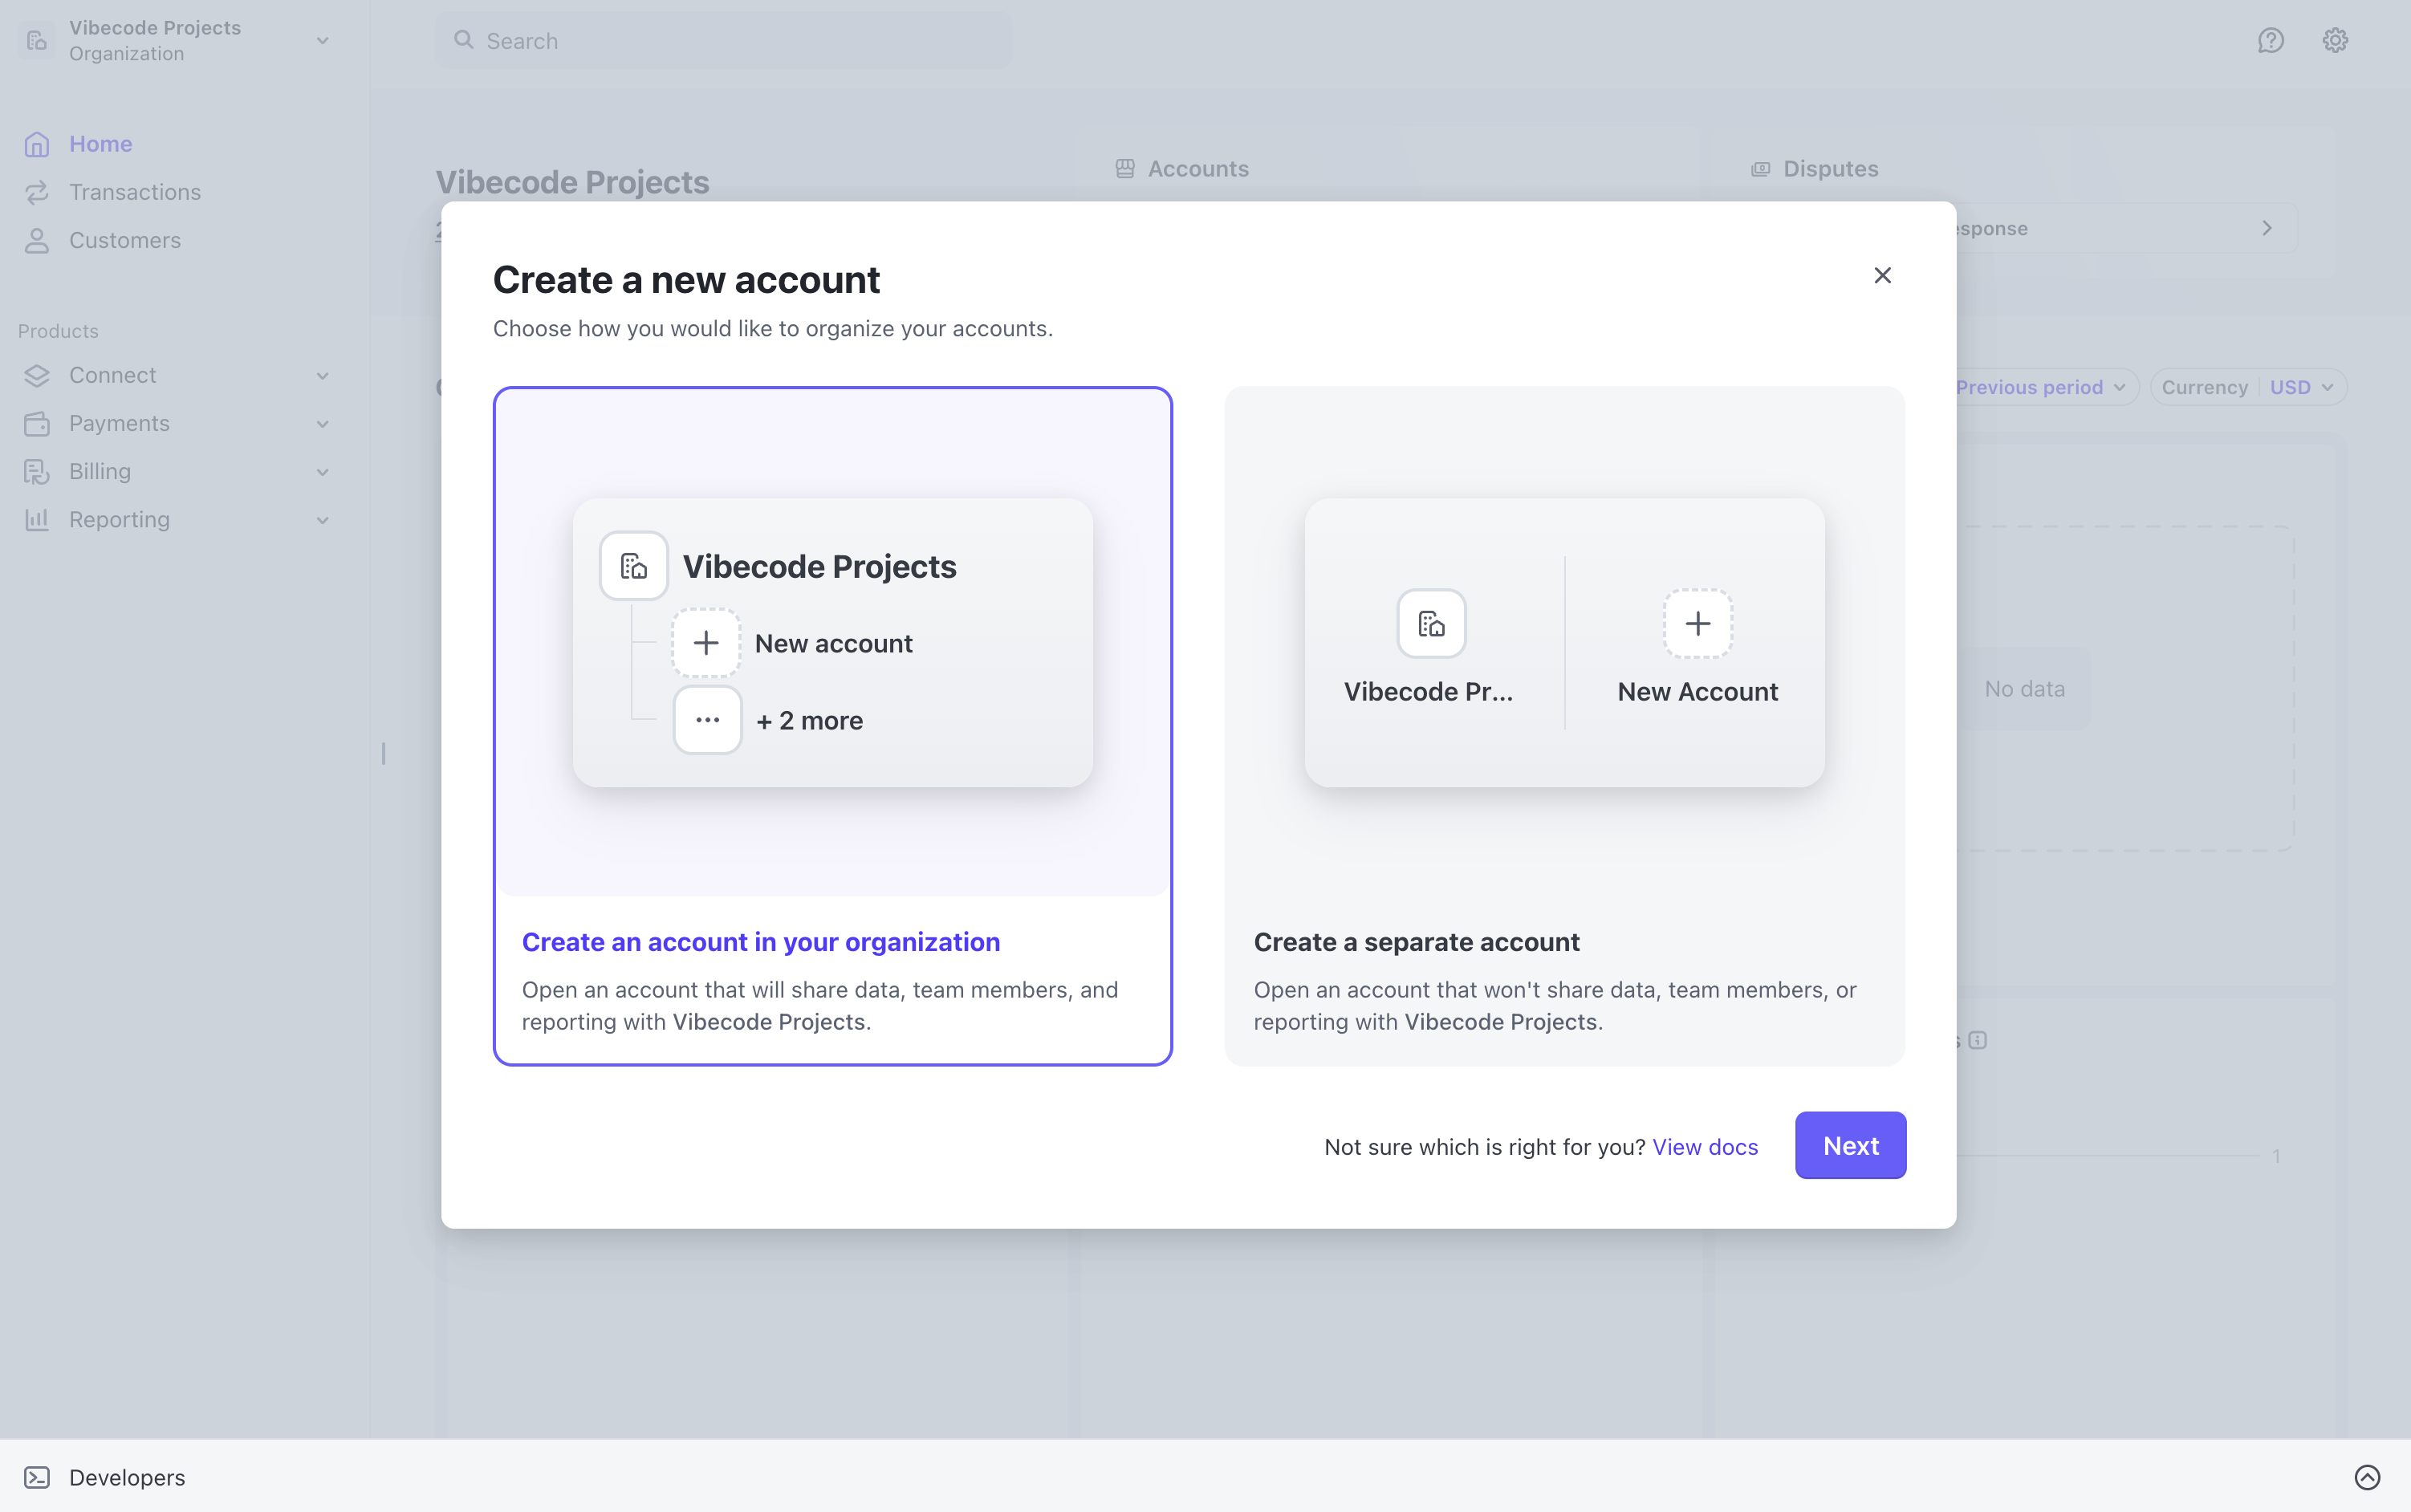
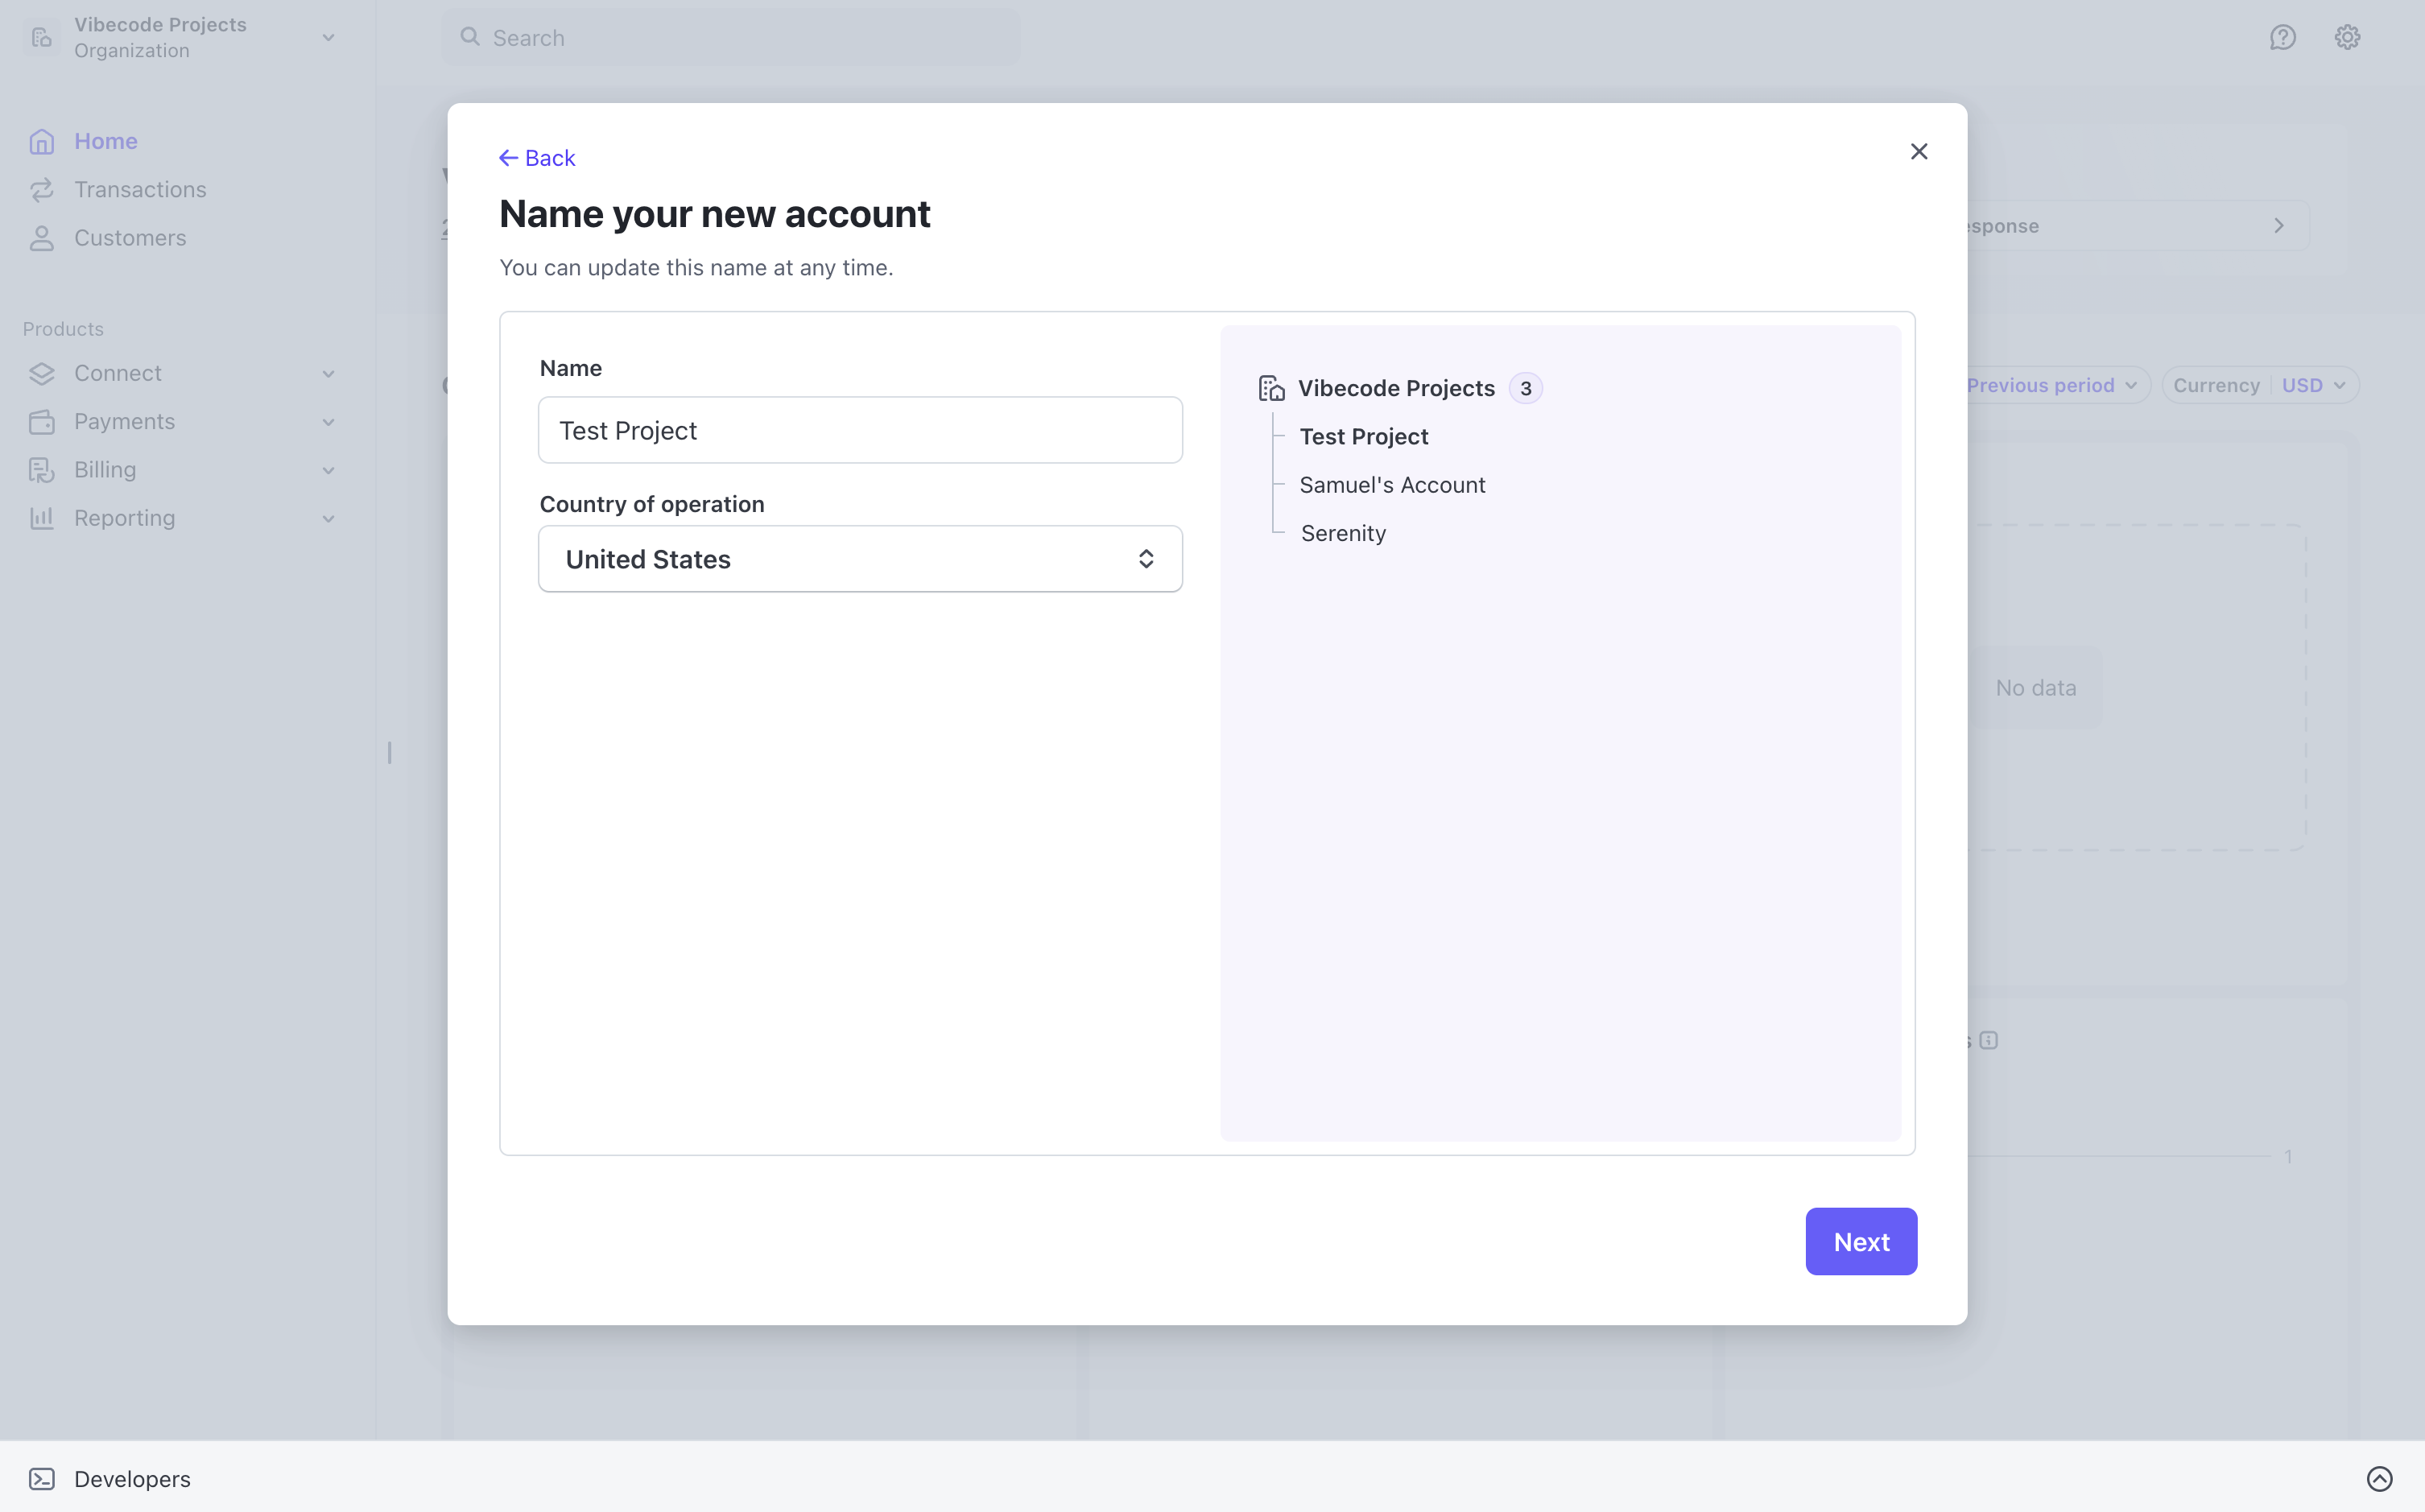
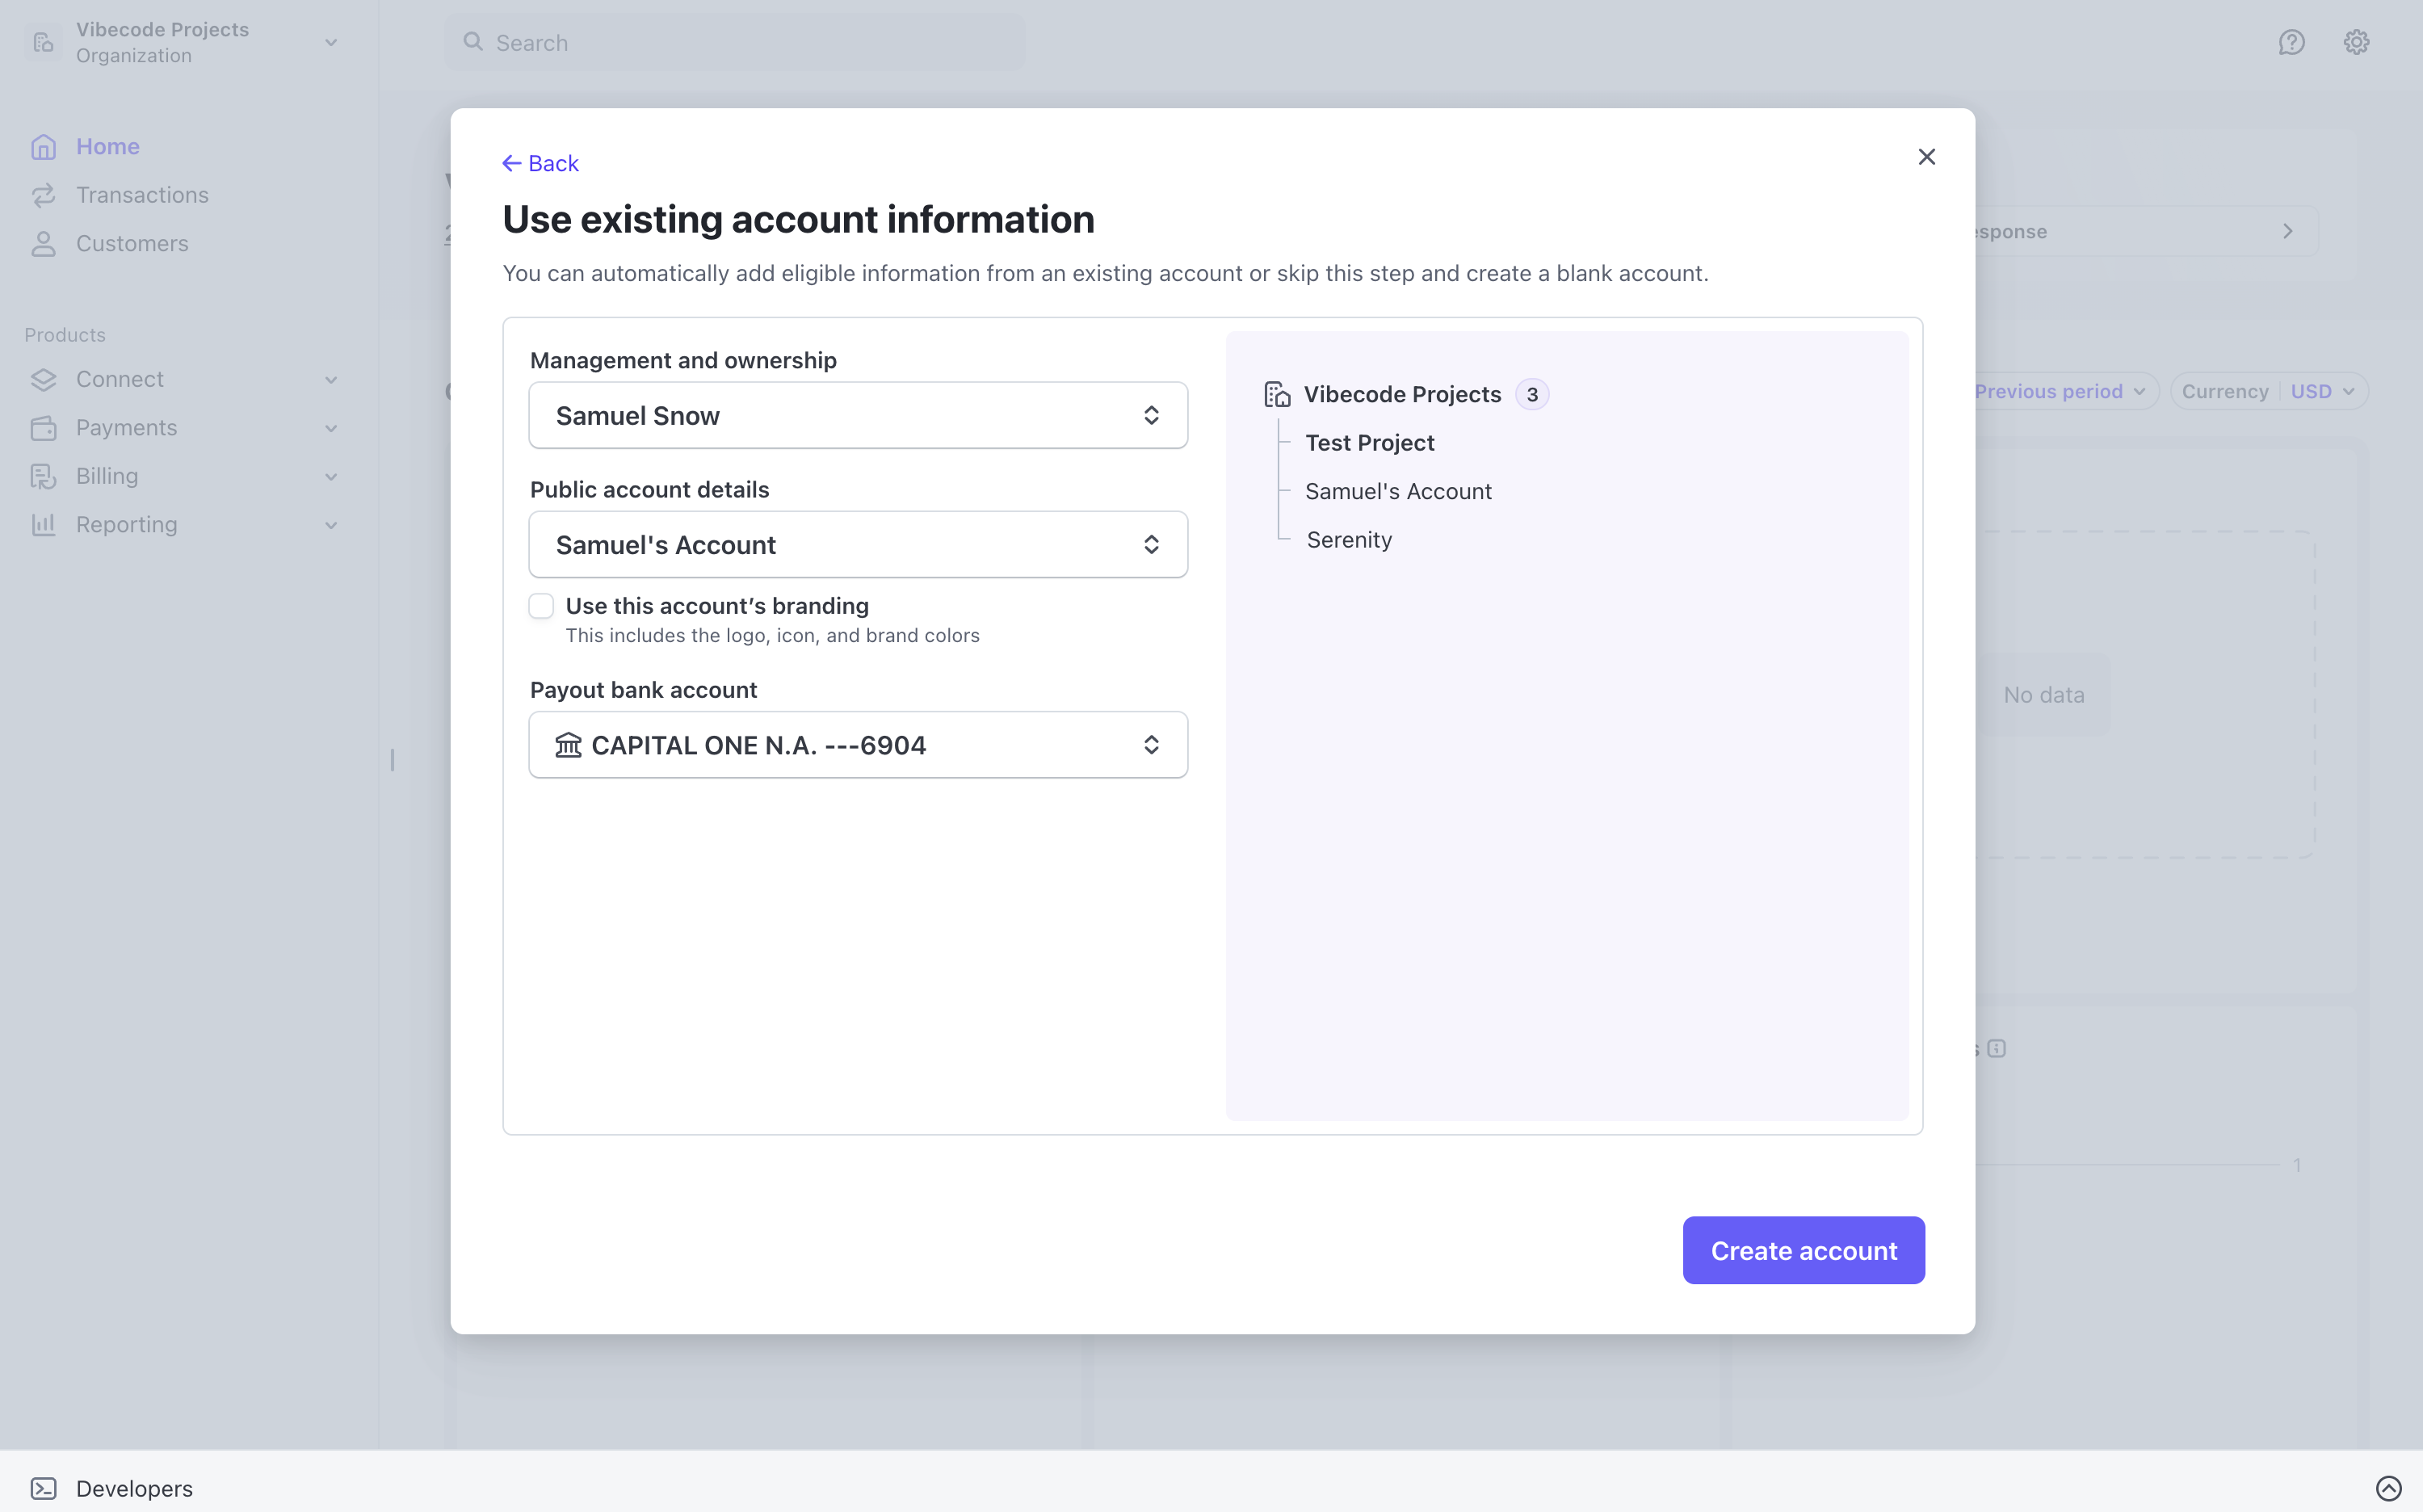
### If you have not created a company in Stripe
If you haven't set up a company inside Stripe yet, you'll need to do this before continuing. If your company is already created, skip to Step 2.
1. In the top right, click **Organizations**
2. Click **Create Account**
3. Choose **Create an account from your organization**
4. Fill out all required information such as your business name, address, and other details
5. Add your billing information
6. Complete the creation process
Once completed, Stripe will guide you through the remaining verification steps.
 ***
## Step 2: Get Your API Keys
Your API keys allow your Vibecode app to authenticate with Stripe.
In the top right of your Stripe Dashboard, switch to **Live Account**. Using test keys in production will prevent real payments from working.
***
## Step 2: Get Your API Keys
Your API keys allow your Vibecode app to authenticate with Stripe.
In the top right of your Stripe Dashboard, switch to **Live Account**. Using test keys in production will prevent real payments from working.
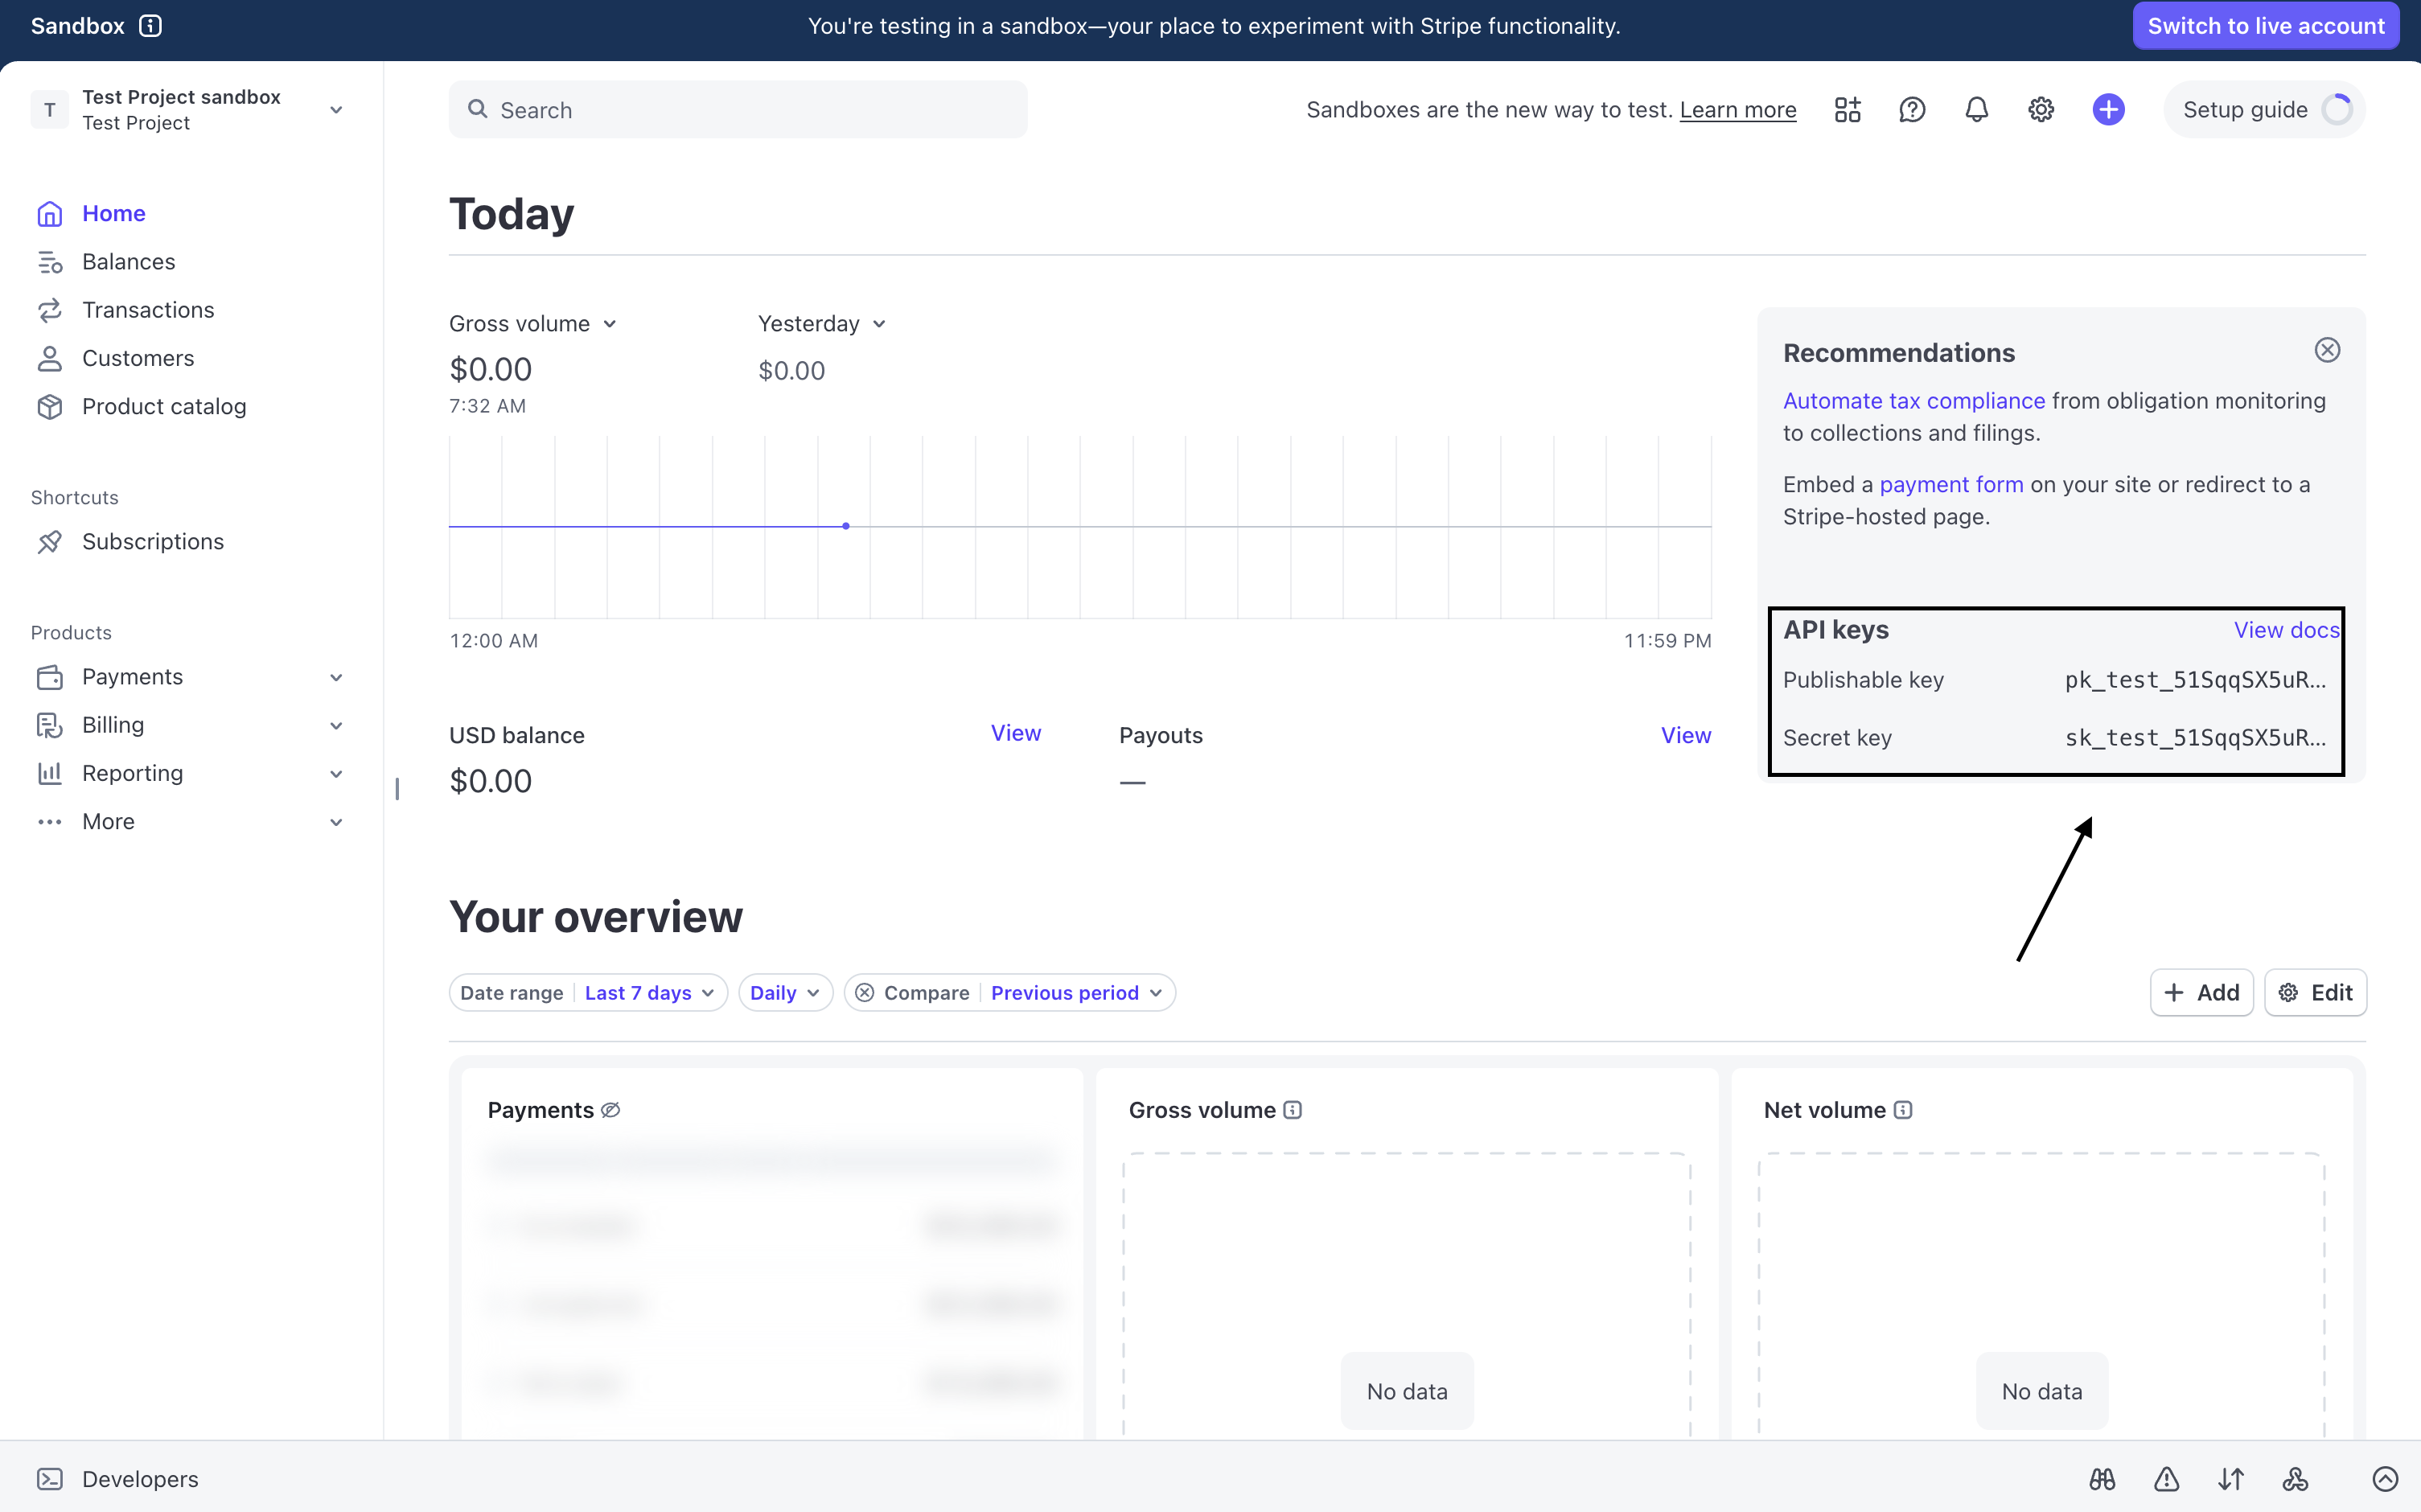 If your keys are not visible:
1. Click **Developers → API keys**
2. You will see two types of keys:
* **Publishable key** (`pk_...`) for frontend use
* **Secret key** (`sk_...`) for backend use only
Copy both keys. You will add them to Vibecode in the next step.
Test keys are different from Live keys. Always use Live keys for production.
***
## Step 3: Add API Keys to Vibecode
Environment variables let you store sensitive data securely.
1. Go to [vibecodeapp.com](https://vibecodeapp.com) and open your project
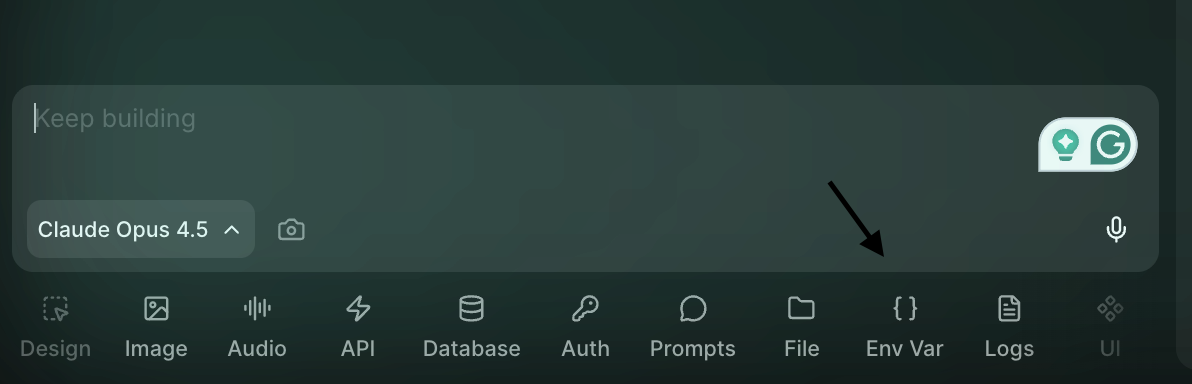
2. Select **Env Var** at the bottom
If your keys are not visible:
1. Click **Developers → API keys**
2. You will see two types of keys:
* **Publishable key** (`pk_...`) for frontend use
* **Secret key** (`sk_...`) for backend use only
Copy both keys. You will add them to Vibecode in the next step.
Test keys are different from Live keys. Always use Live keys for production.
***
## Step 3: Add API Keys to Vibecode
Environment variables let you store sensitive data securely.
1. Go to [vibecodeapp.com](https://vibecodeapp.com) and open your project
2. Select **Env Var** at the bottom
 ### Frontend
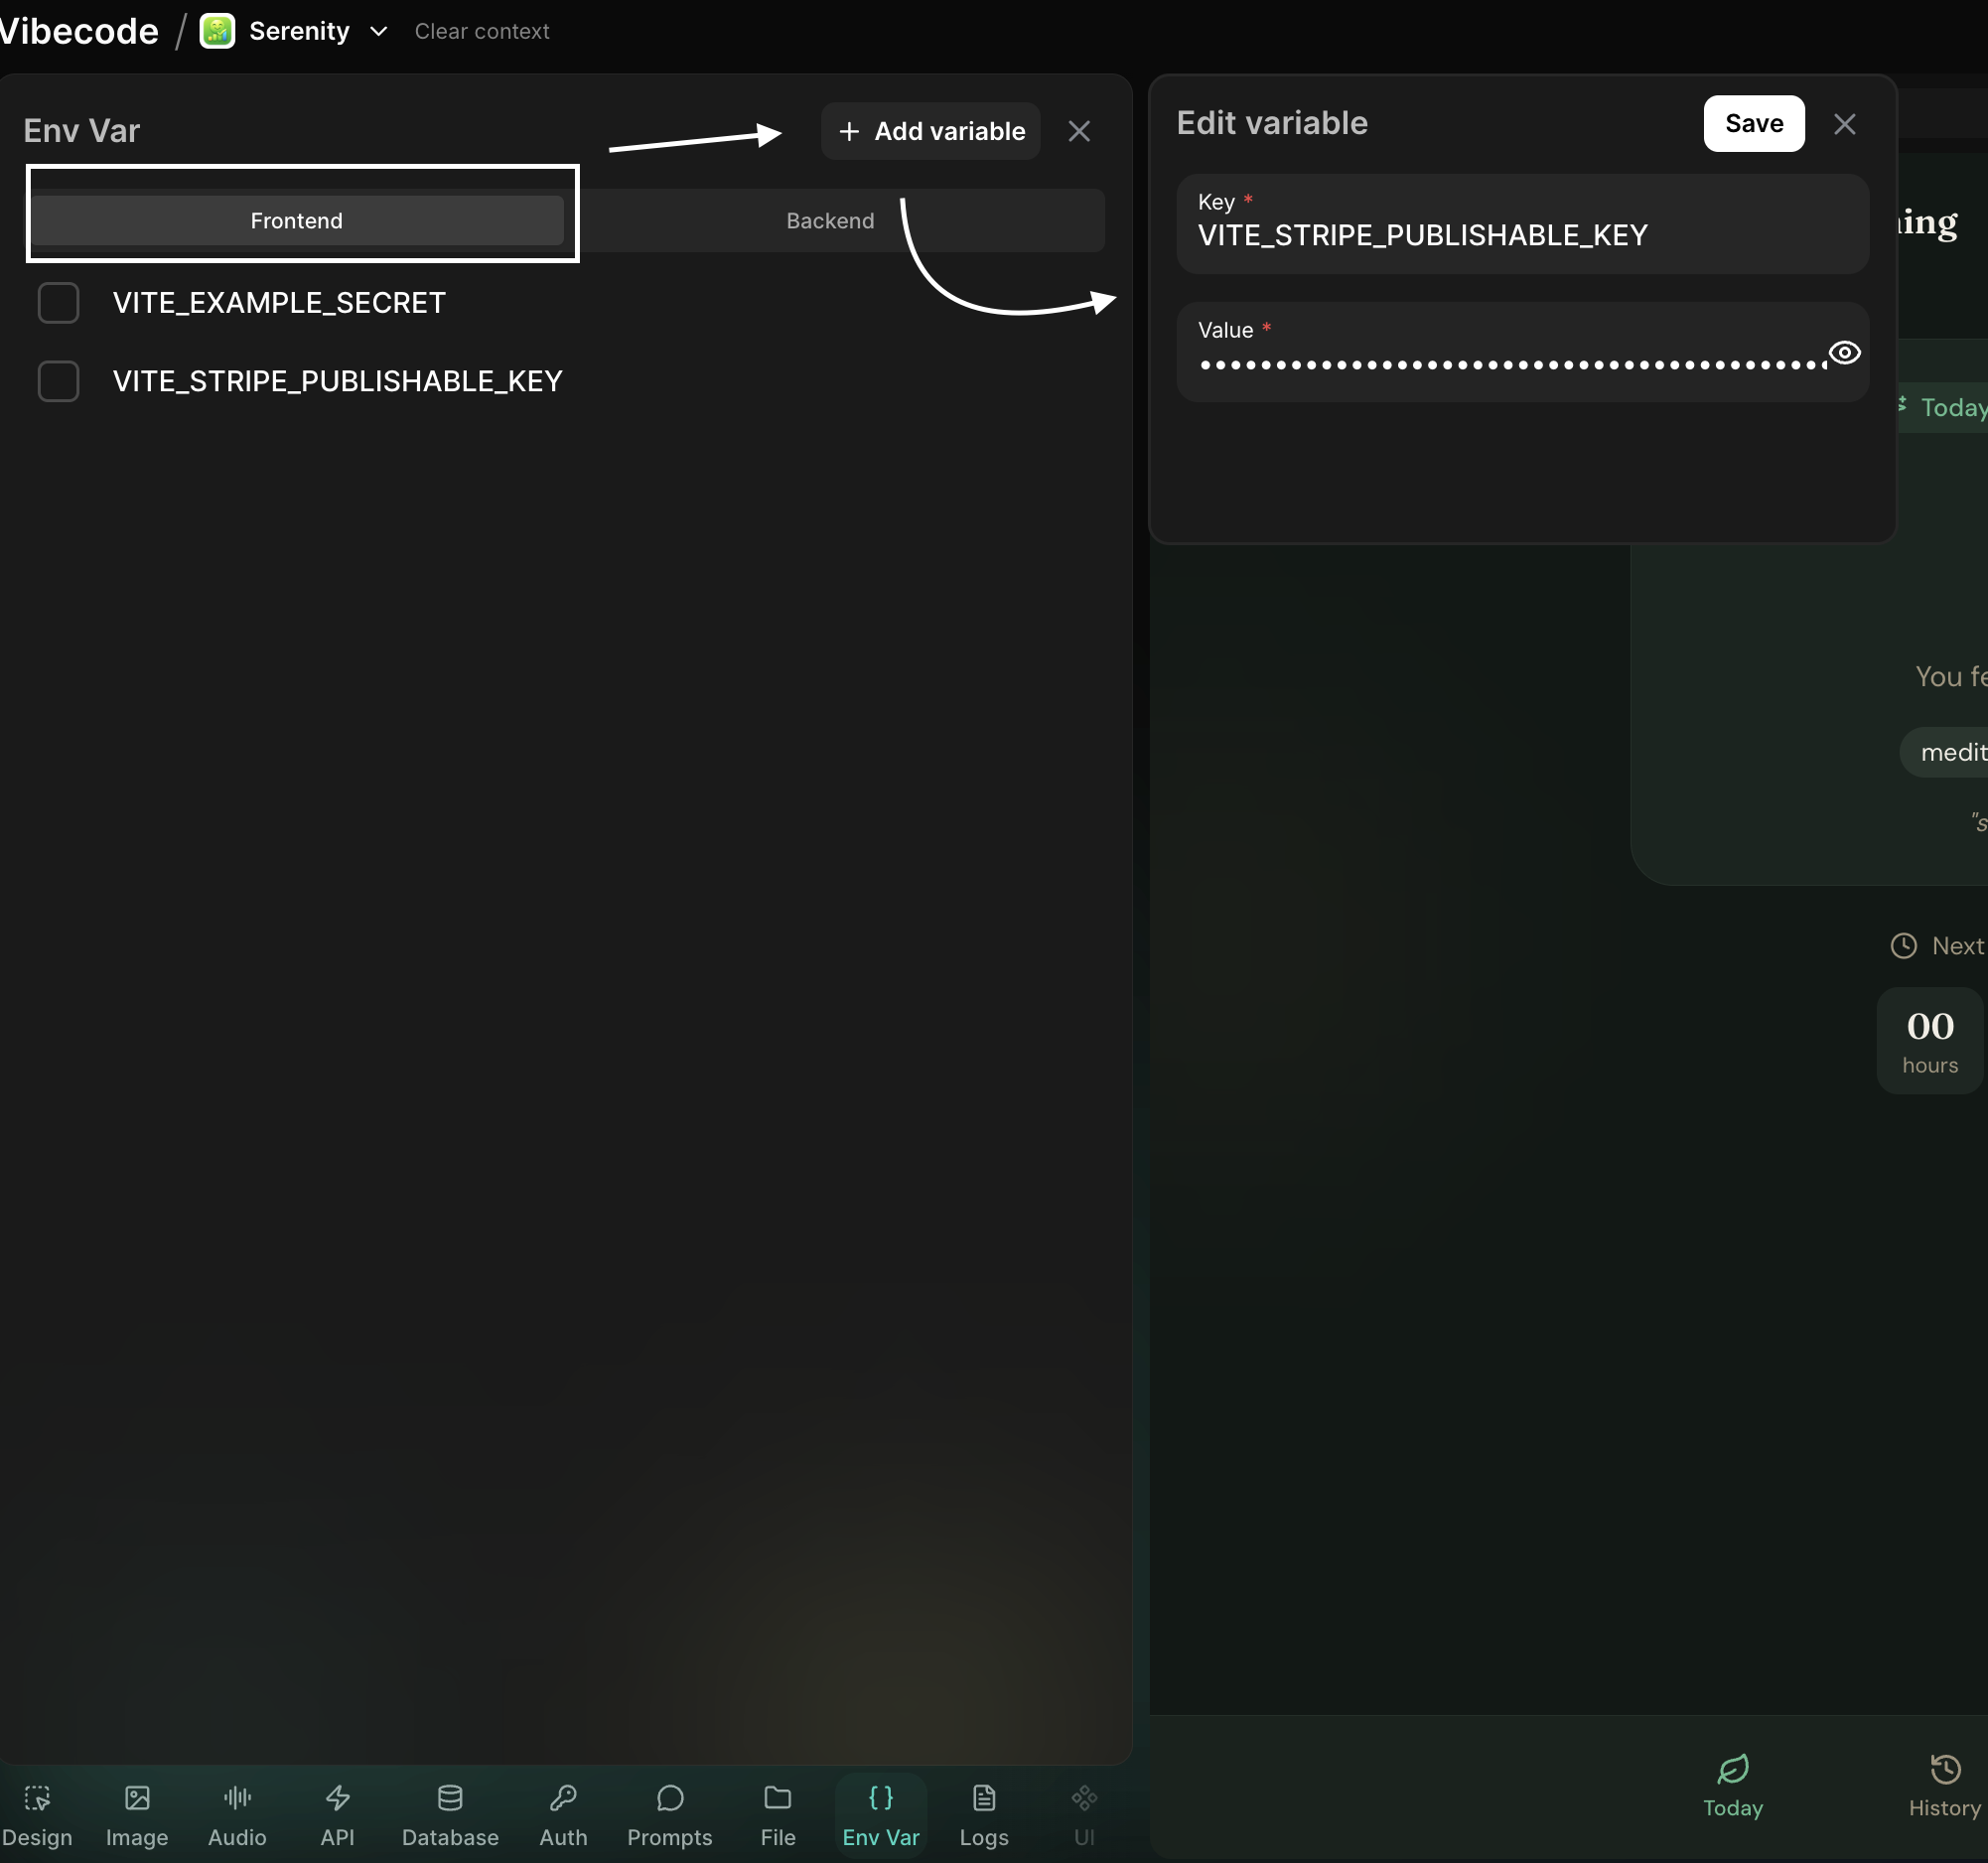
1. Go to **Frontend**
2. Click **add variable**
3. Key: `VITE_STRIPE_PUBLISHABLE_KEY`
4. Value: your Publishable key (`pk_...`)
### Frontend
1. Go to **Frontend**
2. Click **add variable**
3. Key: `VITE_STRIPE_PUBLISHABLE_KEY`
4. Value: your Publishable key (`pk_...`)
 ### Backend
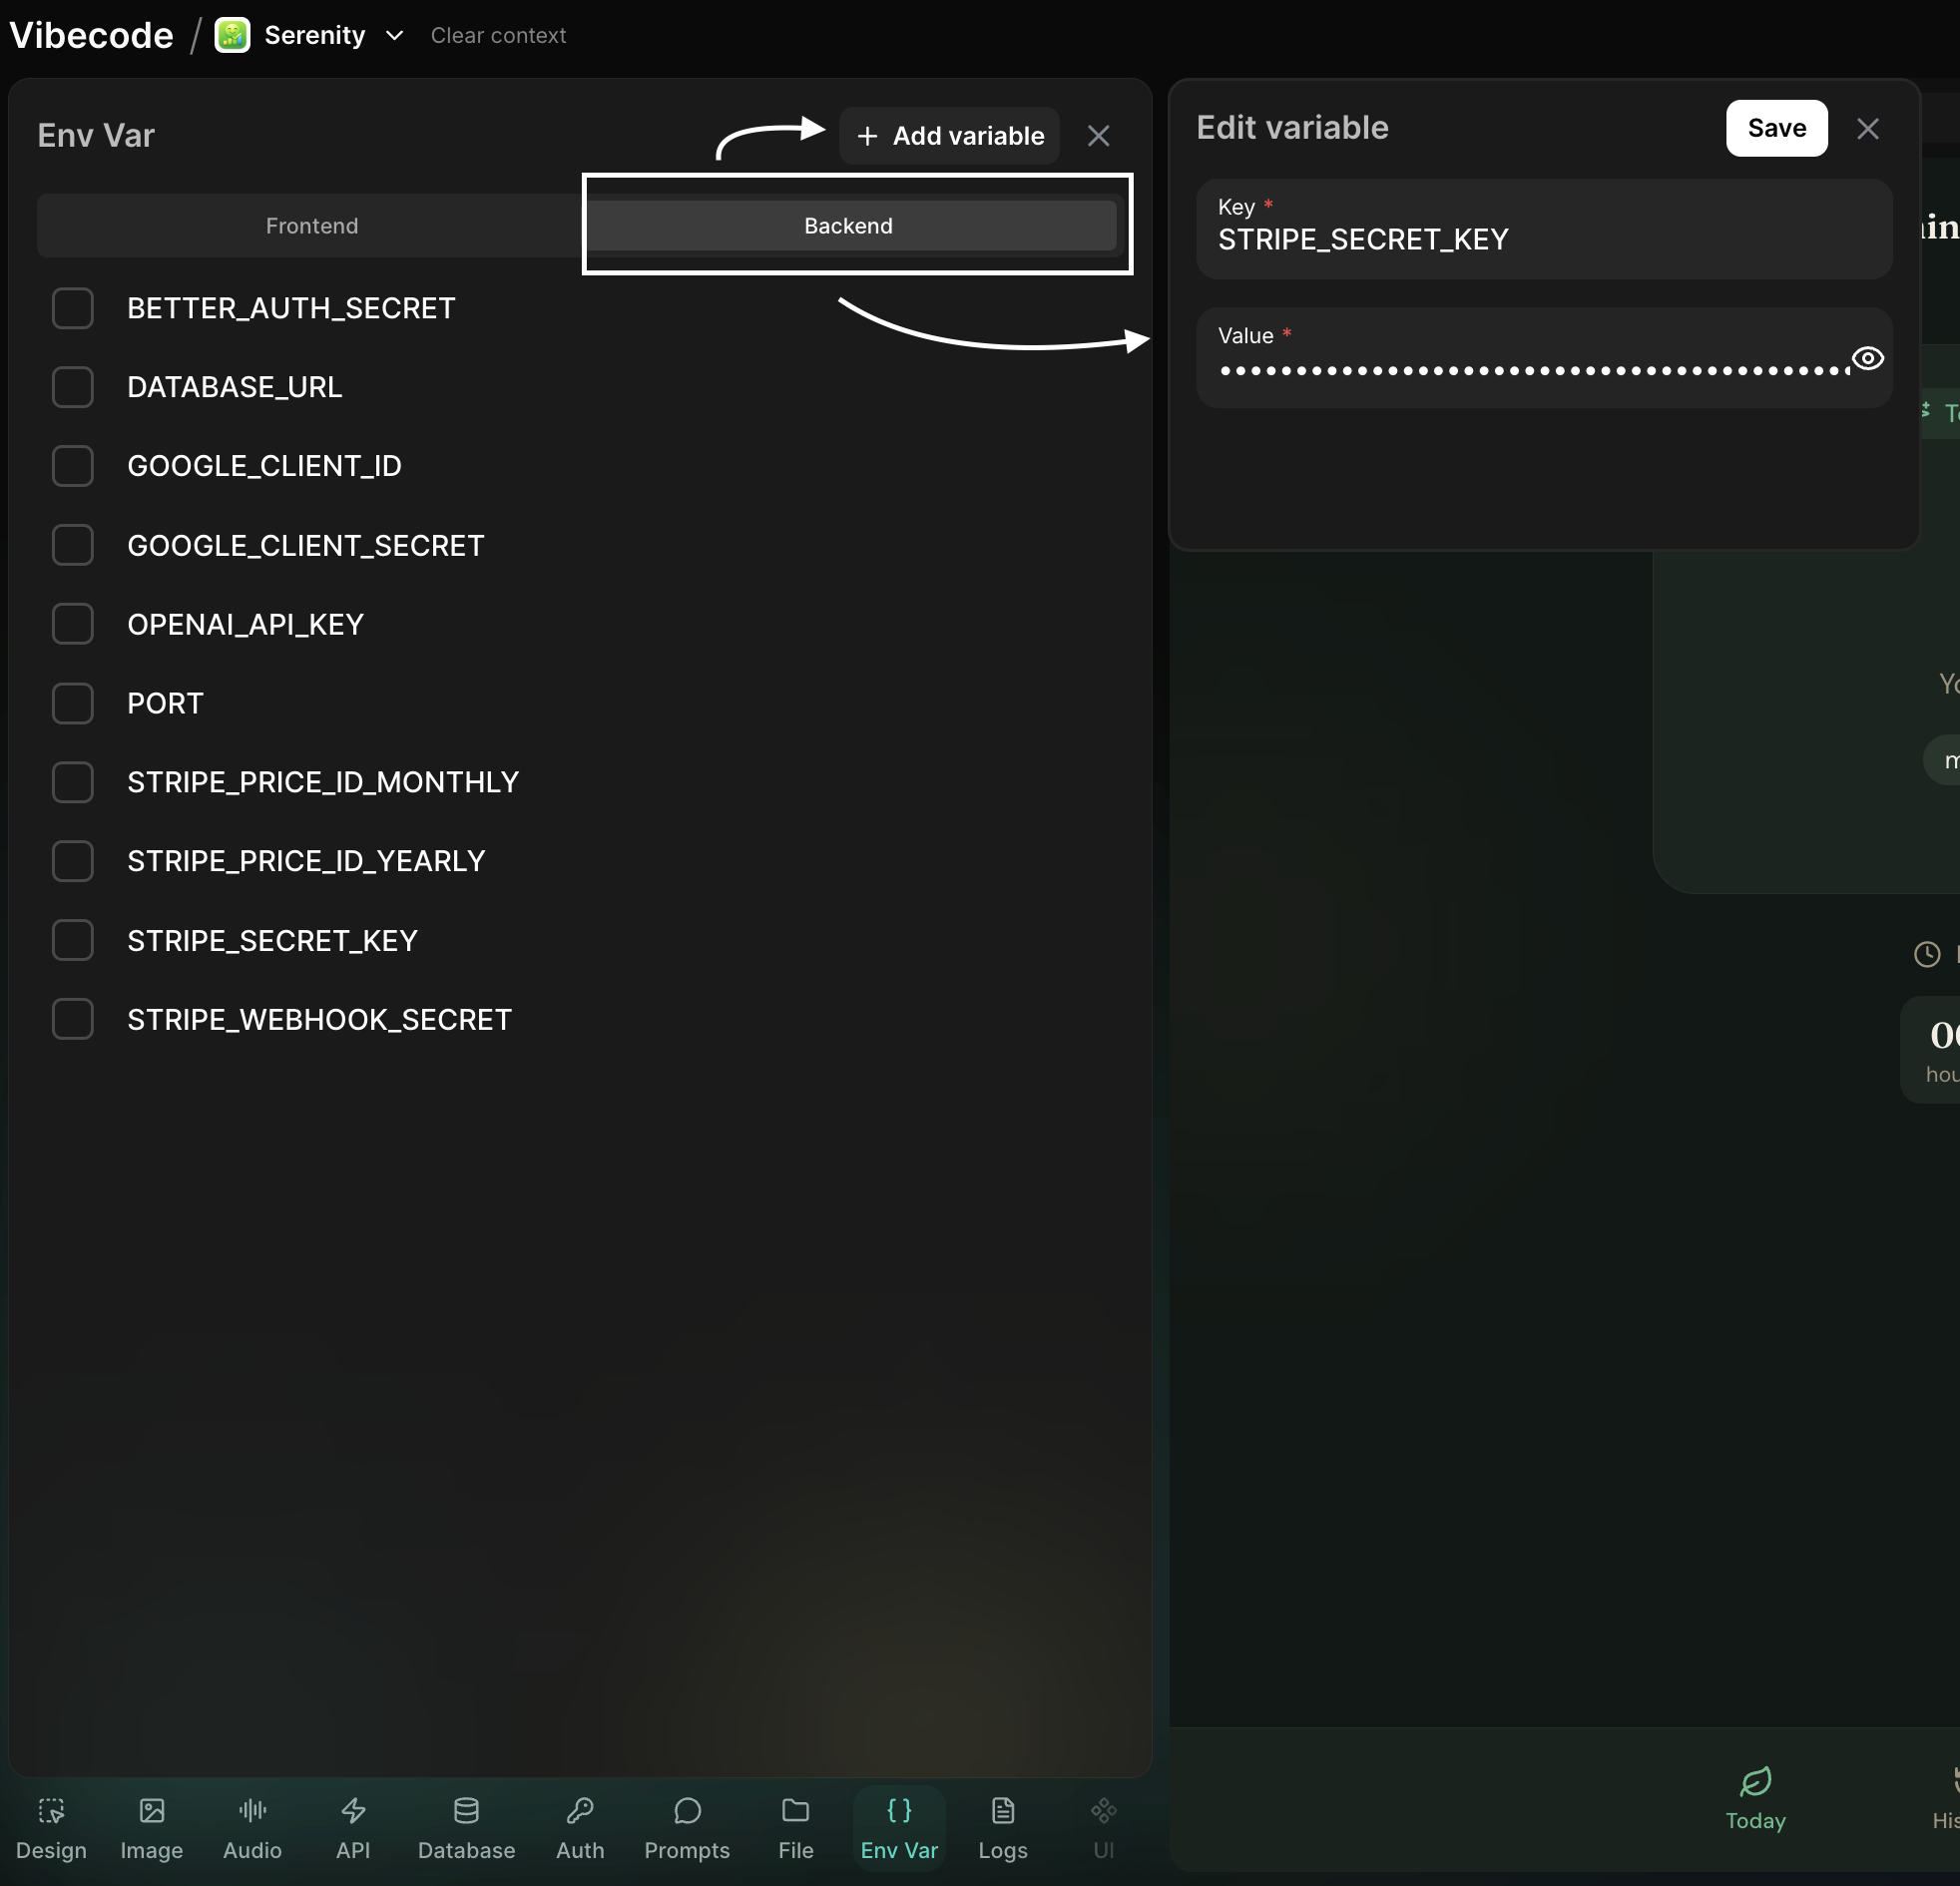
1. Go to **Backend**
2. Click **add variable**
3. Key: `STRIPE_SECRET_KEY`
4. Value: your Secret key (`sk_...`)
### Backend
1. Go to **Backend**
2. Click **add variable**
3. Key: `STRIPE_SECRET_KEY`
4. Value: your Secret key (`sk_...`)
 Never expose your Secret key. Only use it in backend code.
***
## Step 4: Create Your Product
Before customers can purchase anything, you must create at least one product in Stripe.
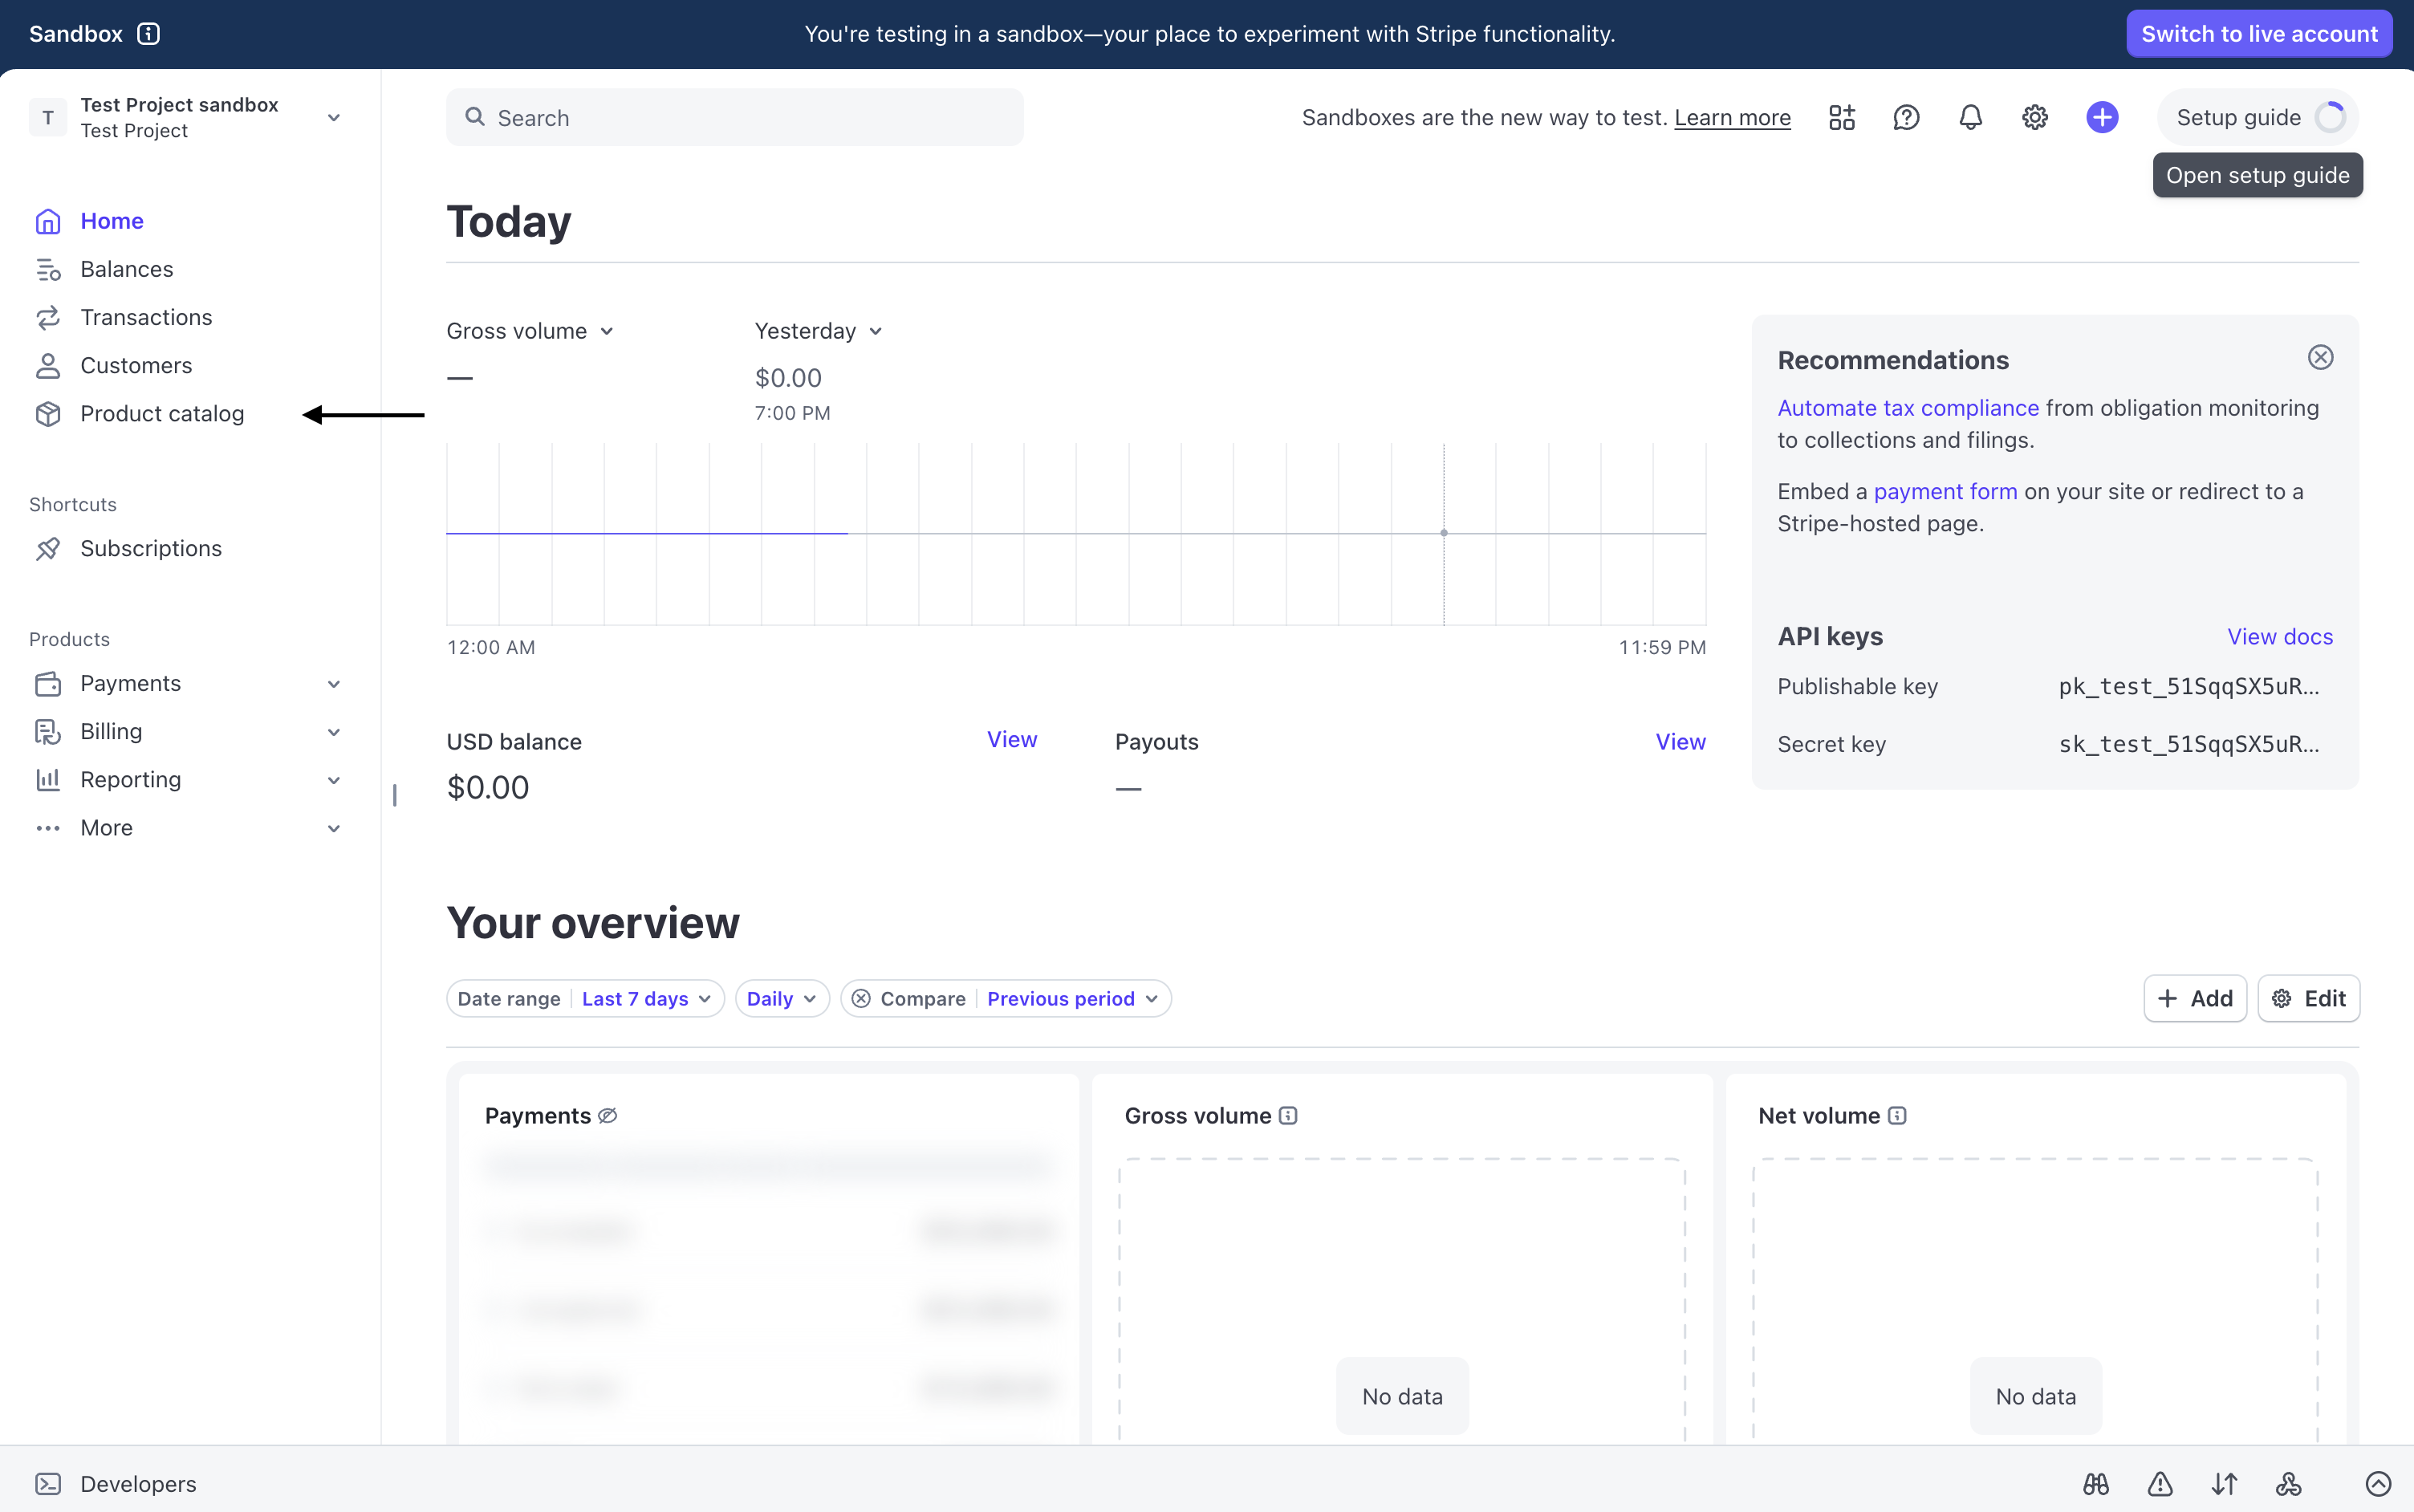
1. Go to **Product Catalog**
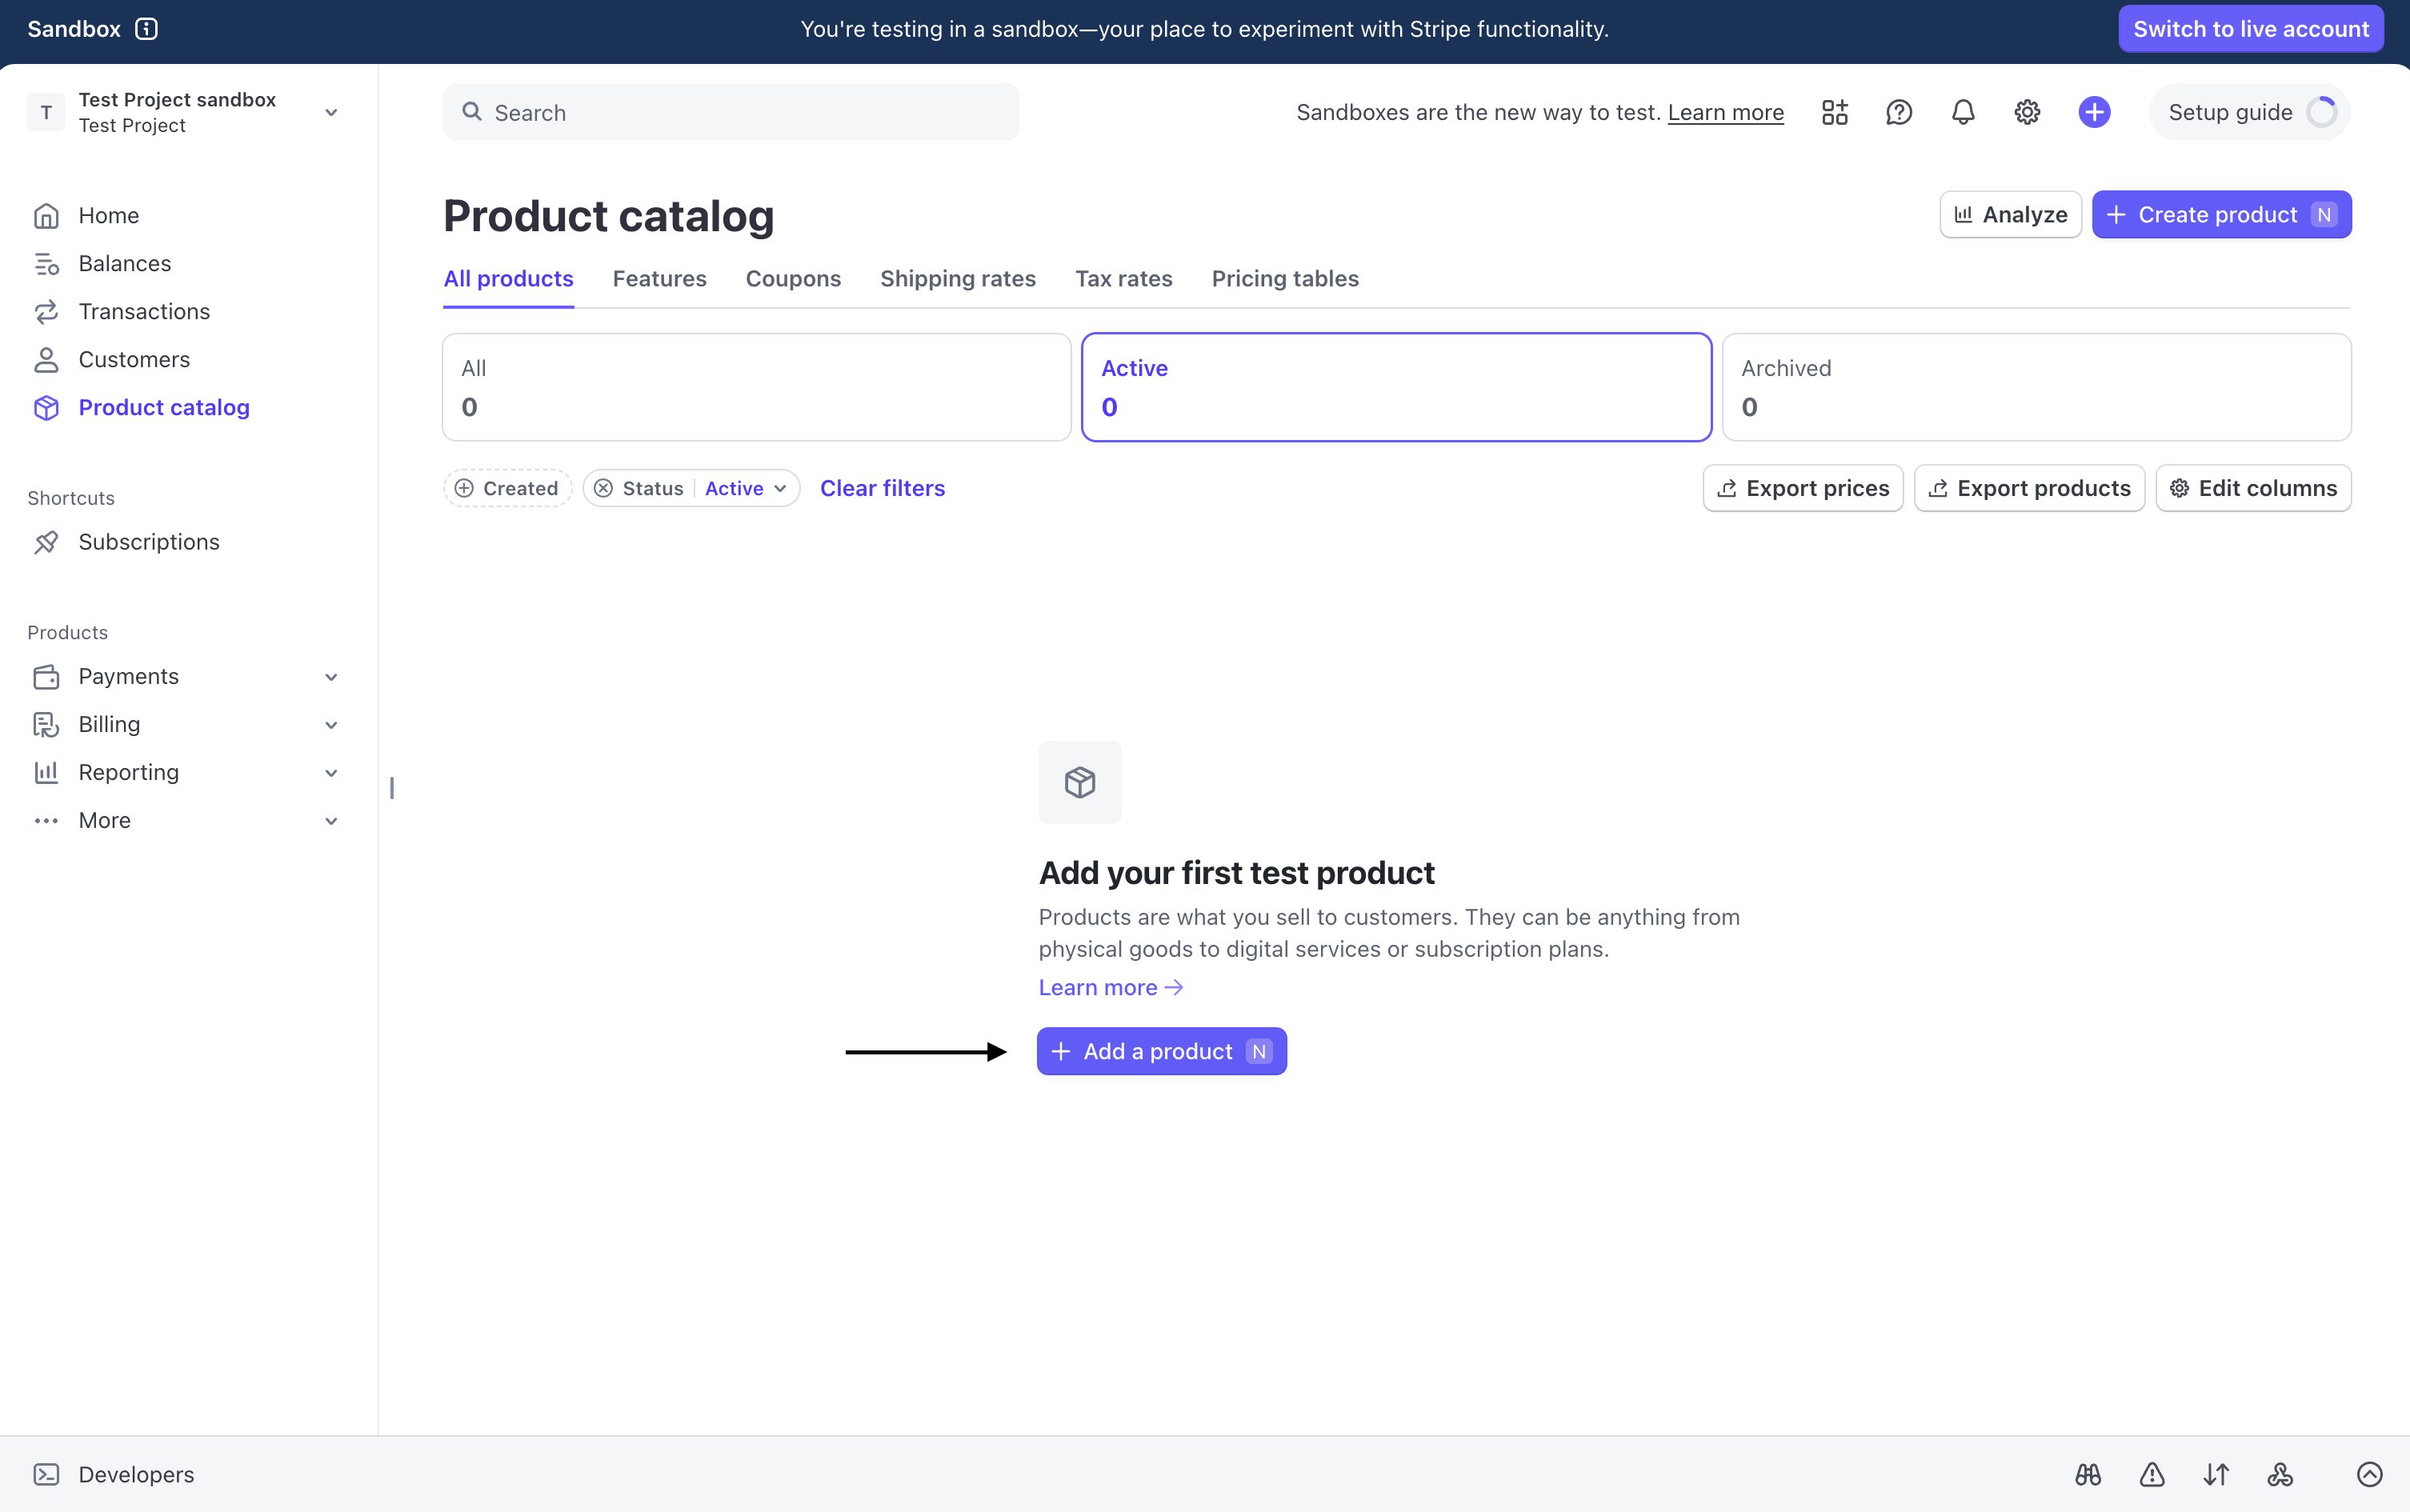
2. Click **Add a product**
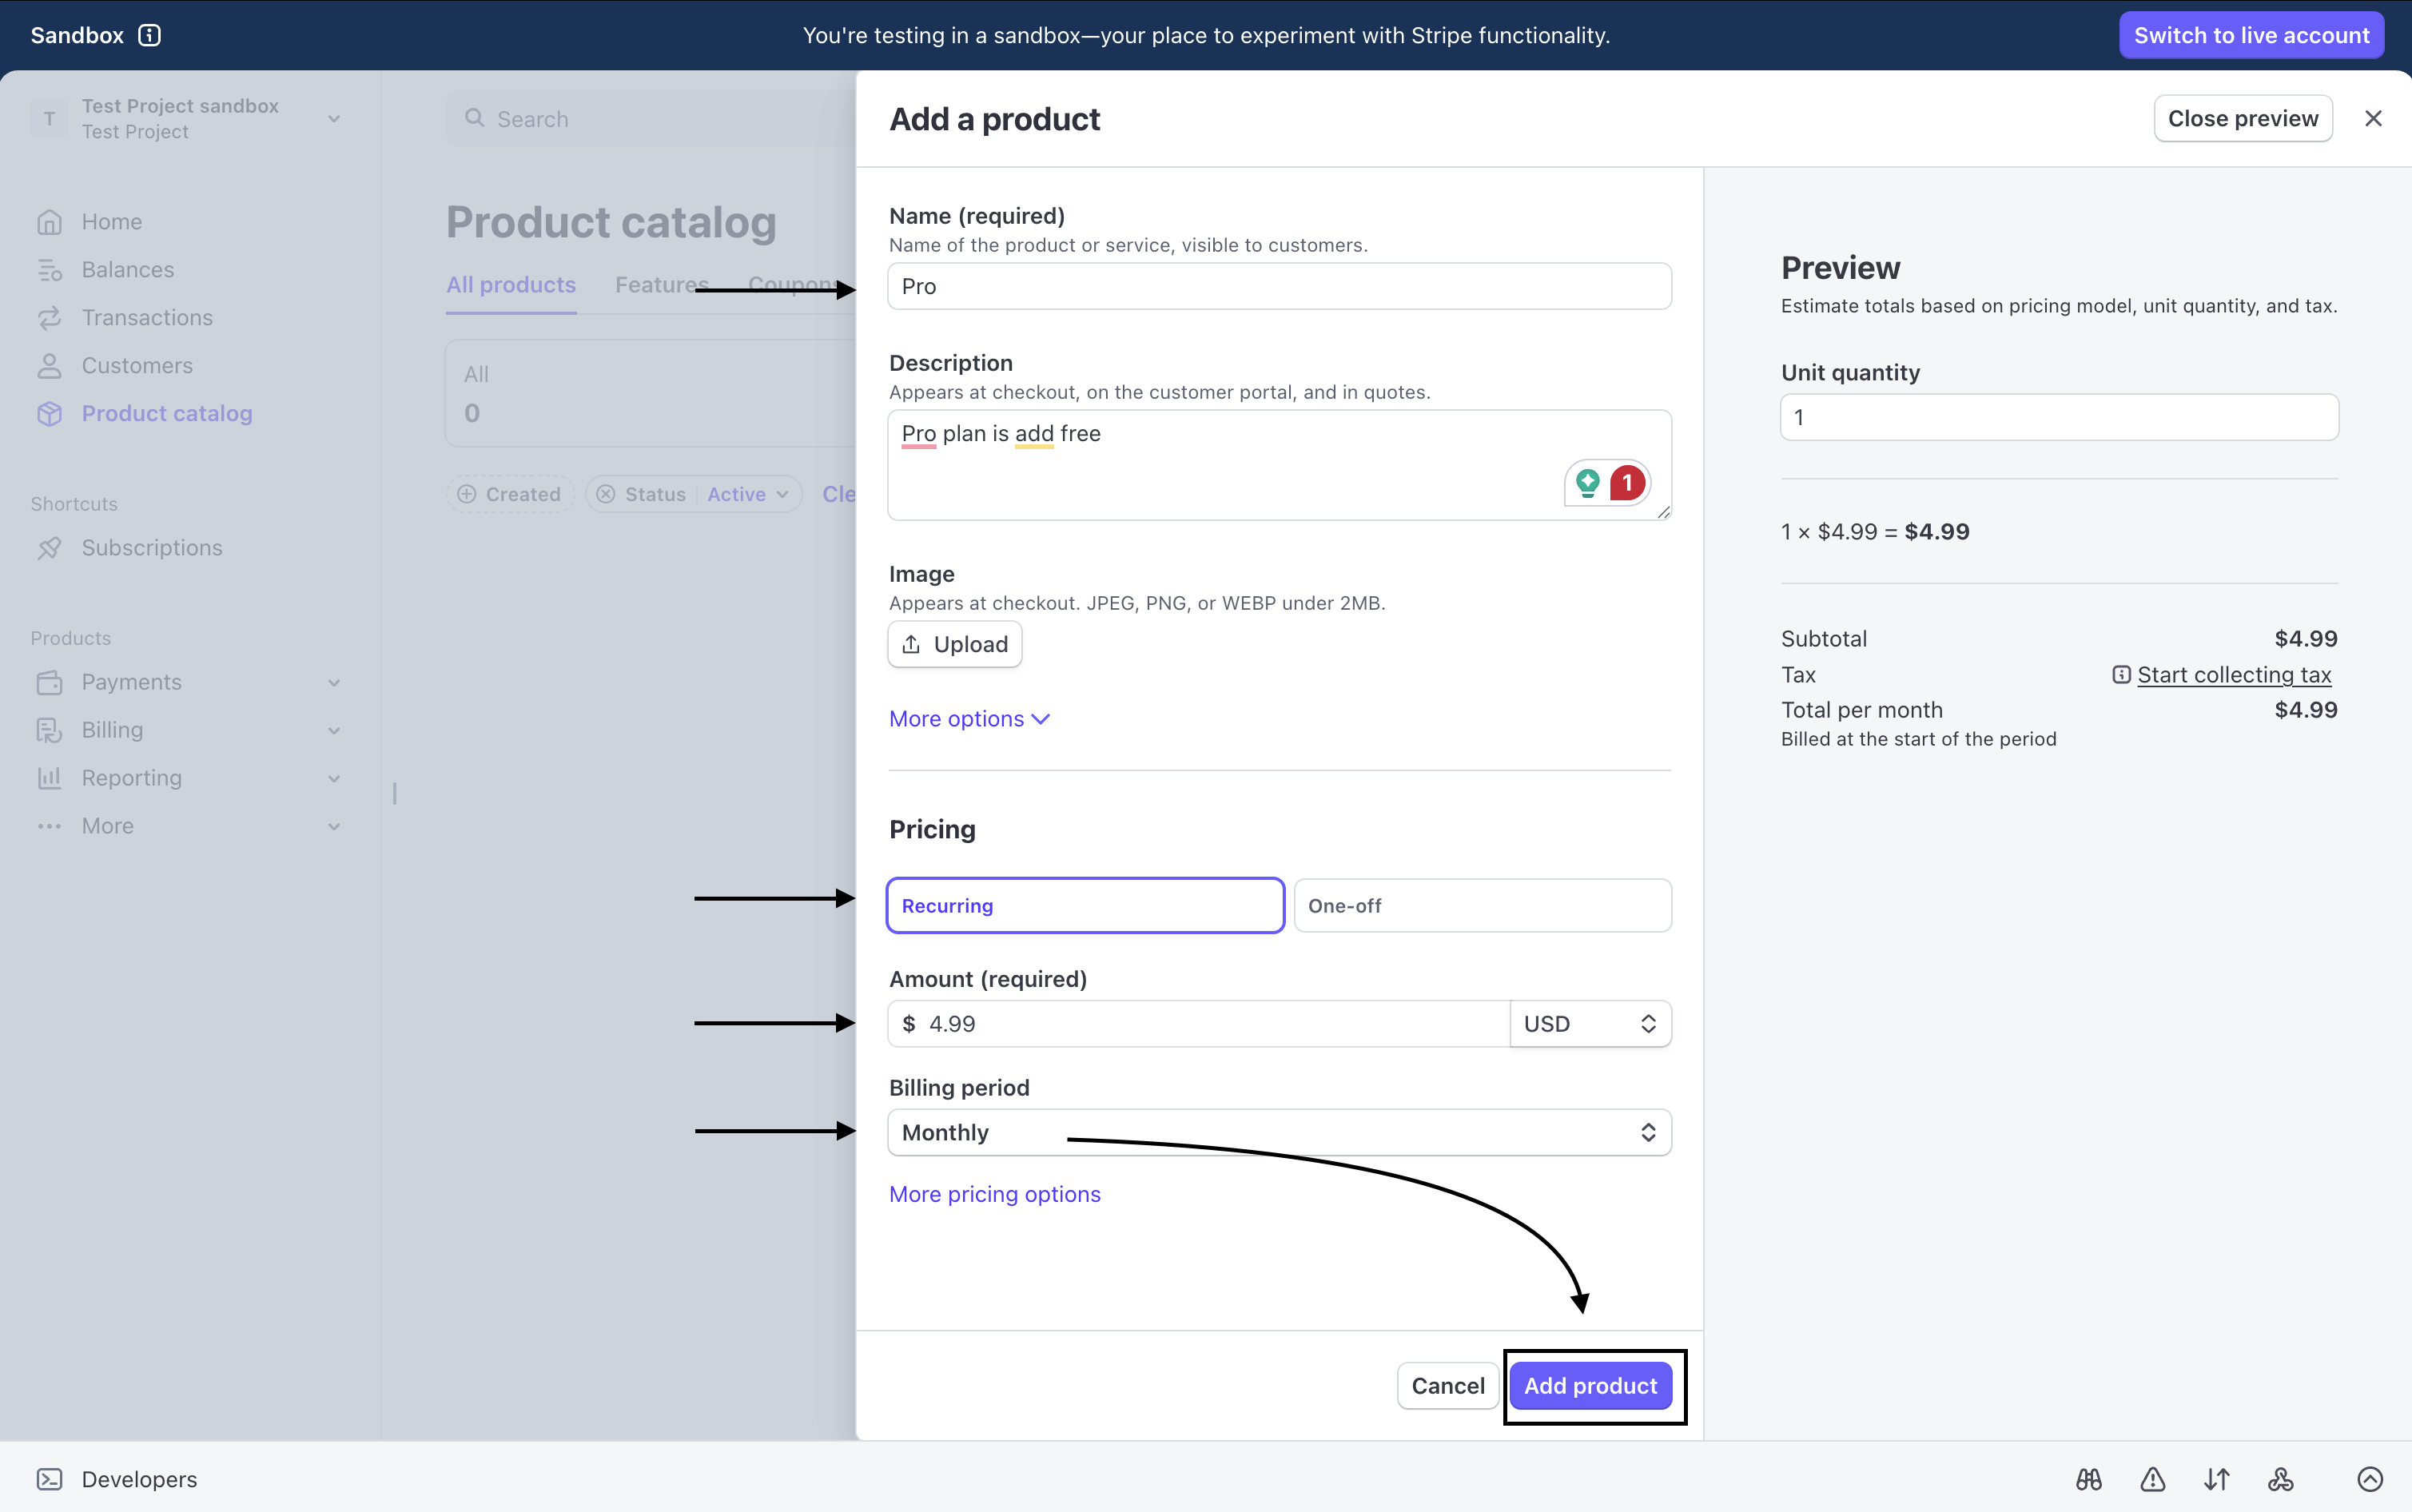
3. Enter a product name such as Pro Plan
4. Add a description
5. Choose **Recurring**
6. Set your price such as 4.99
7. Choose billing period such as Monthly
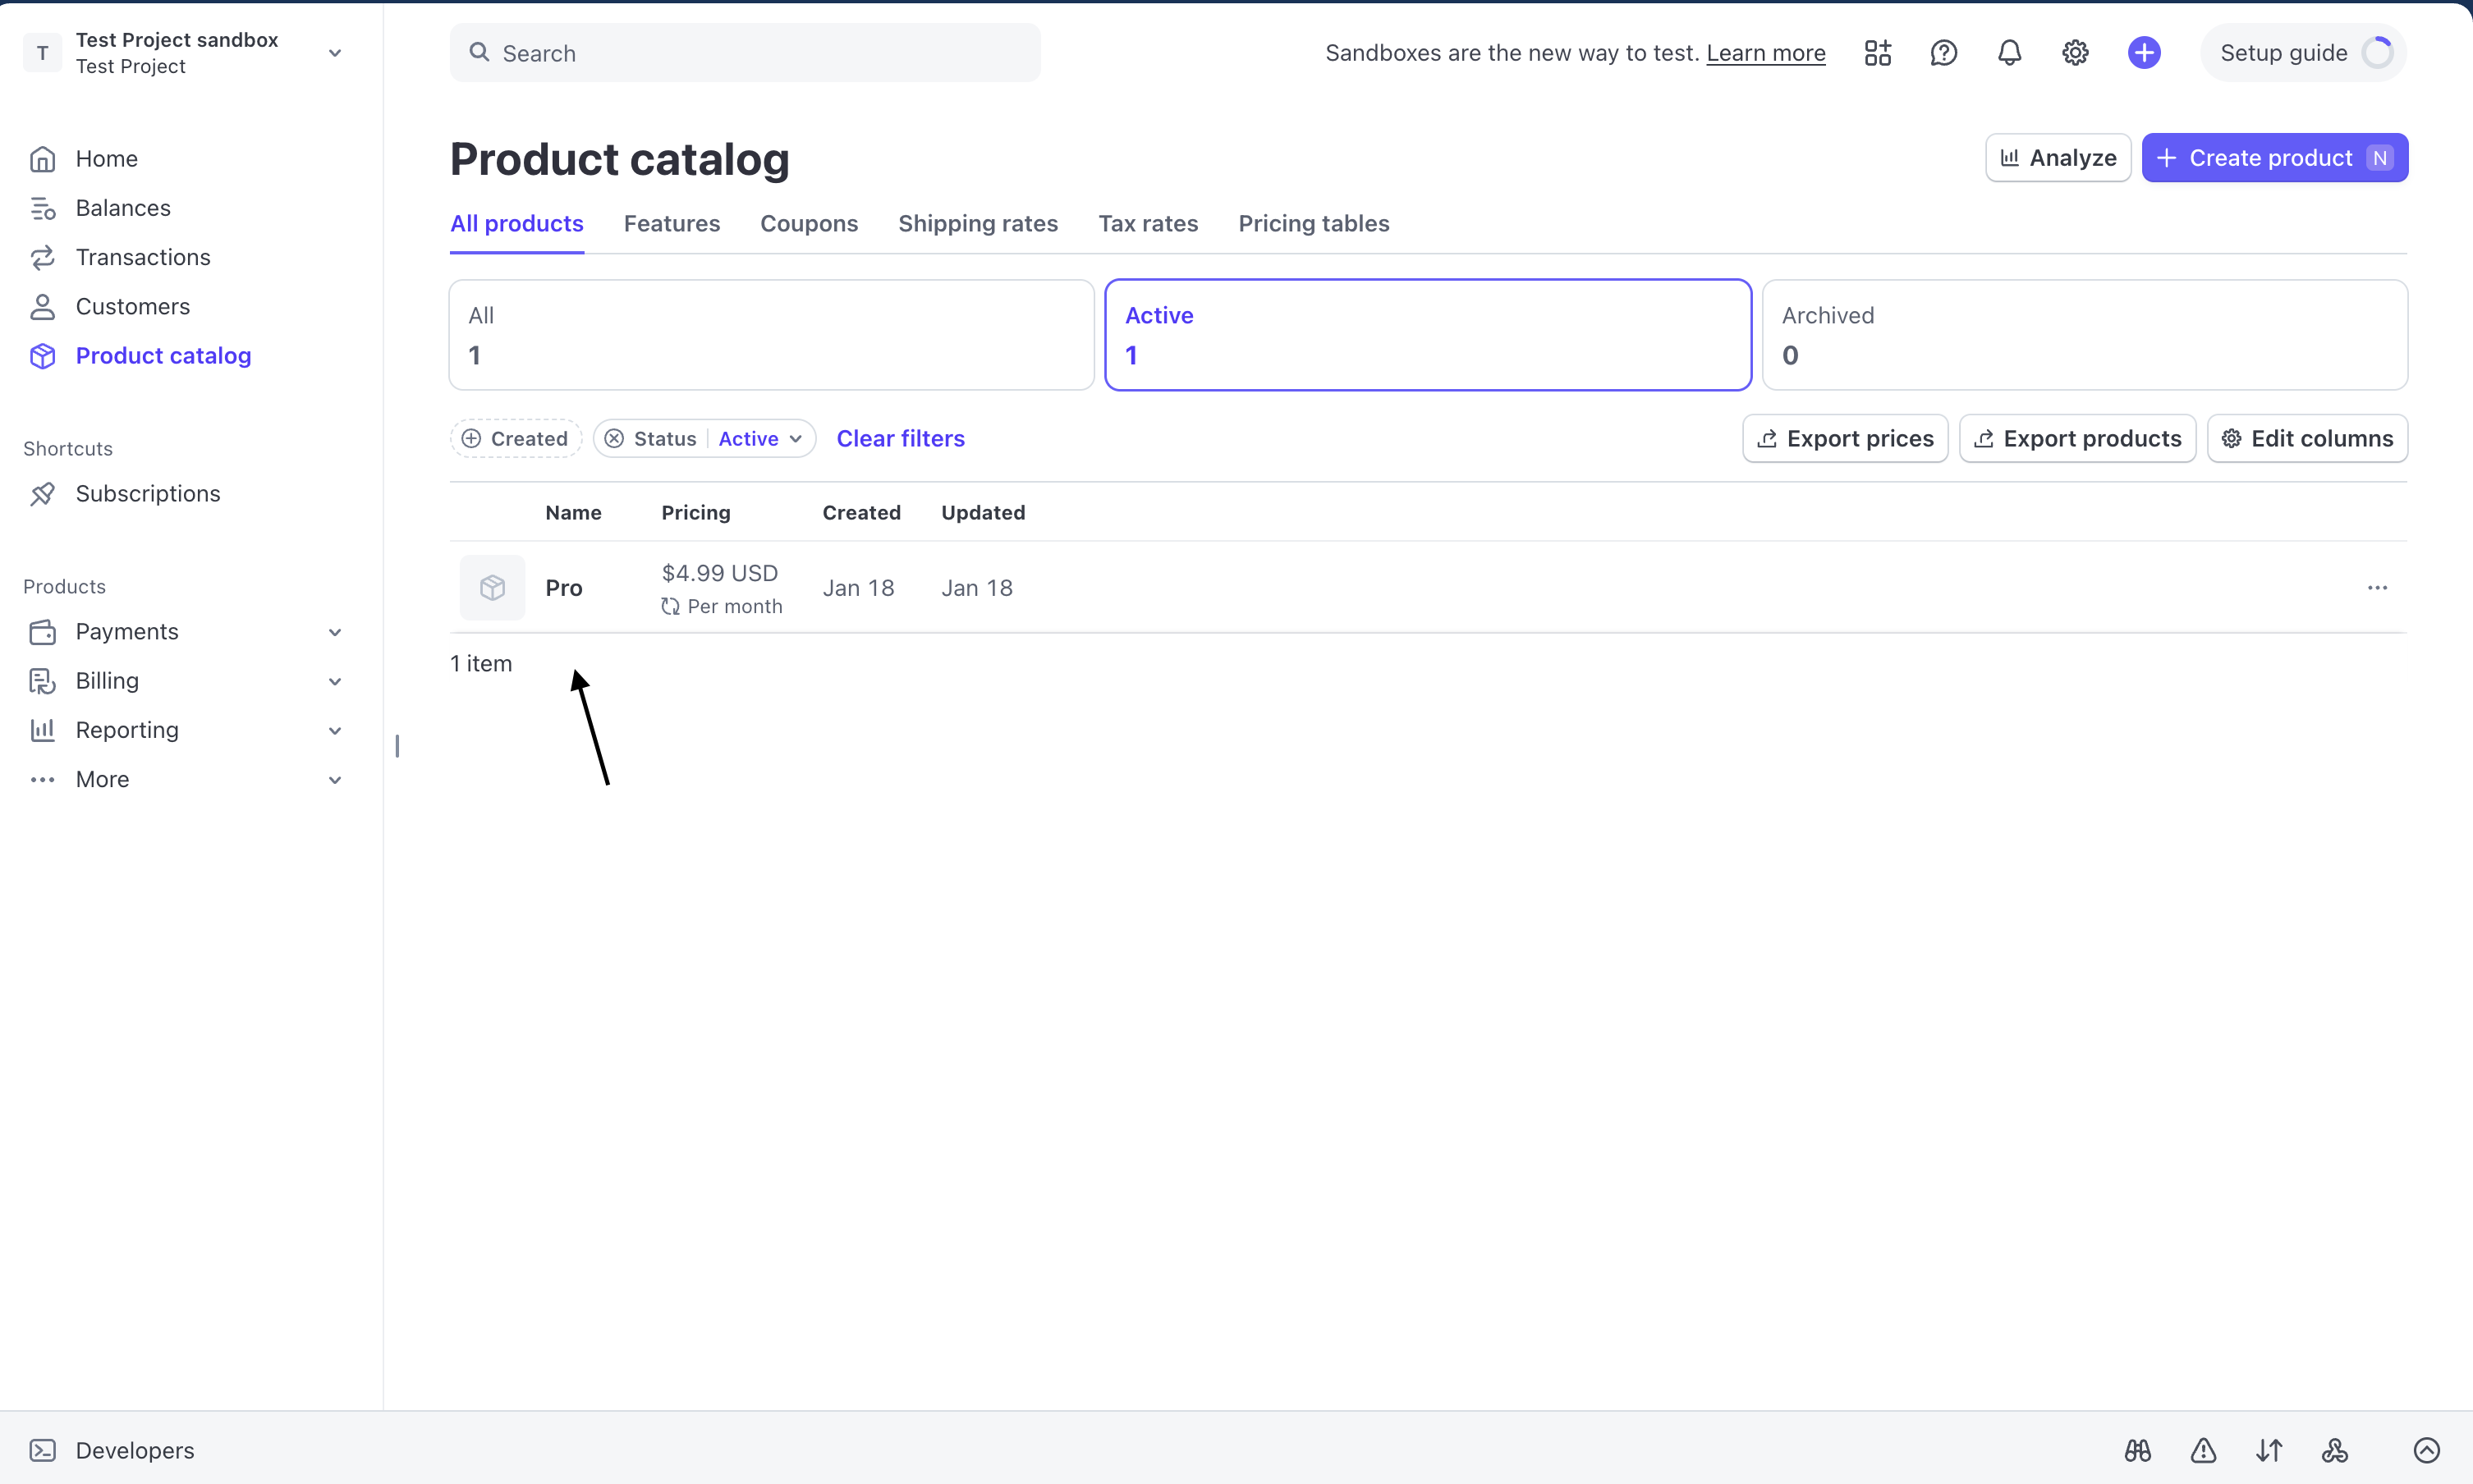
8. Save the product
Never expose your Secret key. Only use it in backend code.
***
## Step 4: Create Your Product
Before customers can purchase anything, you must create at least one product in Stripe.
1. Go to **Product Catalog**
2. Click **Add a product**
3. Enter a product name such as Pro Plan
4. Add a description
5. Choose **Recurring**
6. Set your price such as 4.99
7. Choose billing period such as Monthly
8. Save the product
 ***
## Step 5: Get Your Price IDs
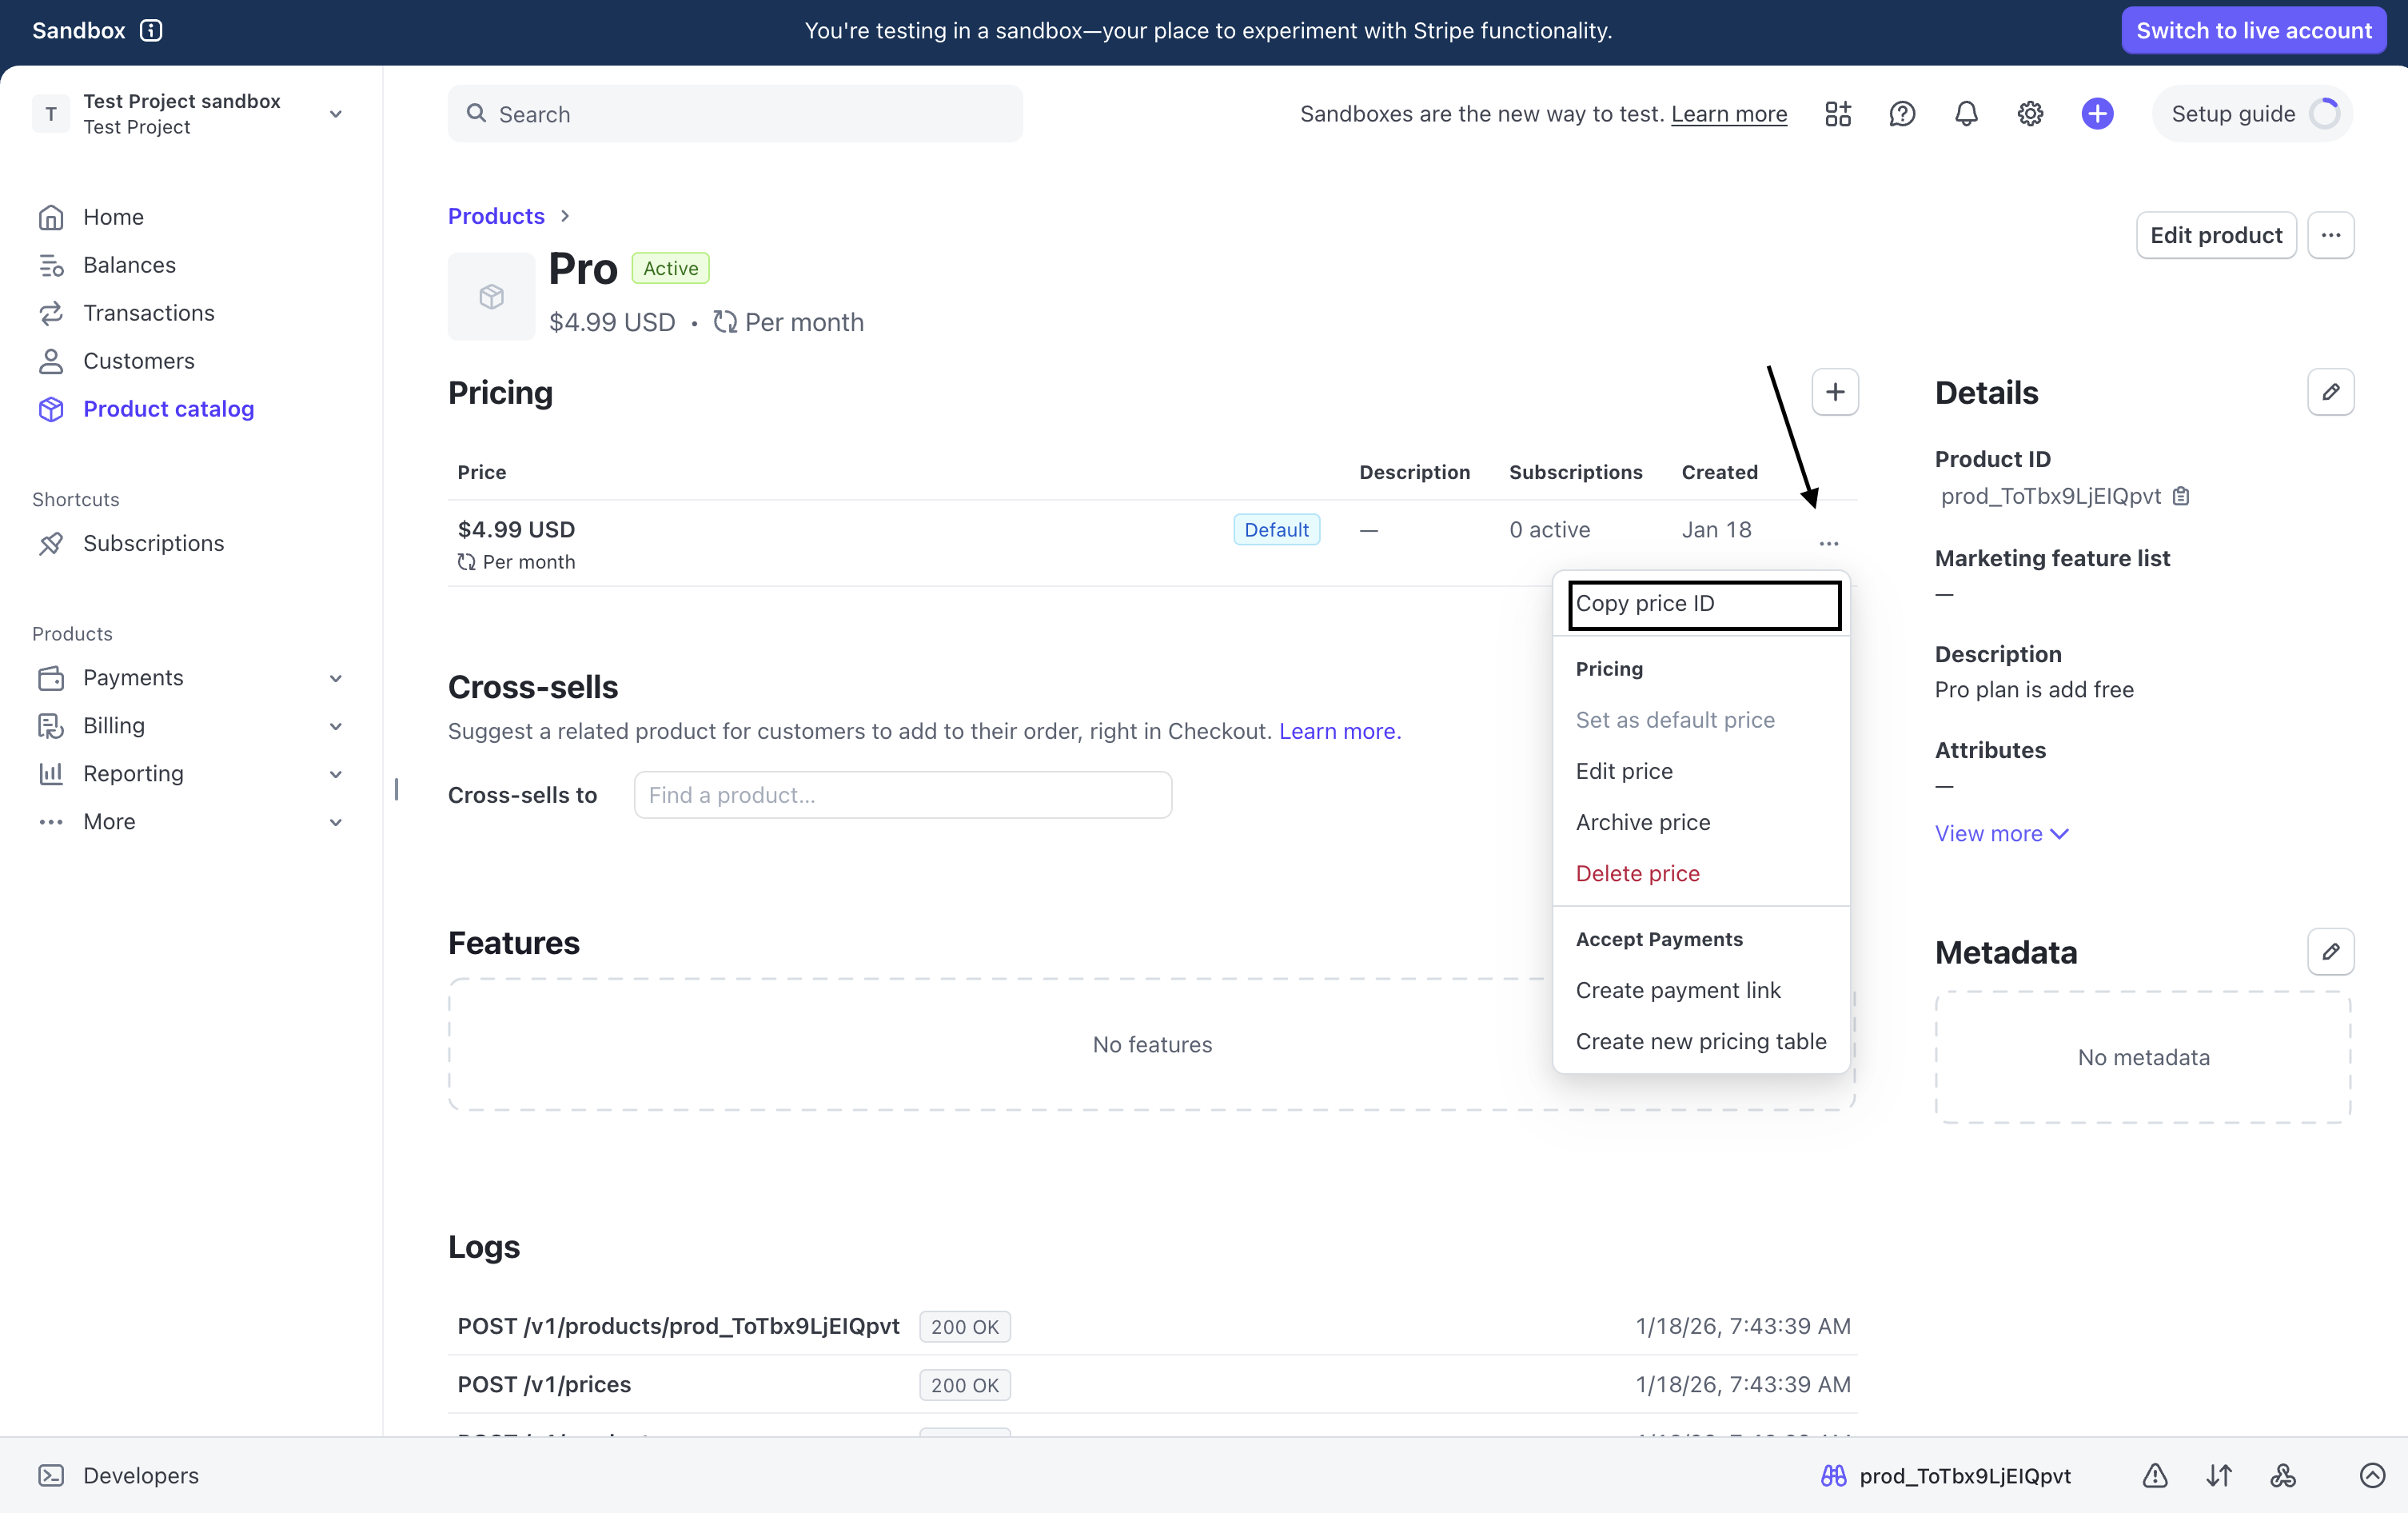
Each price has its own unique ID. You will need this so your Vibecode app knows which product to charge for.
1. Open your product in Stripe
2. Click the three dots beside the price
3. Click **Copy price ID**
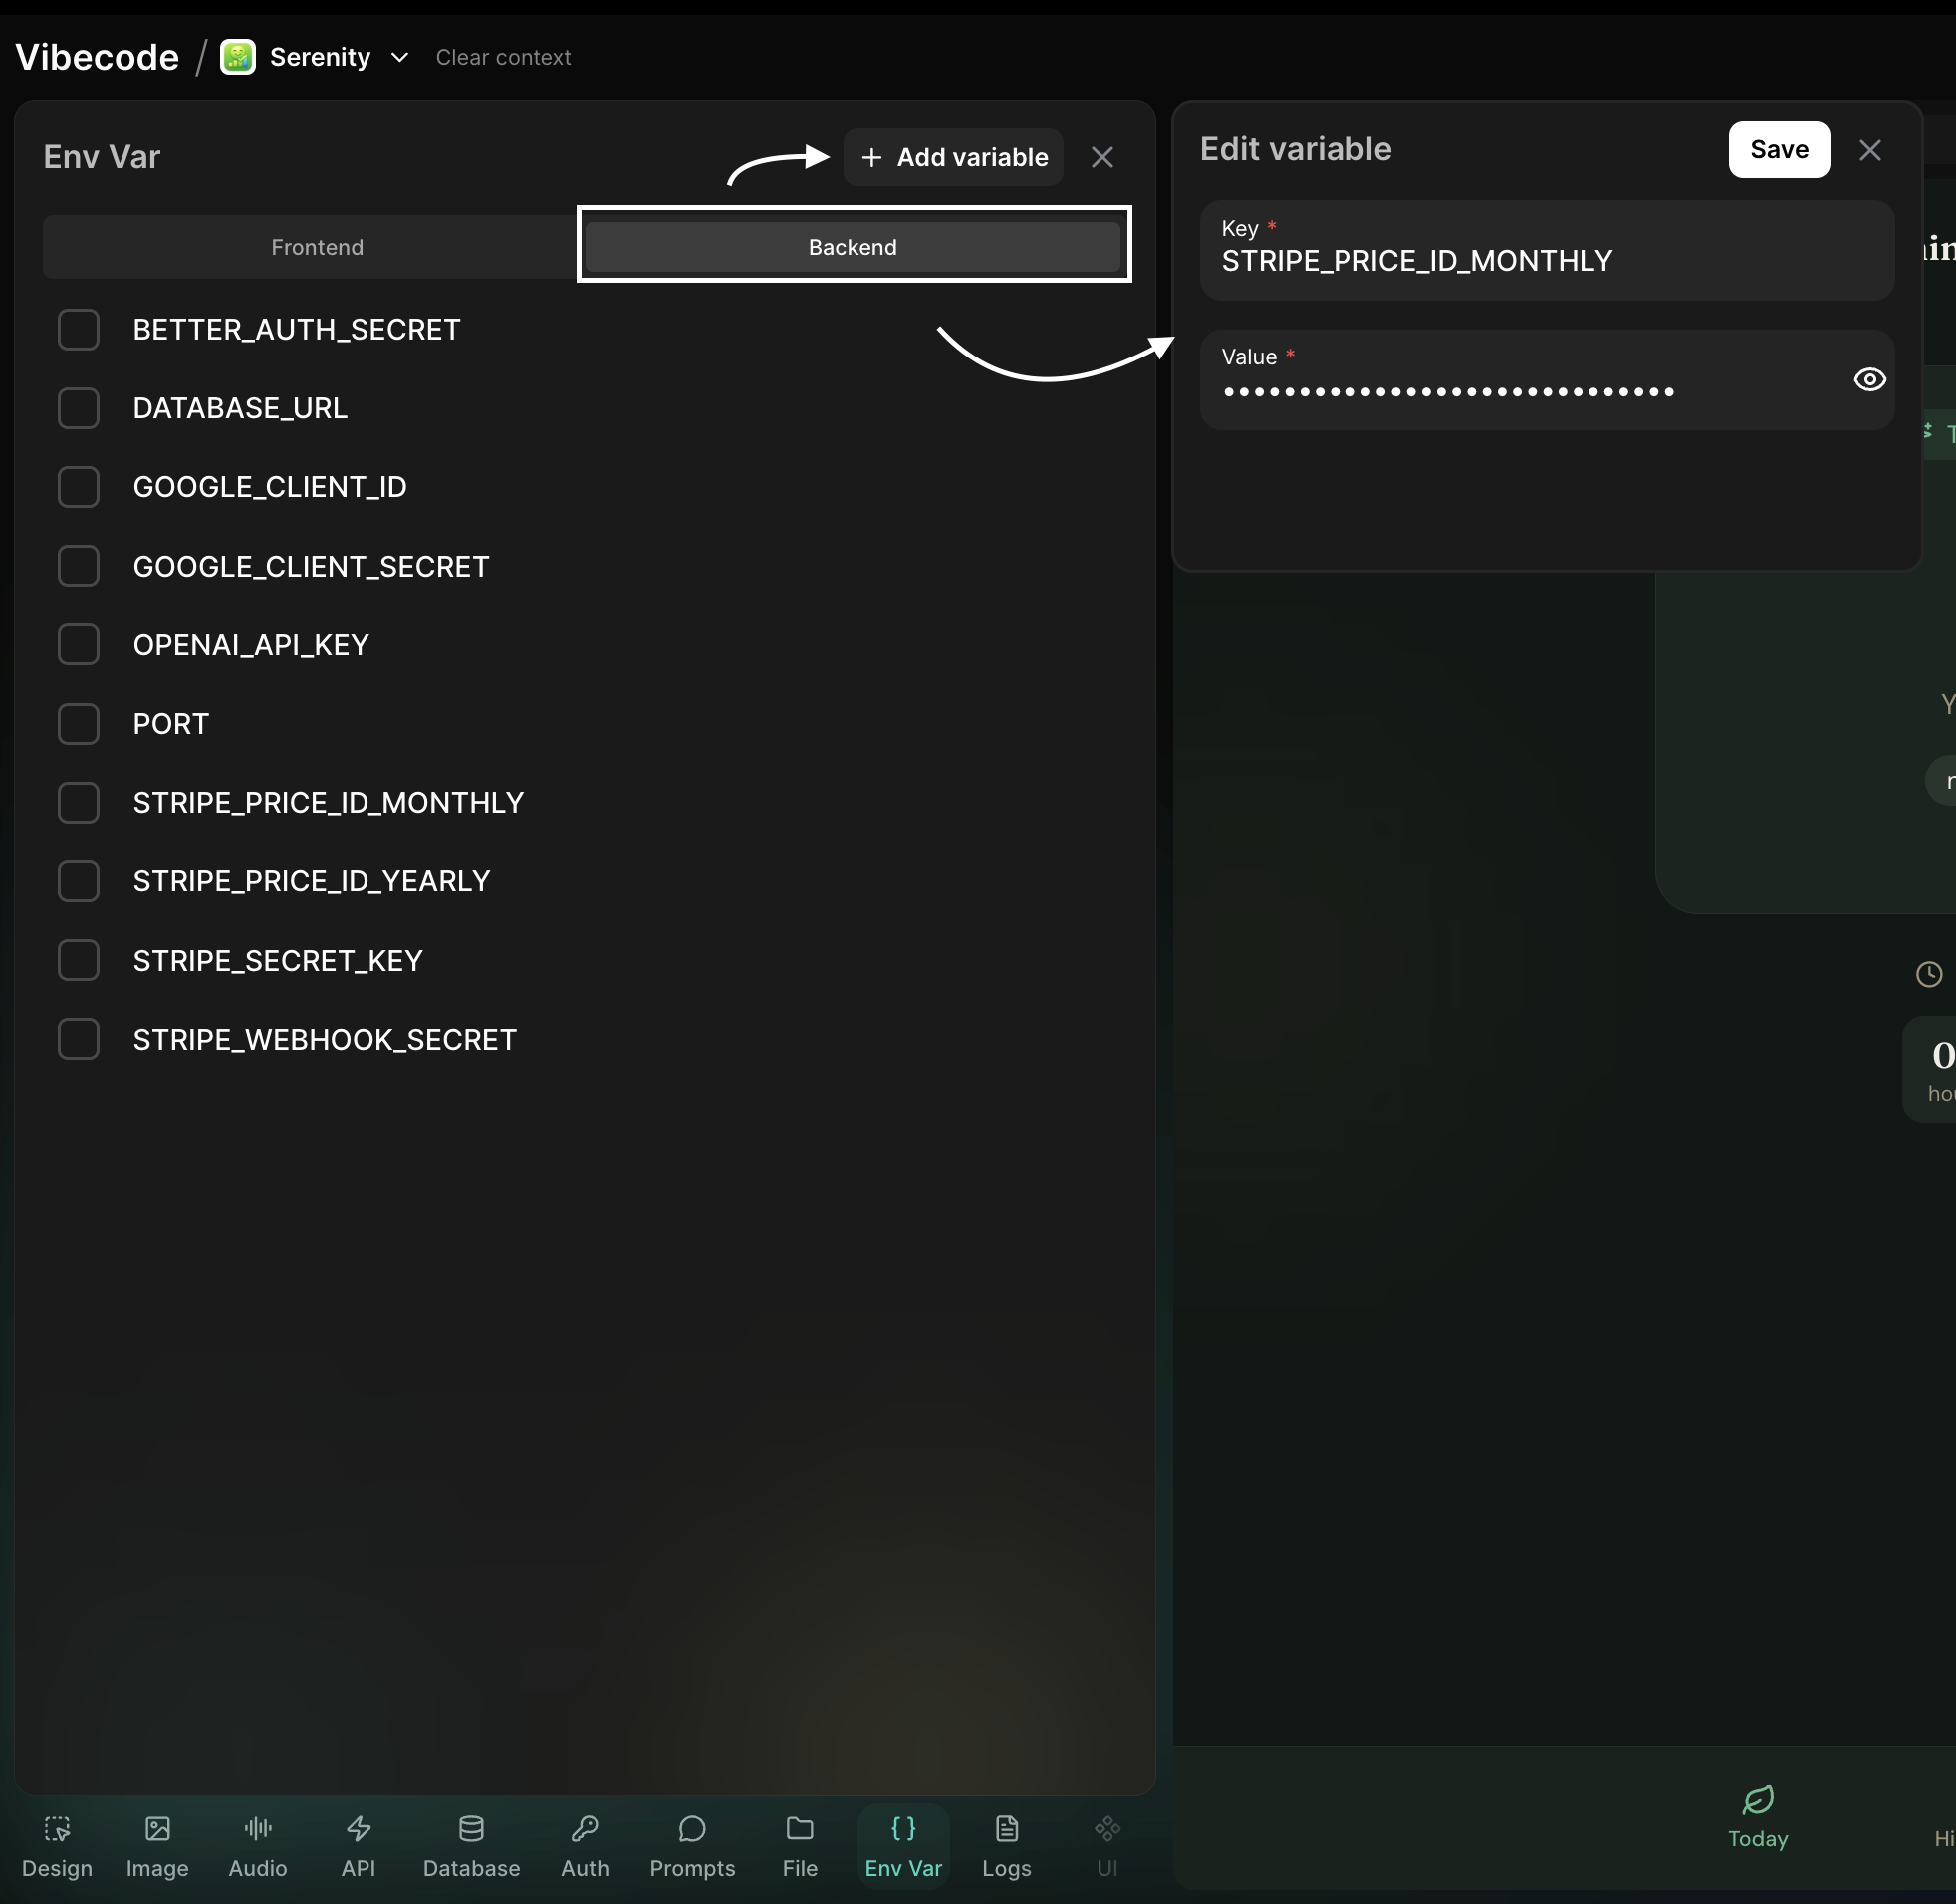
4. Go to Vibecode
5. Navigate to **Env Var → Backend**
6. Add a new variable:
* Key: `STRIPE_PRICE_ID_MONTHLY`
* Value: your price ID
***
## Step 5: Get Your Price IDs
Each price has its own unique ID. You will need this so your Vibecode app knows which product to charge for.
1. Open your product in Stripe
2. Click the three dots beside the price
3. Click **Copy price ID**
4. Go to Vibecode
5. Navigate to **Env Var → Backend**
6. Add a new variable:
* Key: `STRIPE_PRICE_ID_MONTHLY`
* Value: your price ID
 If you offer yearly billing, repeat this using the key `STRIPE_PRICE_ID_YEARLY`.
***
## Step 6: Set Up Webhooks
Webhooks notify your app when something happens in Stripe.
### In Stripe Dashboard
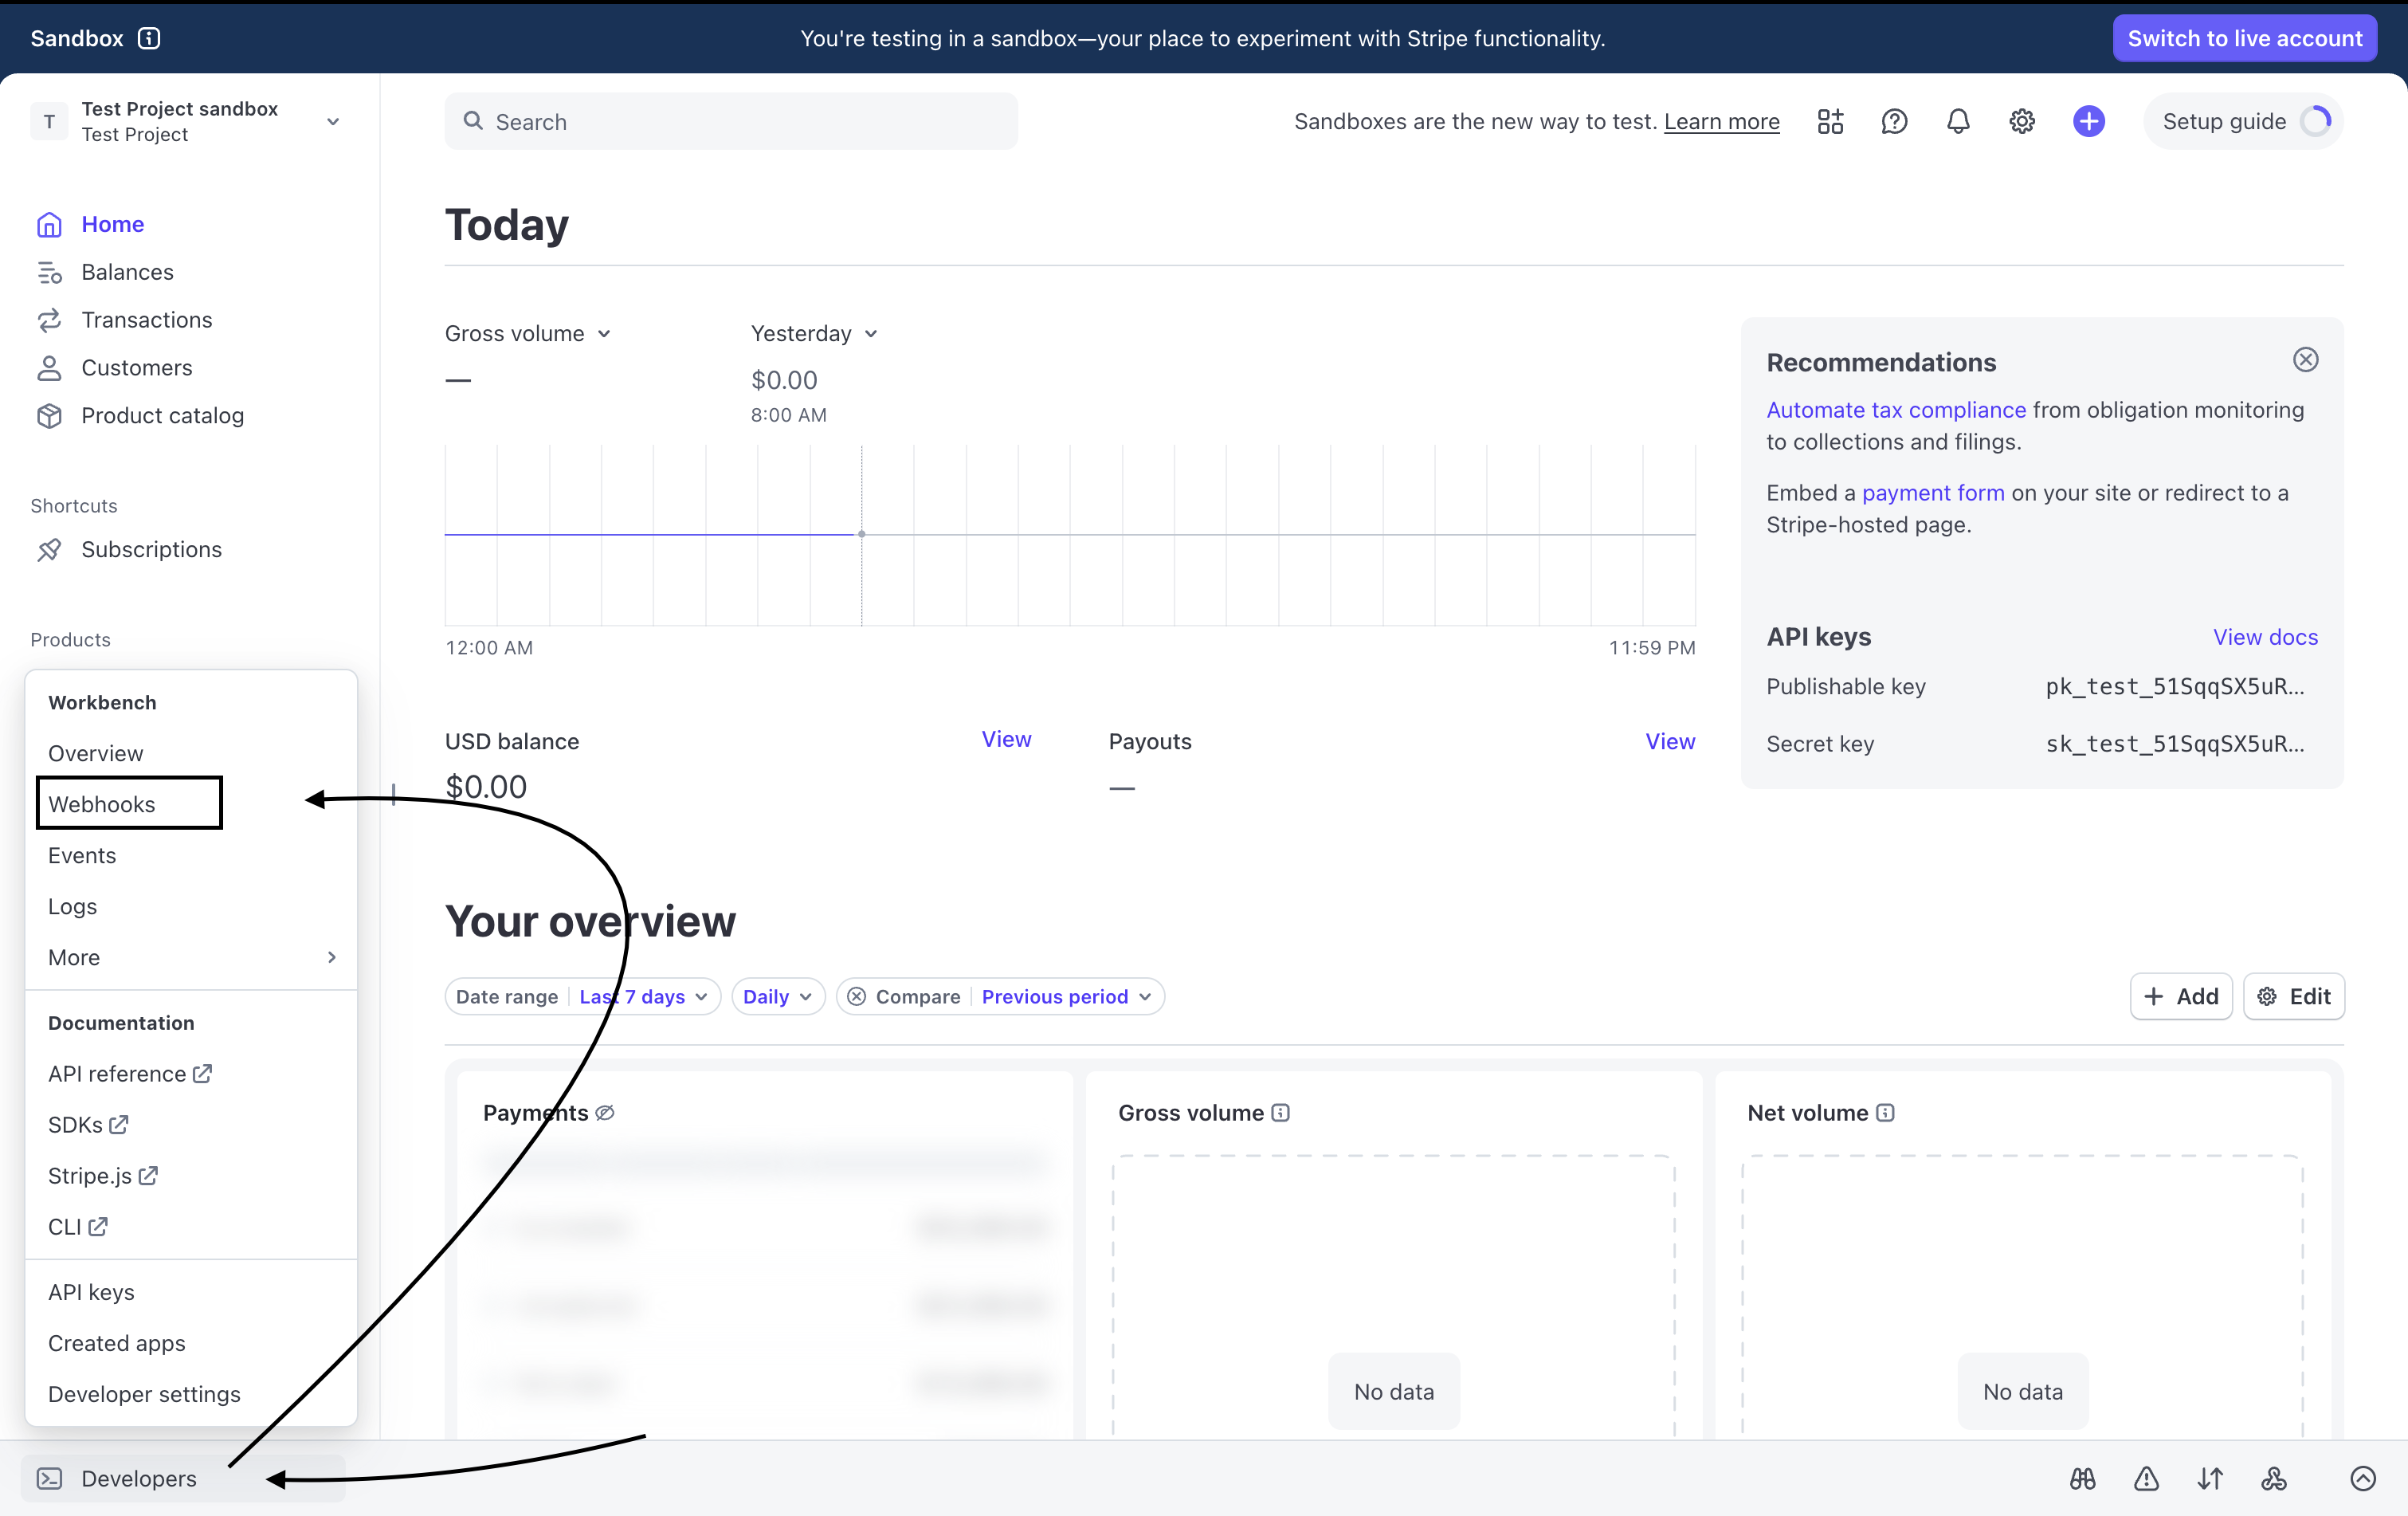
1. Go to **Developers → Webhooks**
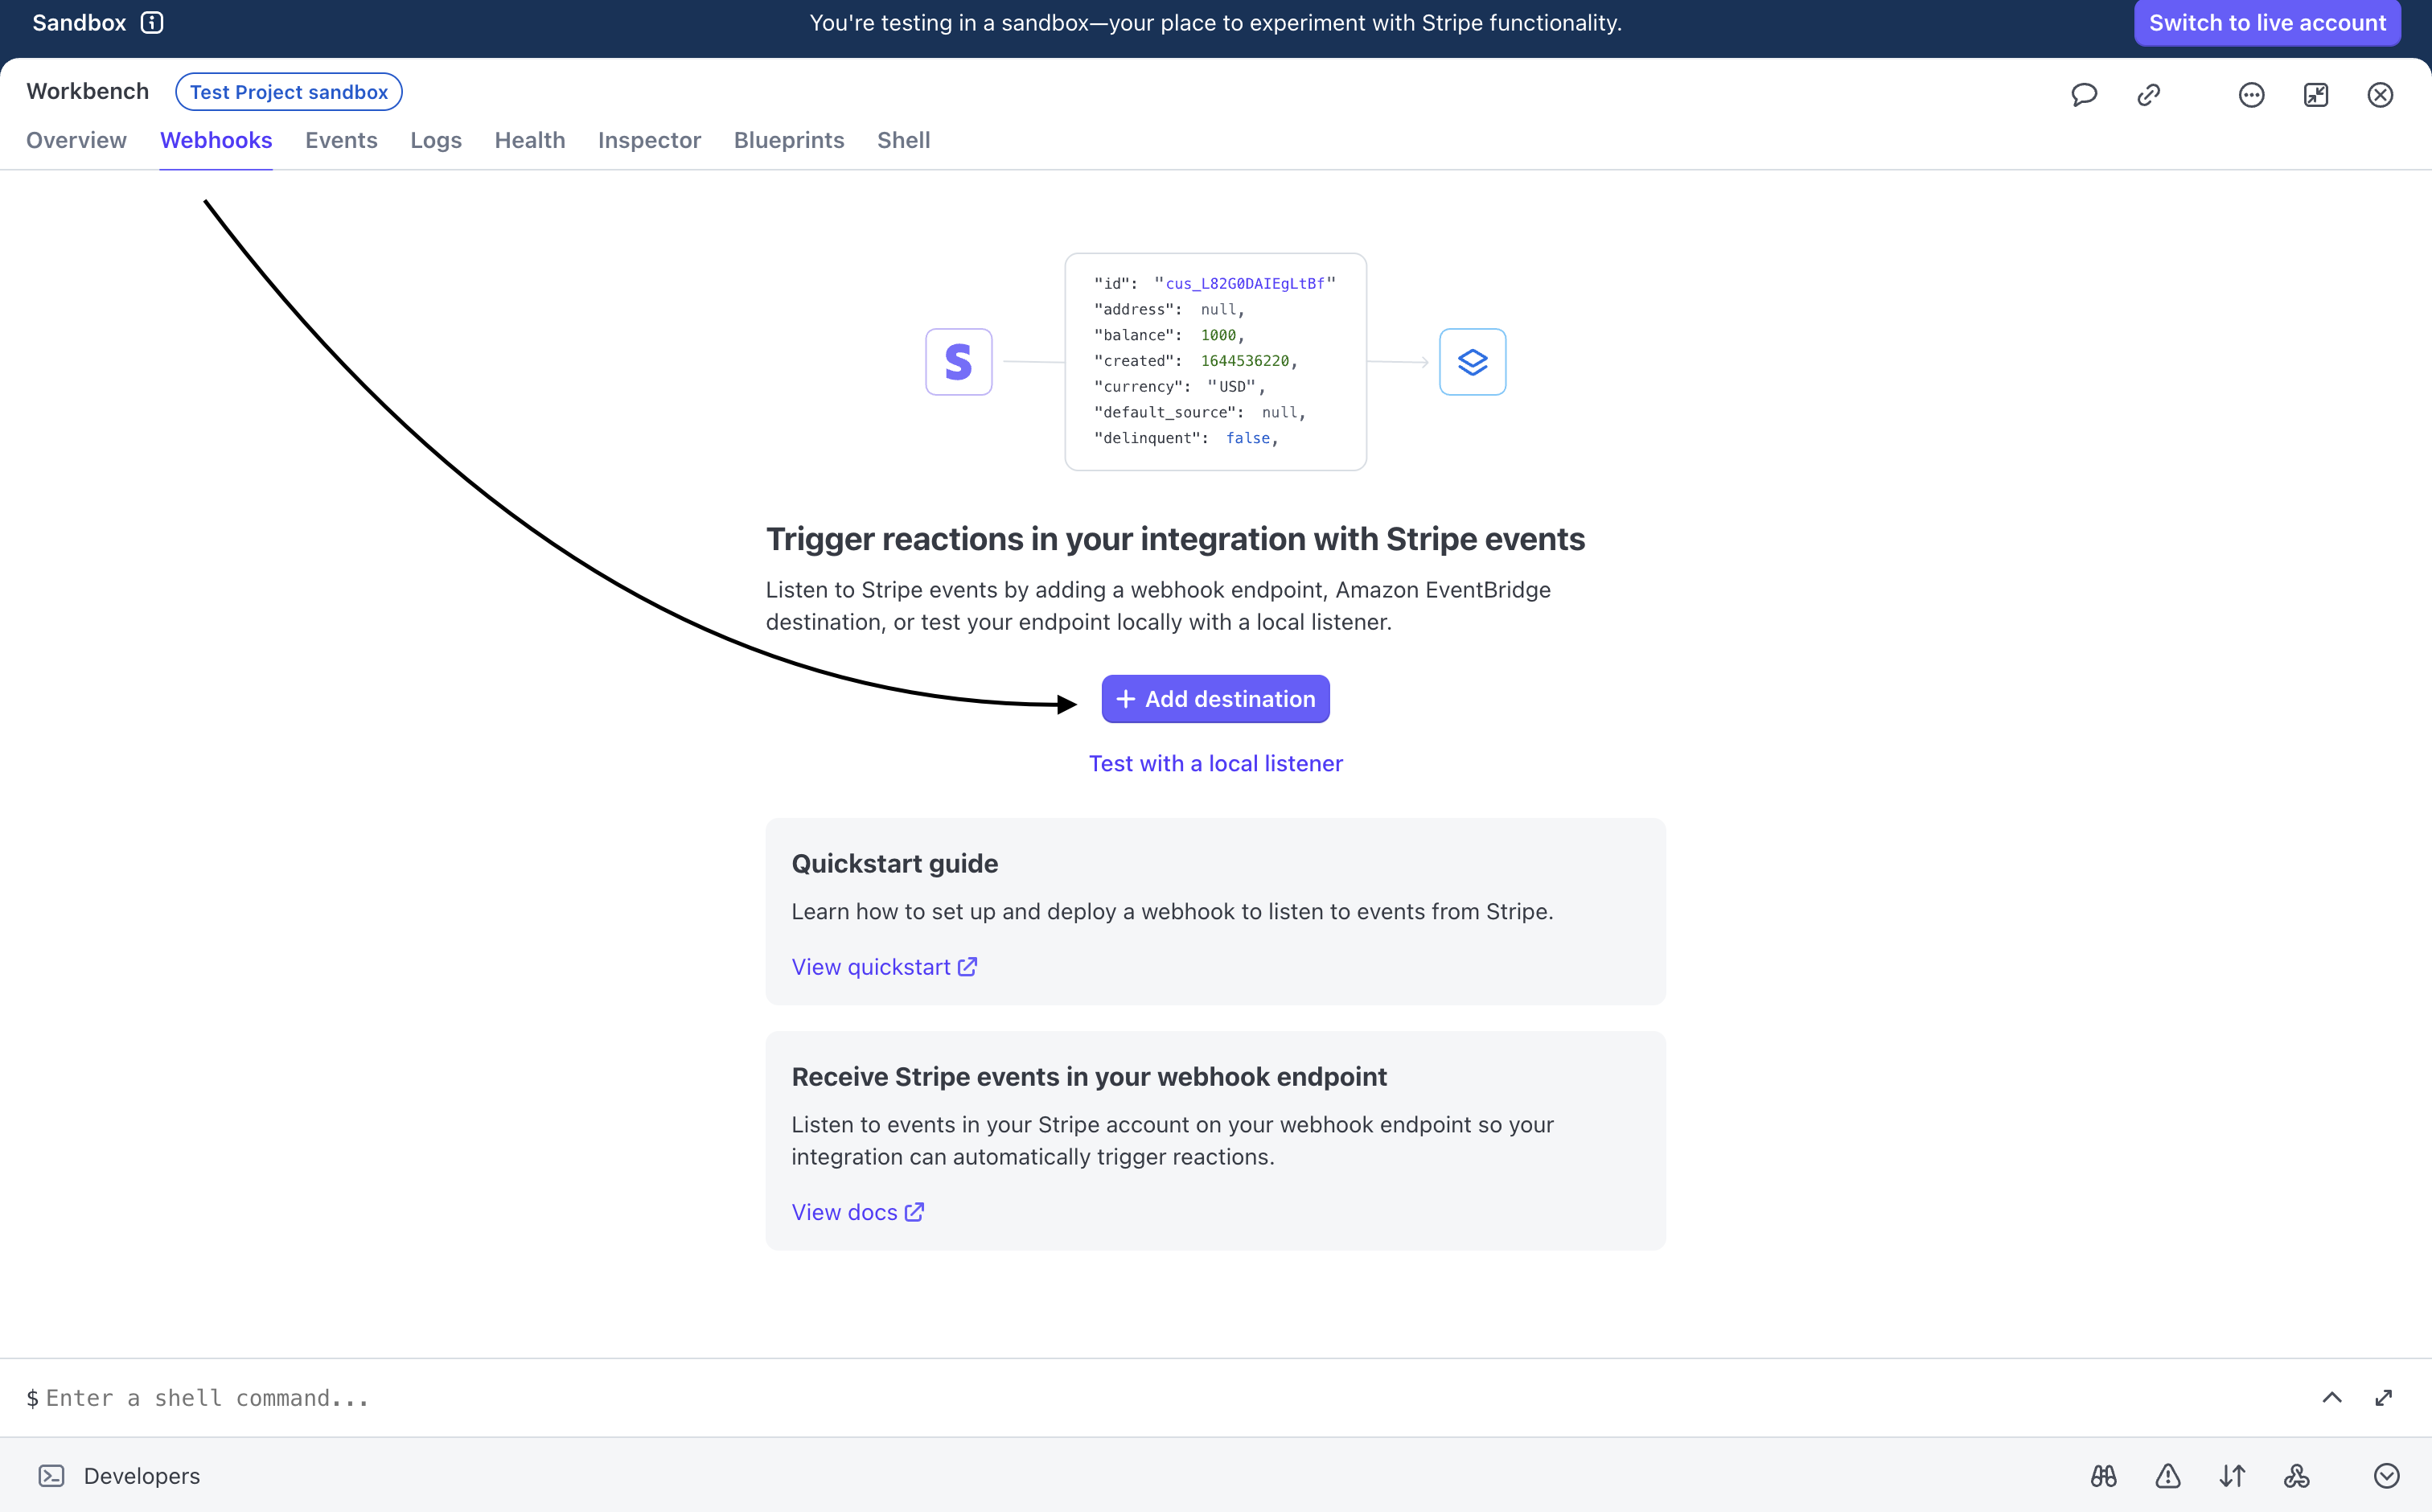
2. Click **Add destination**
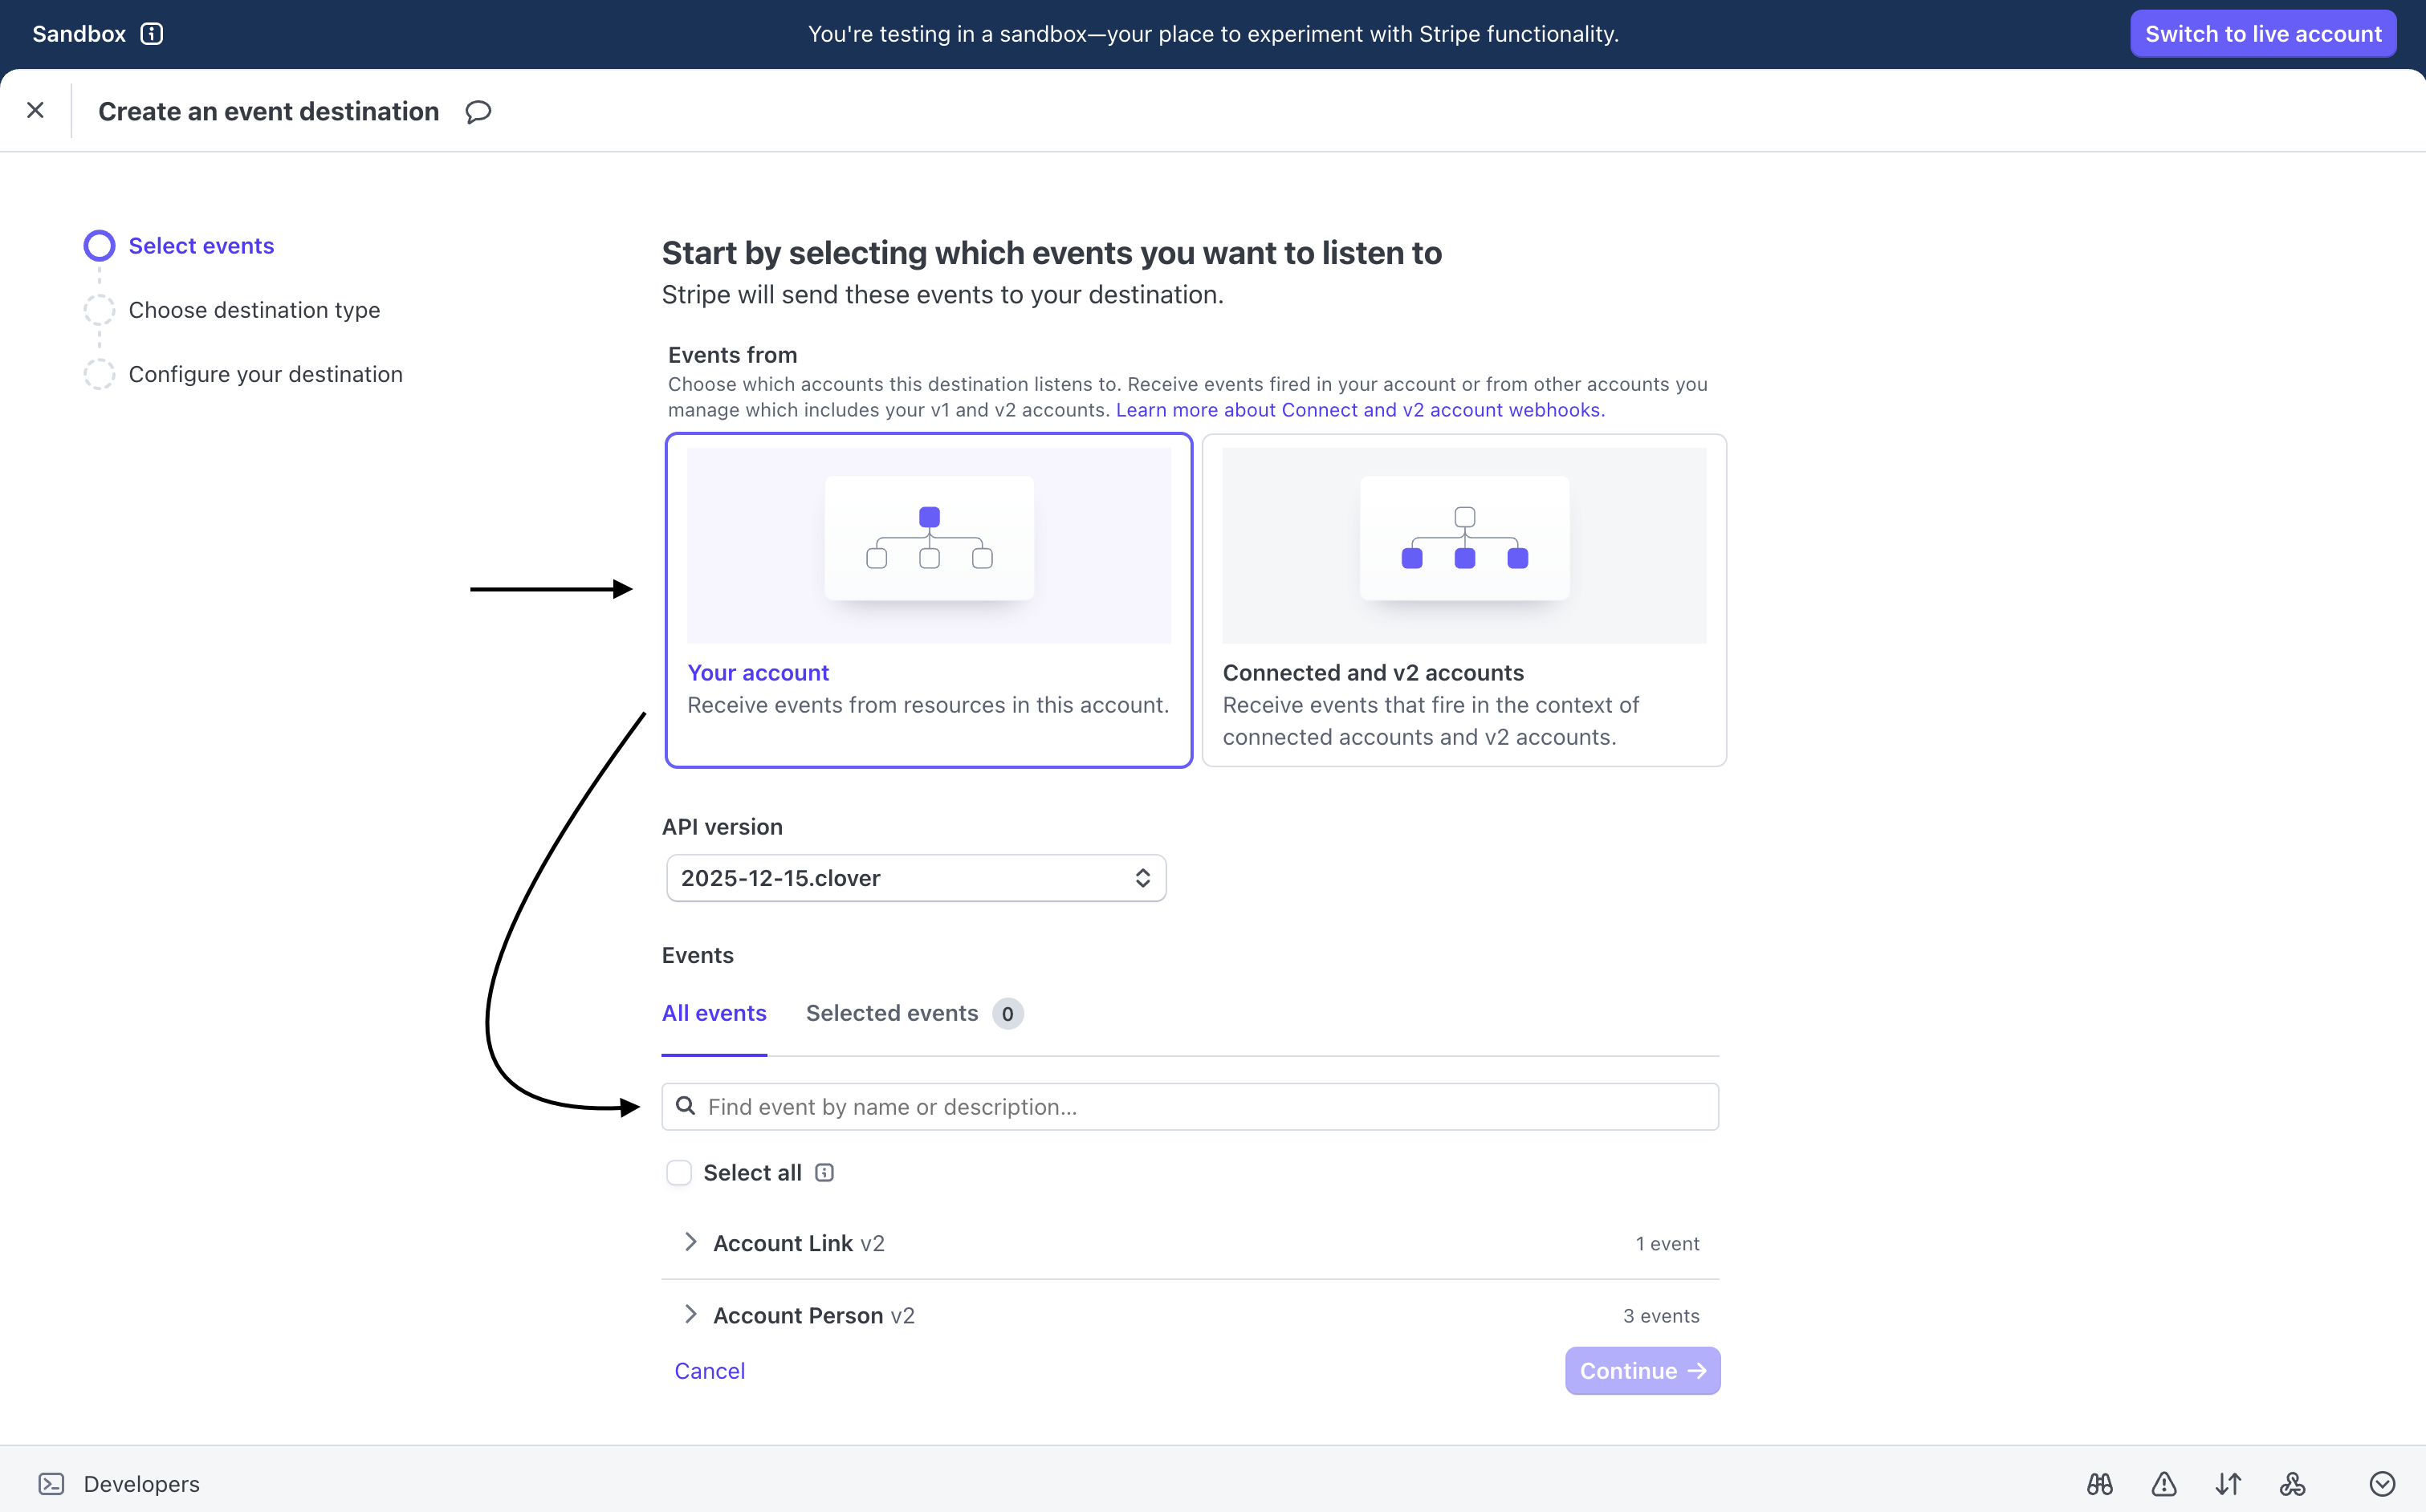
3. Choose **Your account**
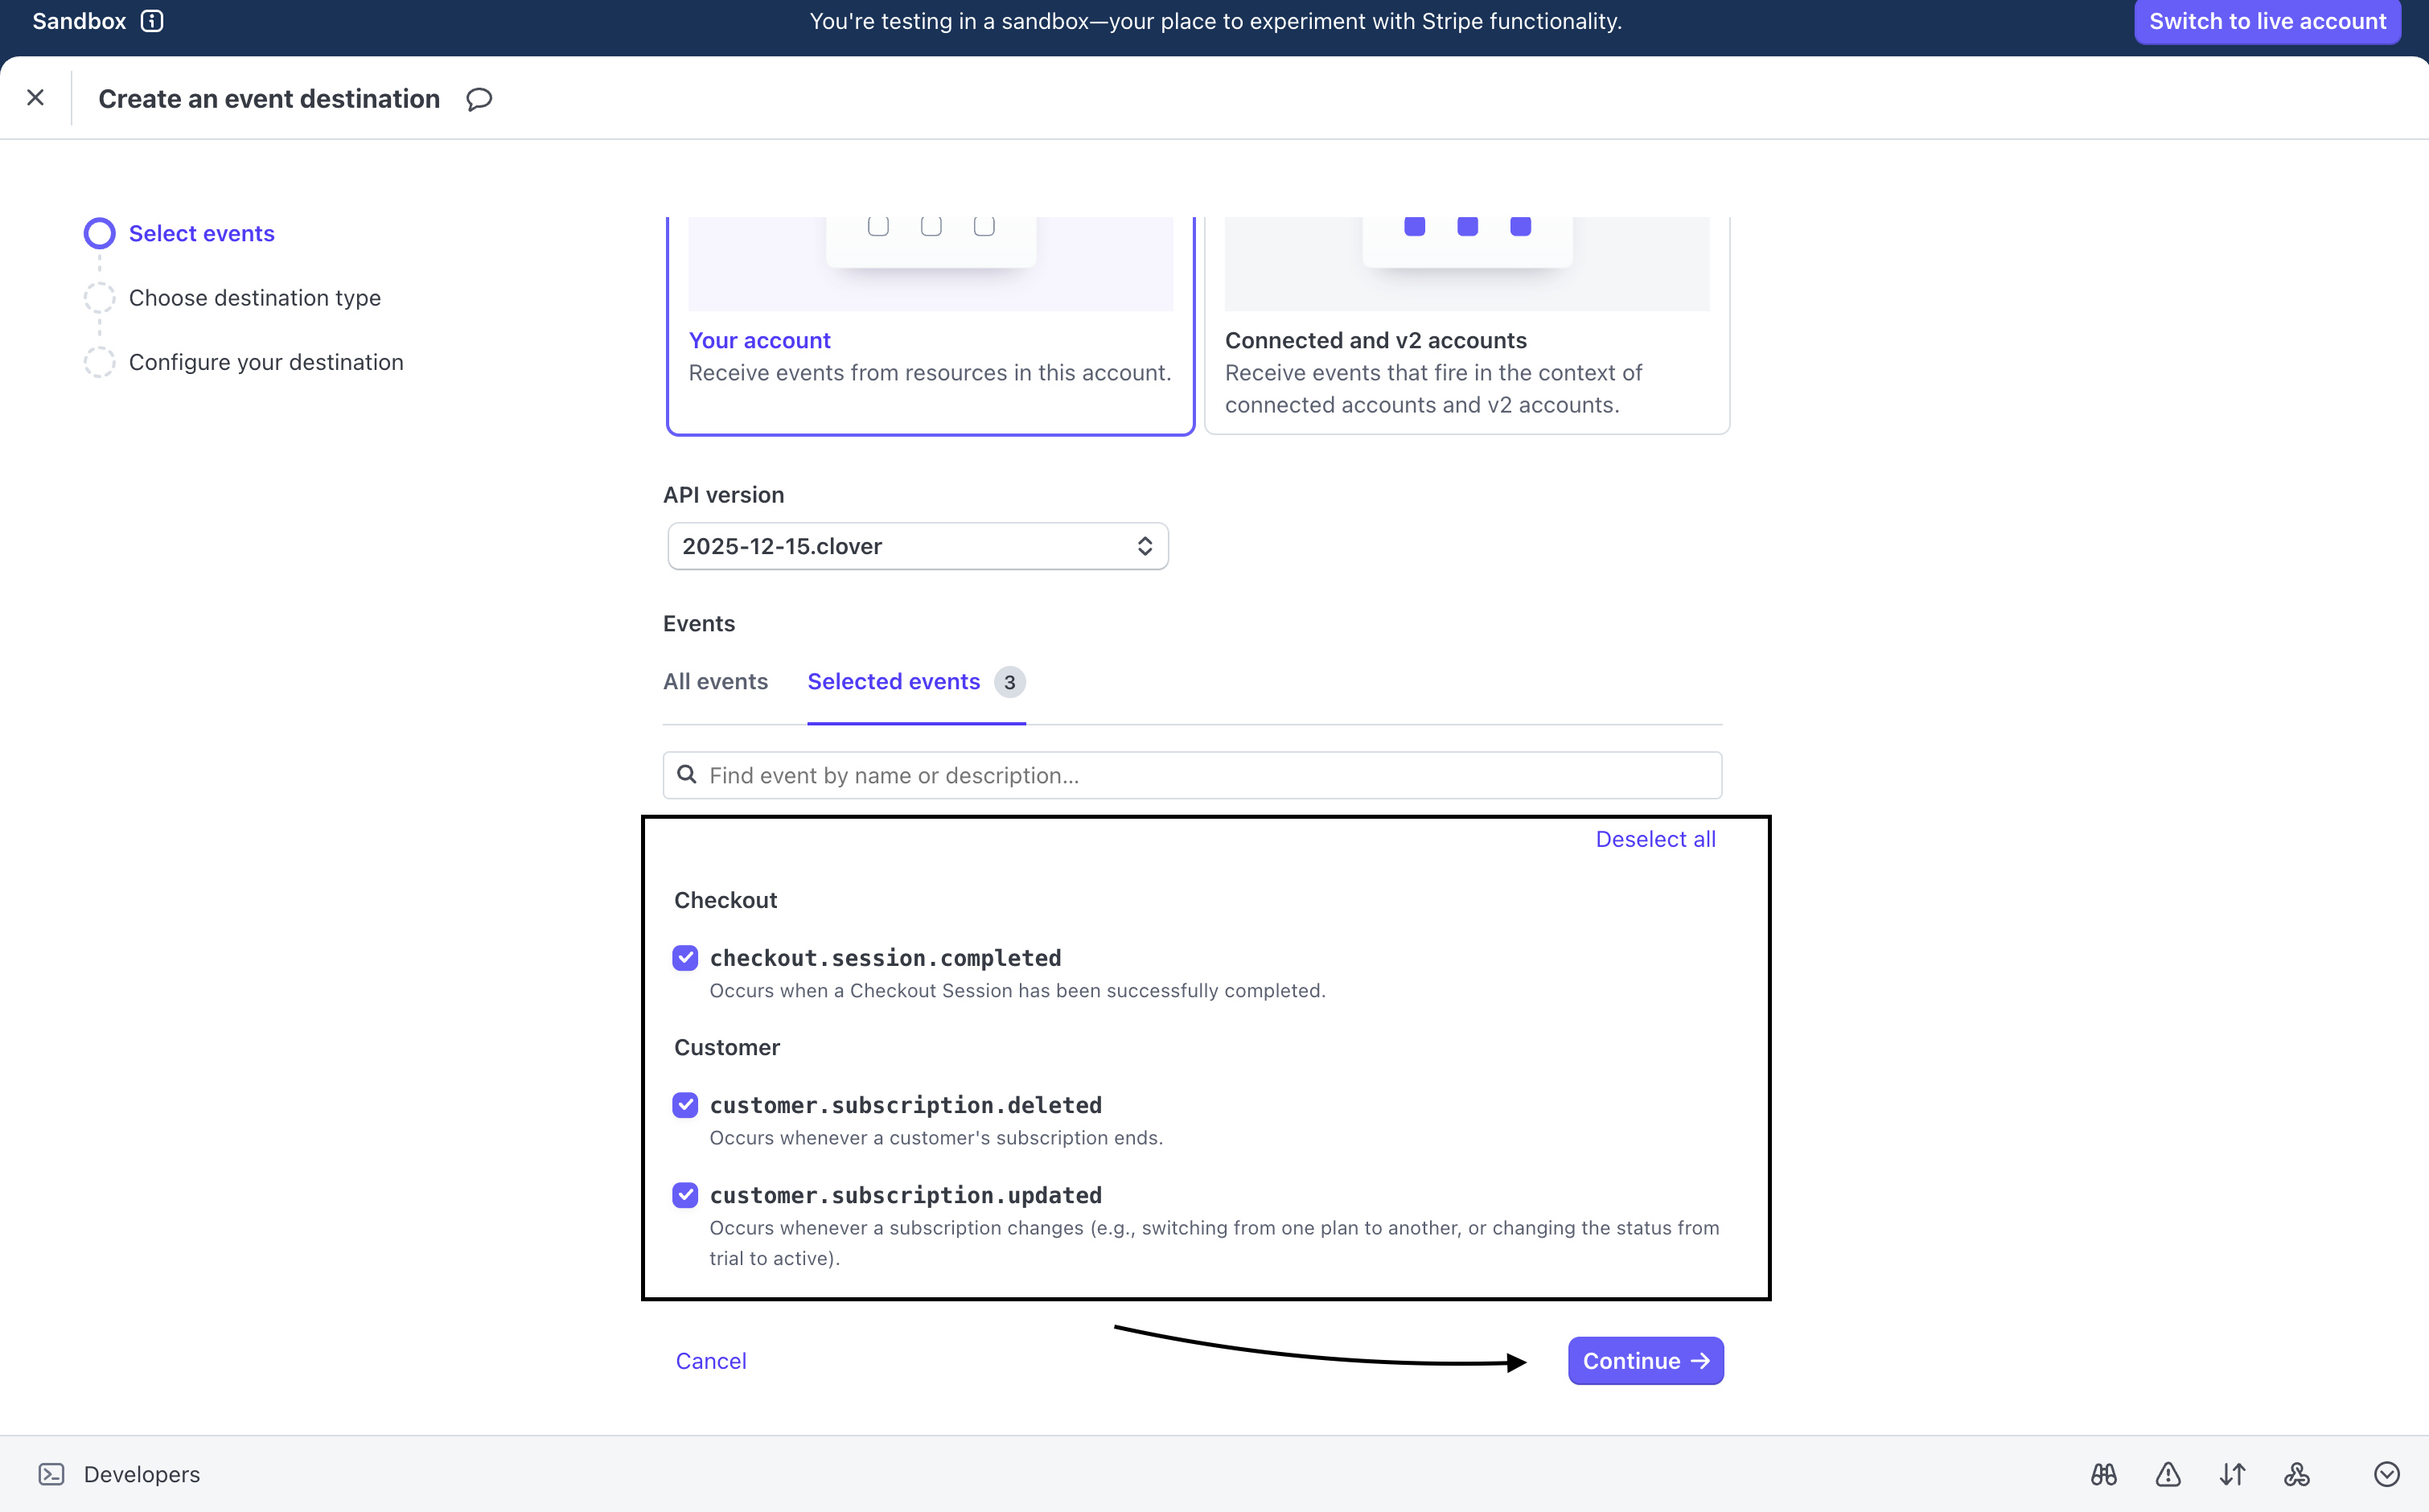
4. Select these events:
* `checkout.session.completed`
* `customer.subscription.updated`
* `customer.subscription.deleted`
5. Click **Continue**
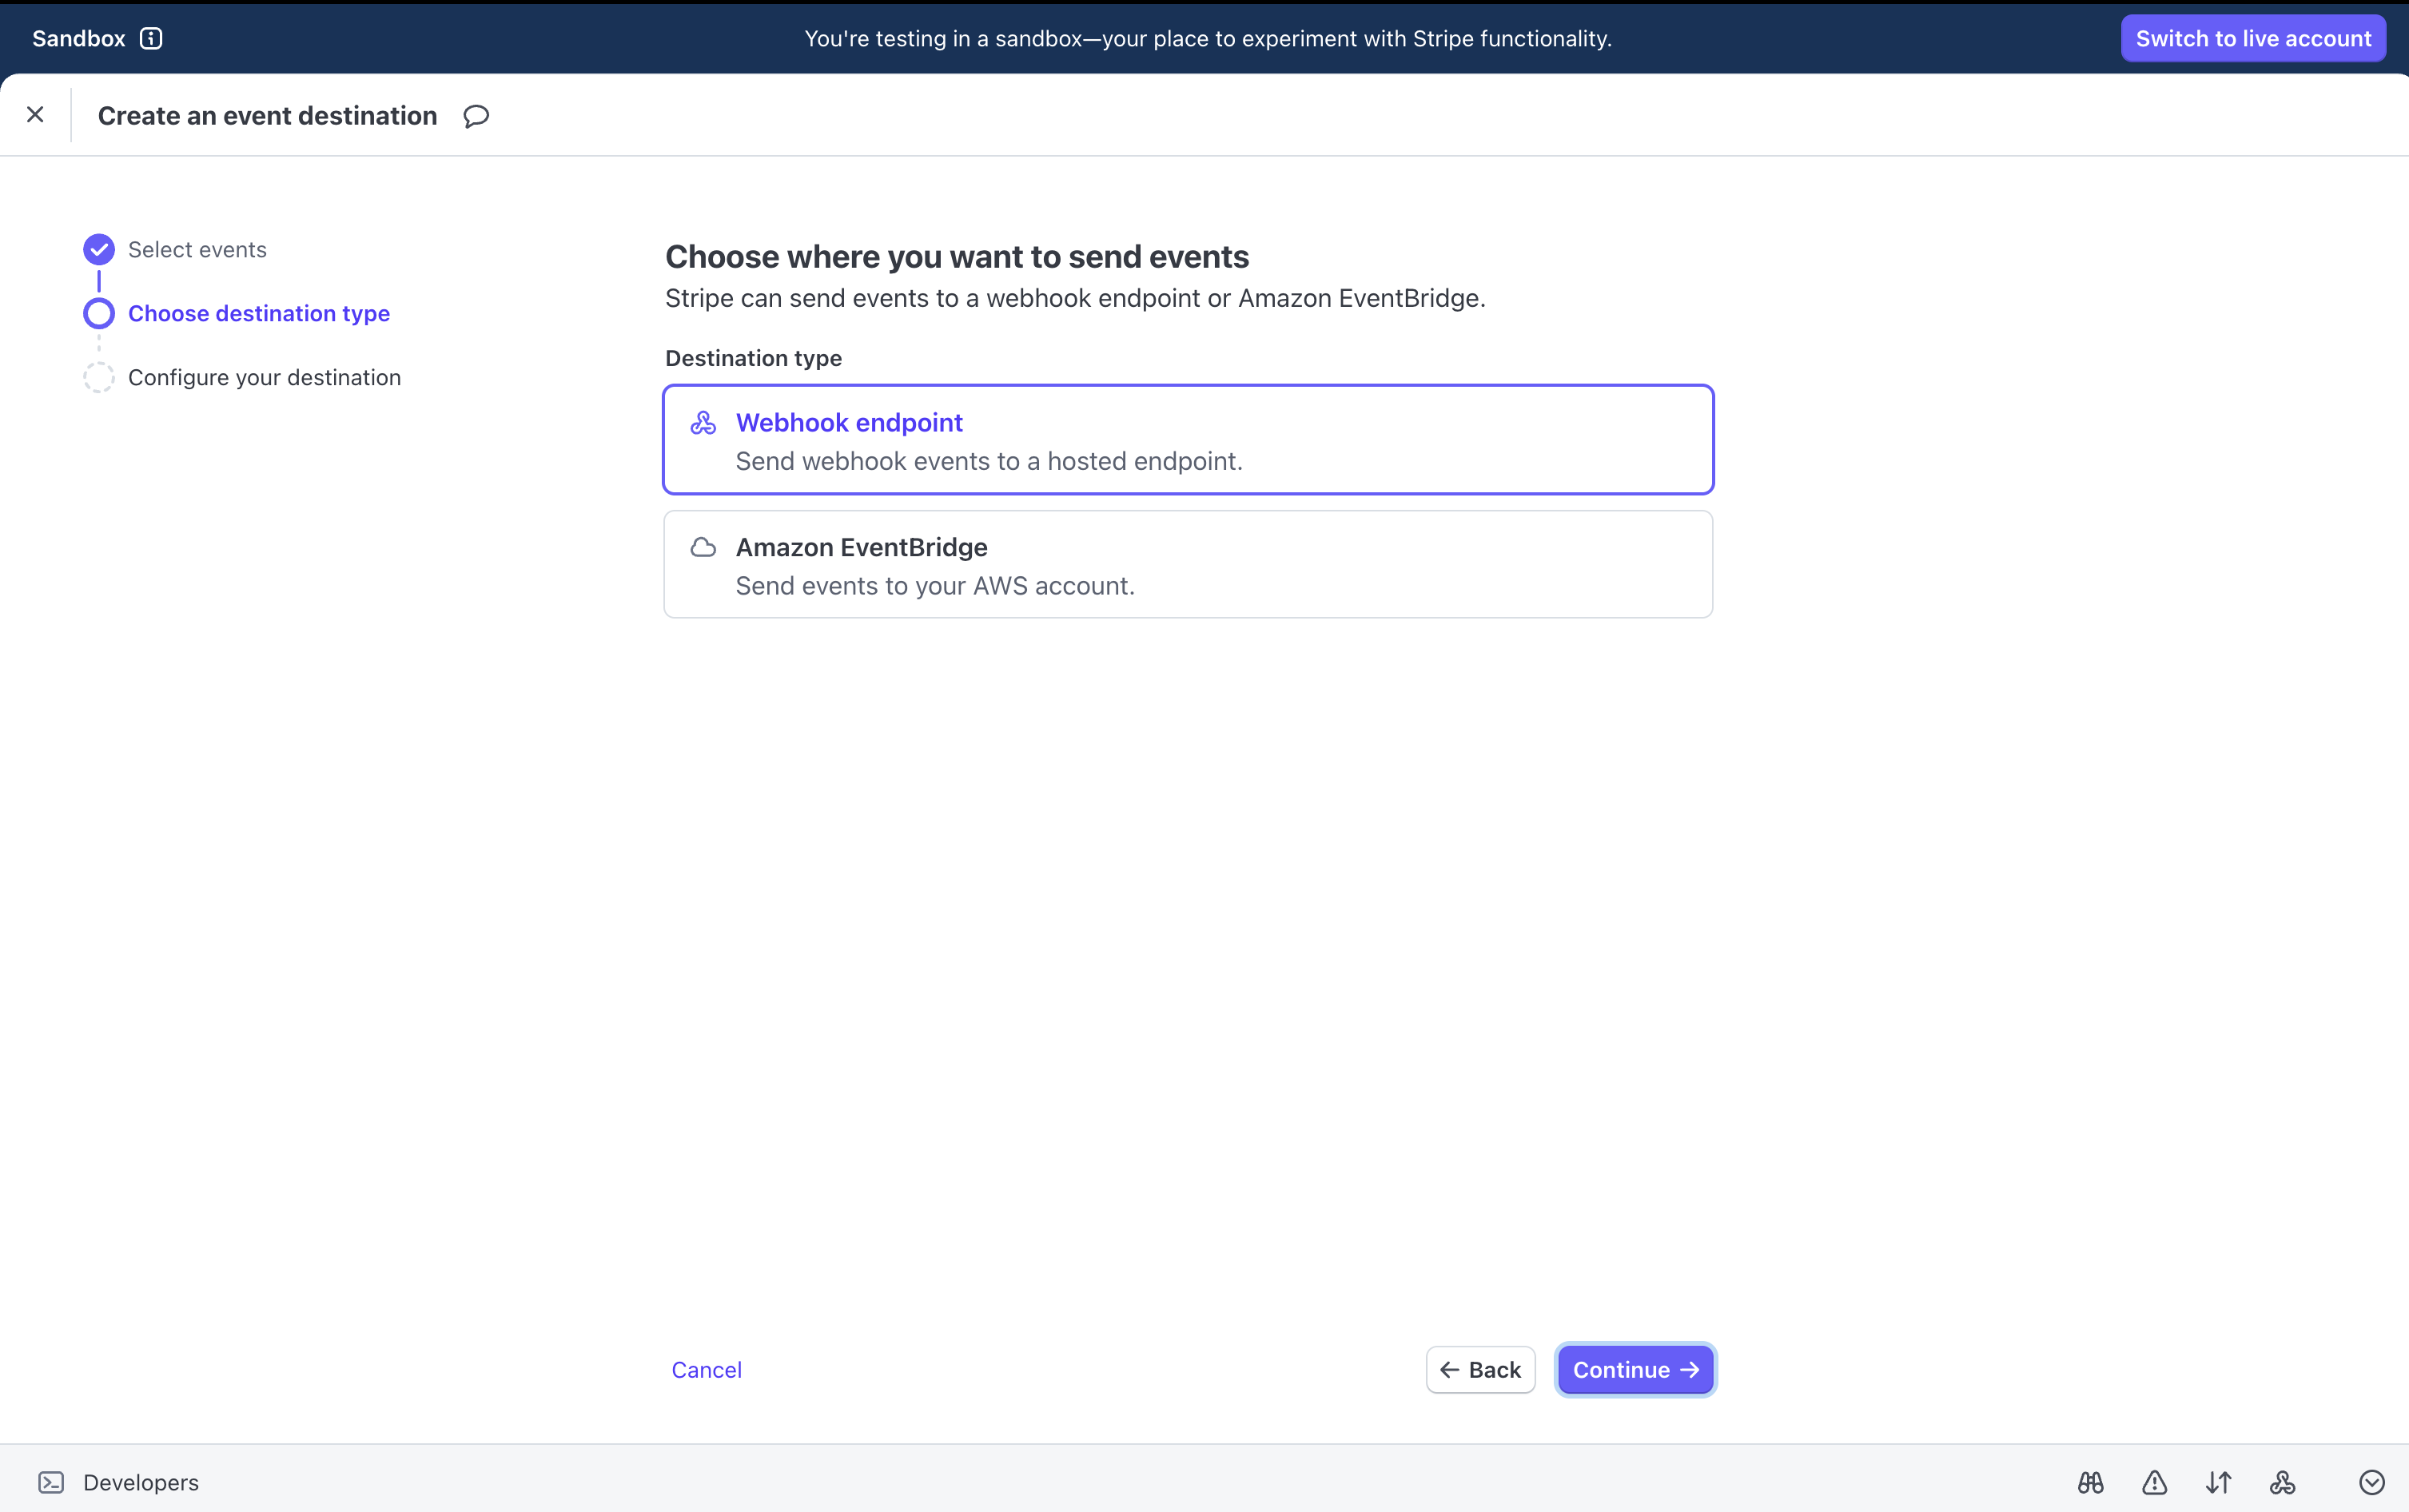
6. Choose **Webhook endpoint**
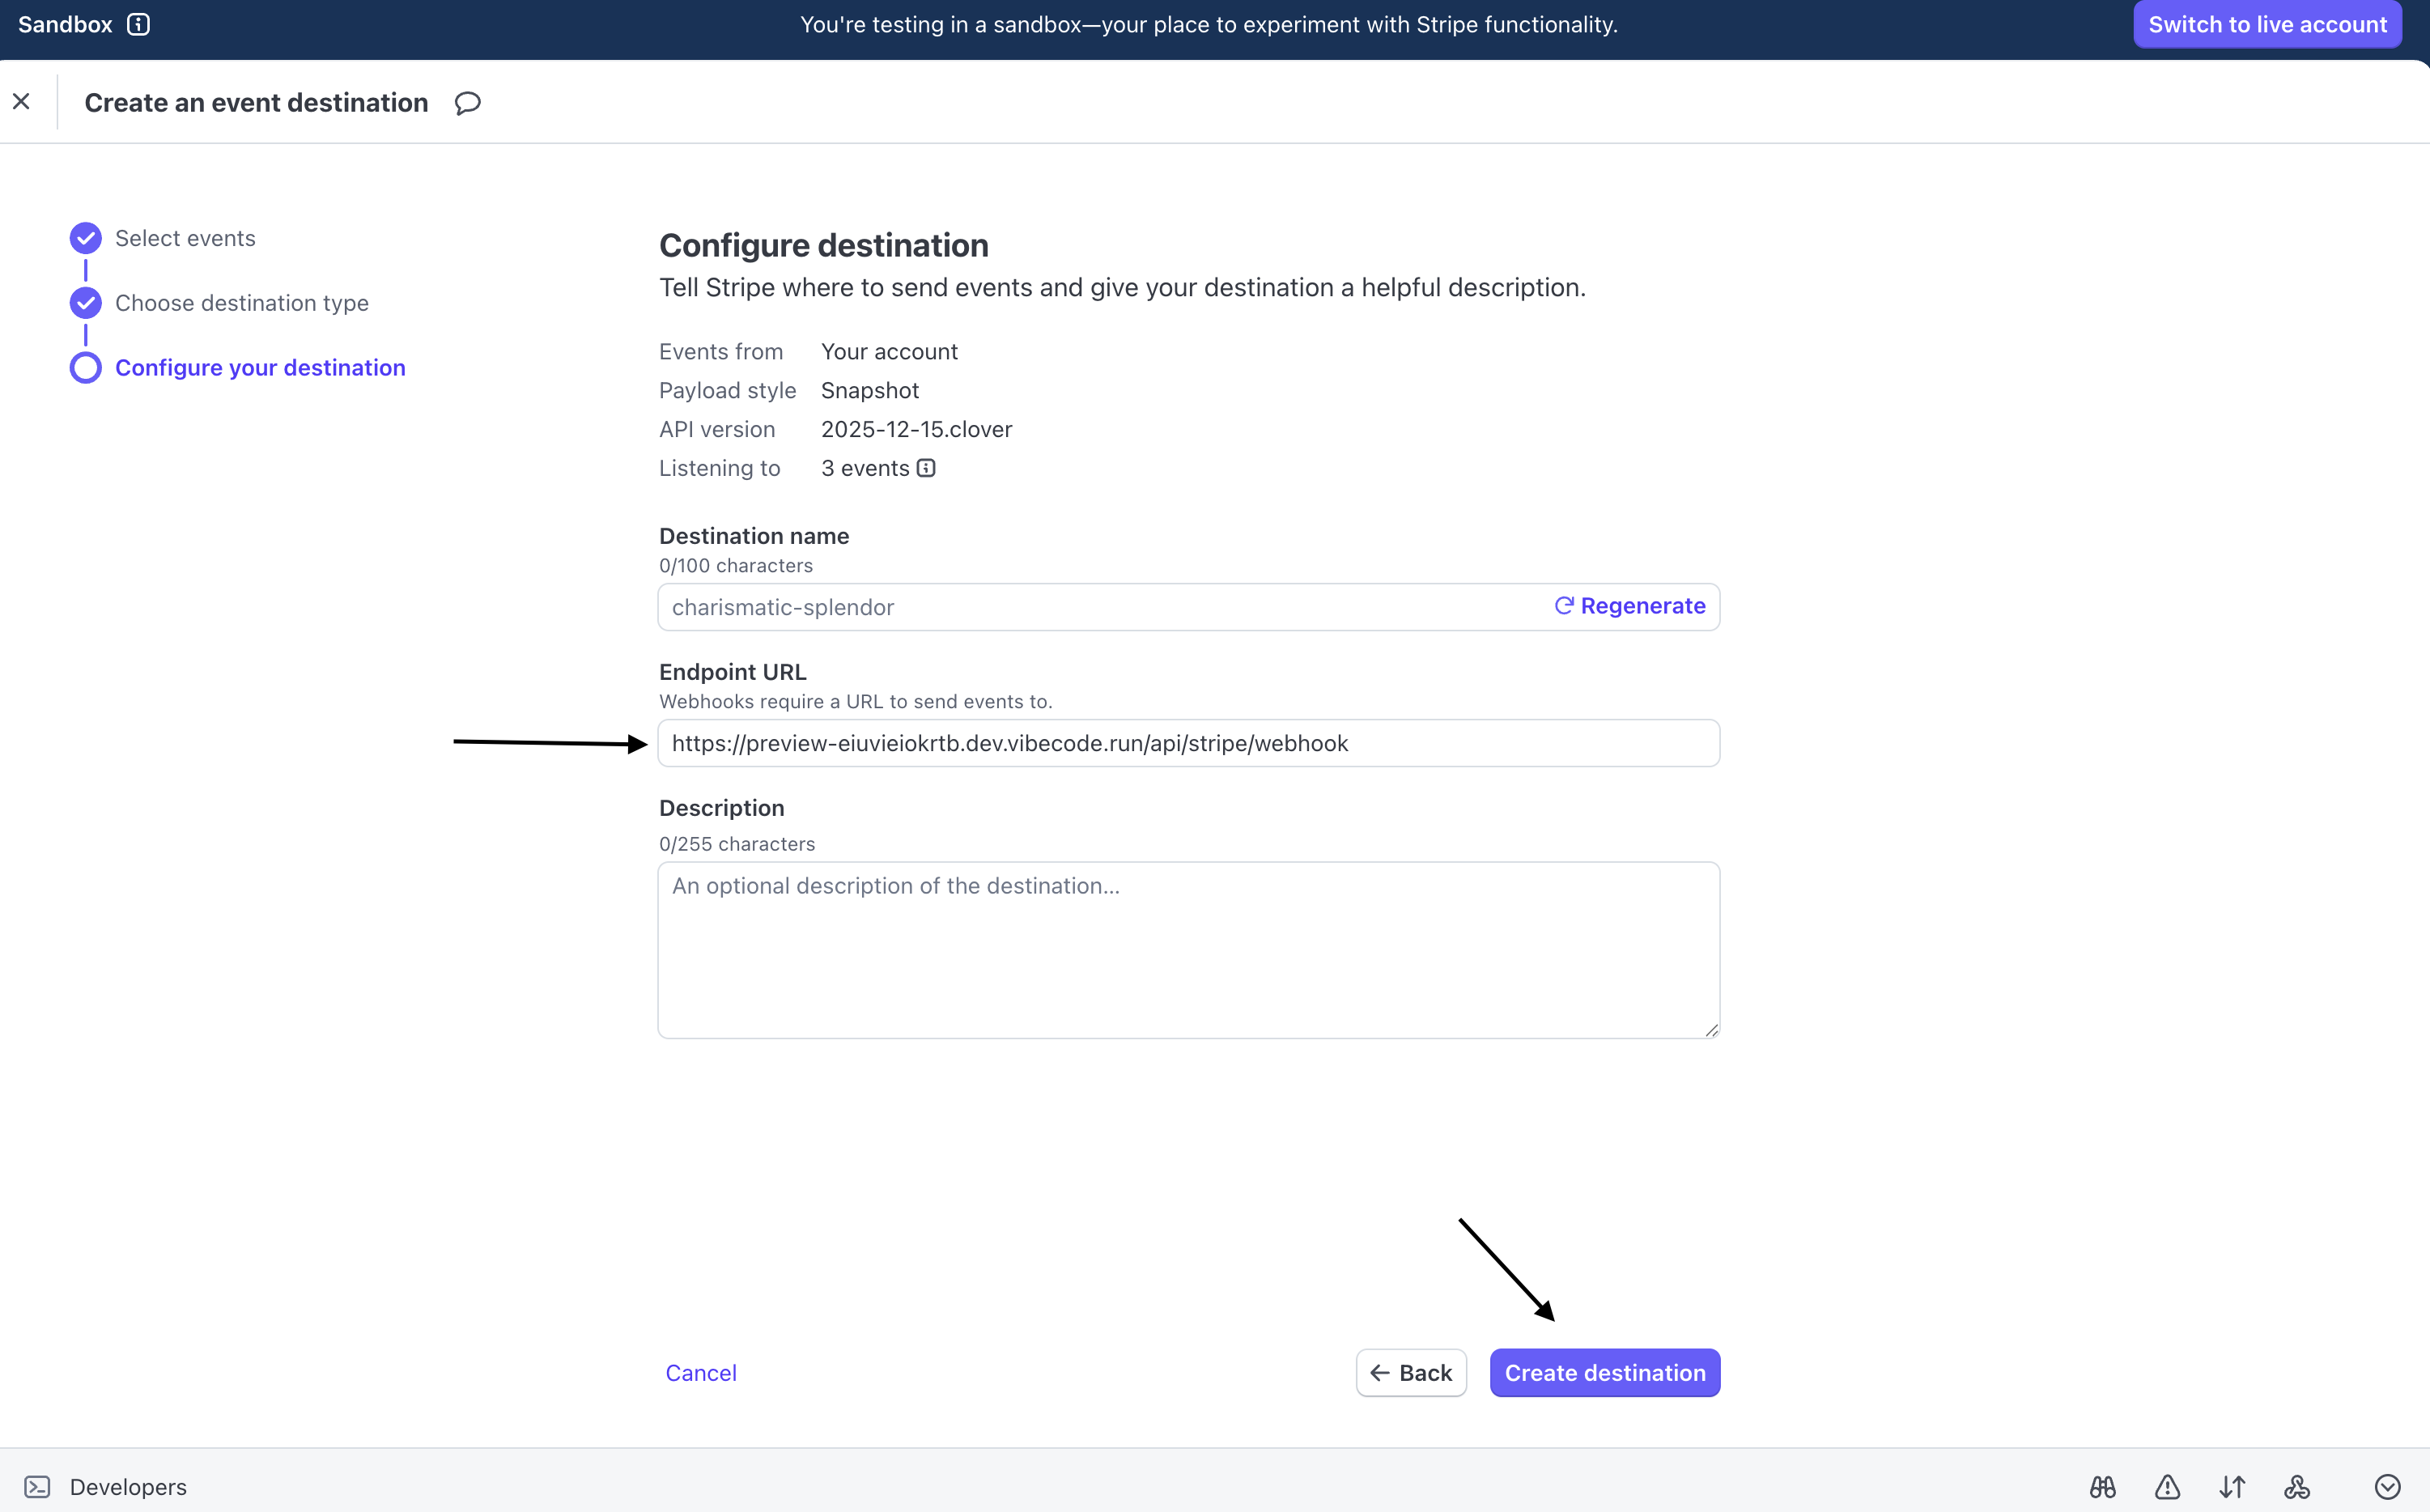
7. Enter your Vibecode webhook URL
8. Create the destination
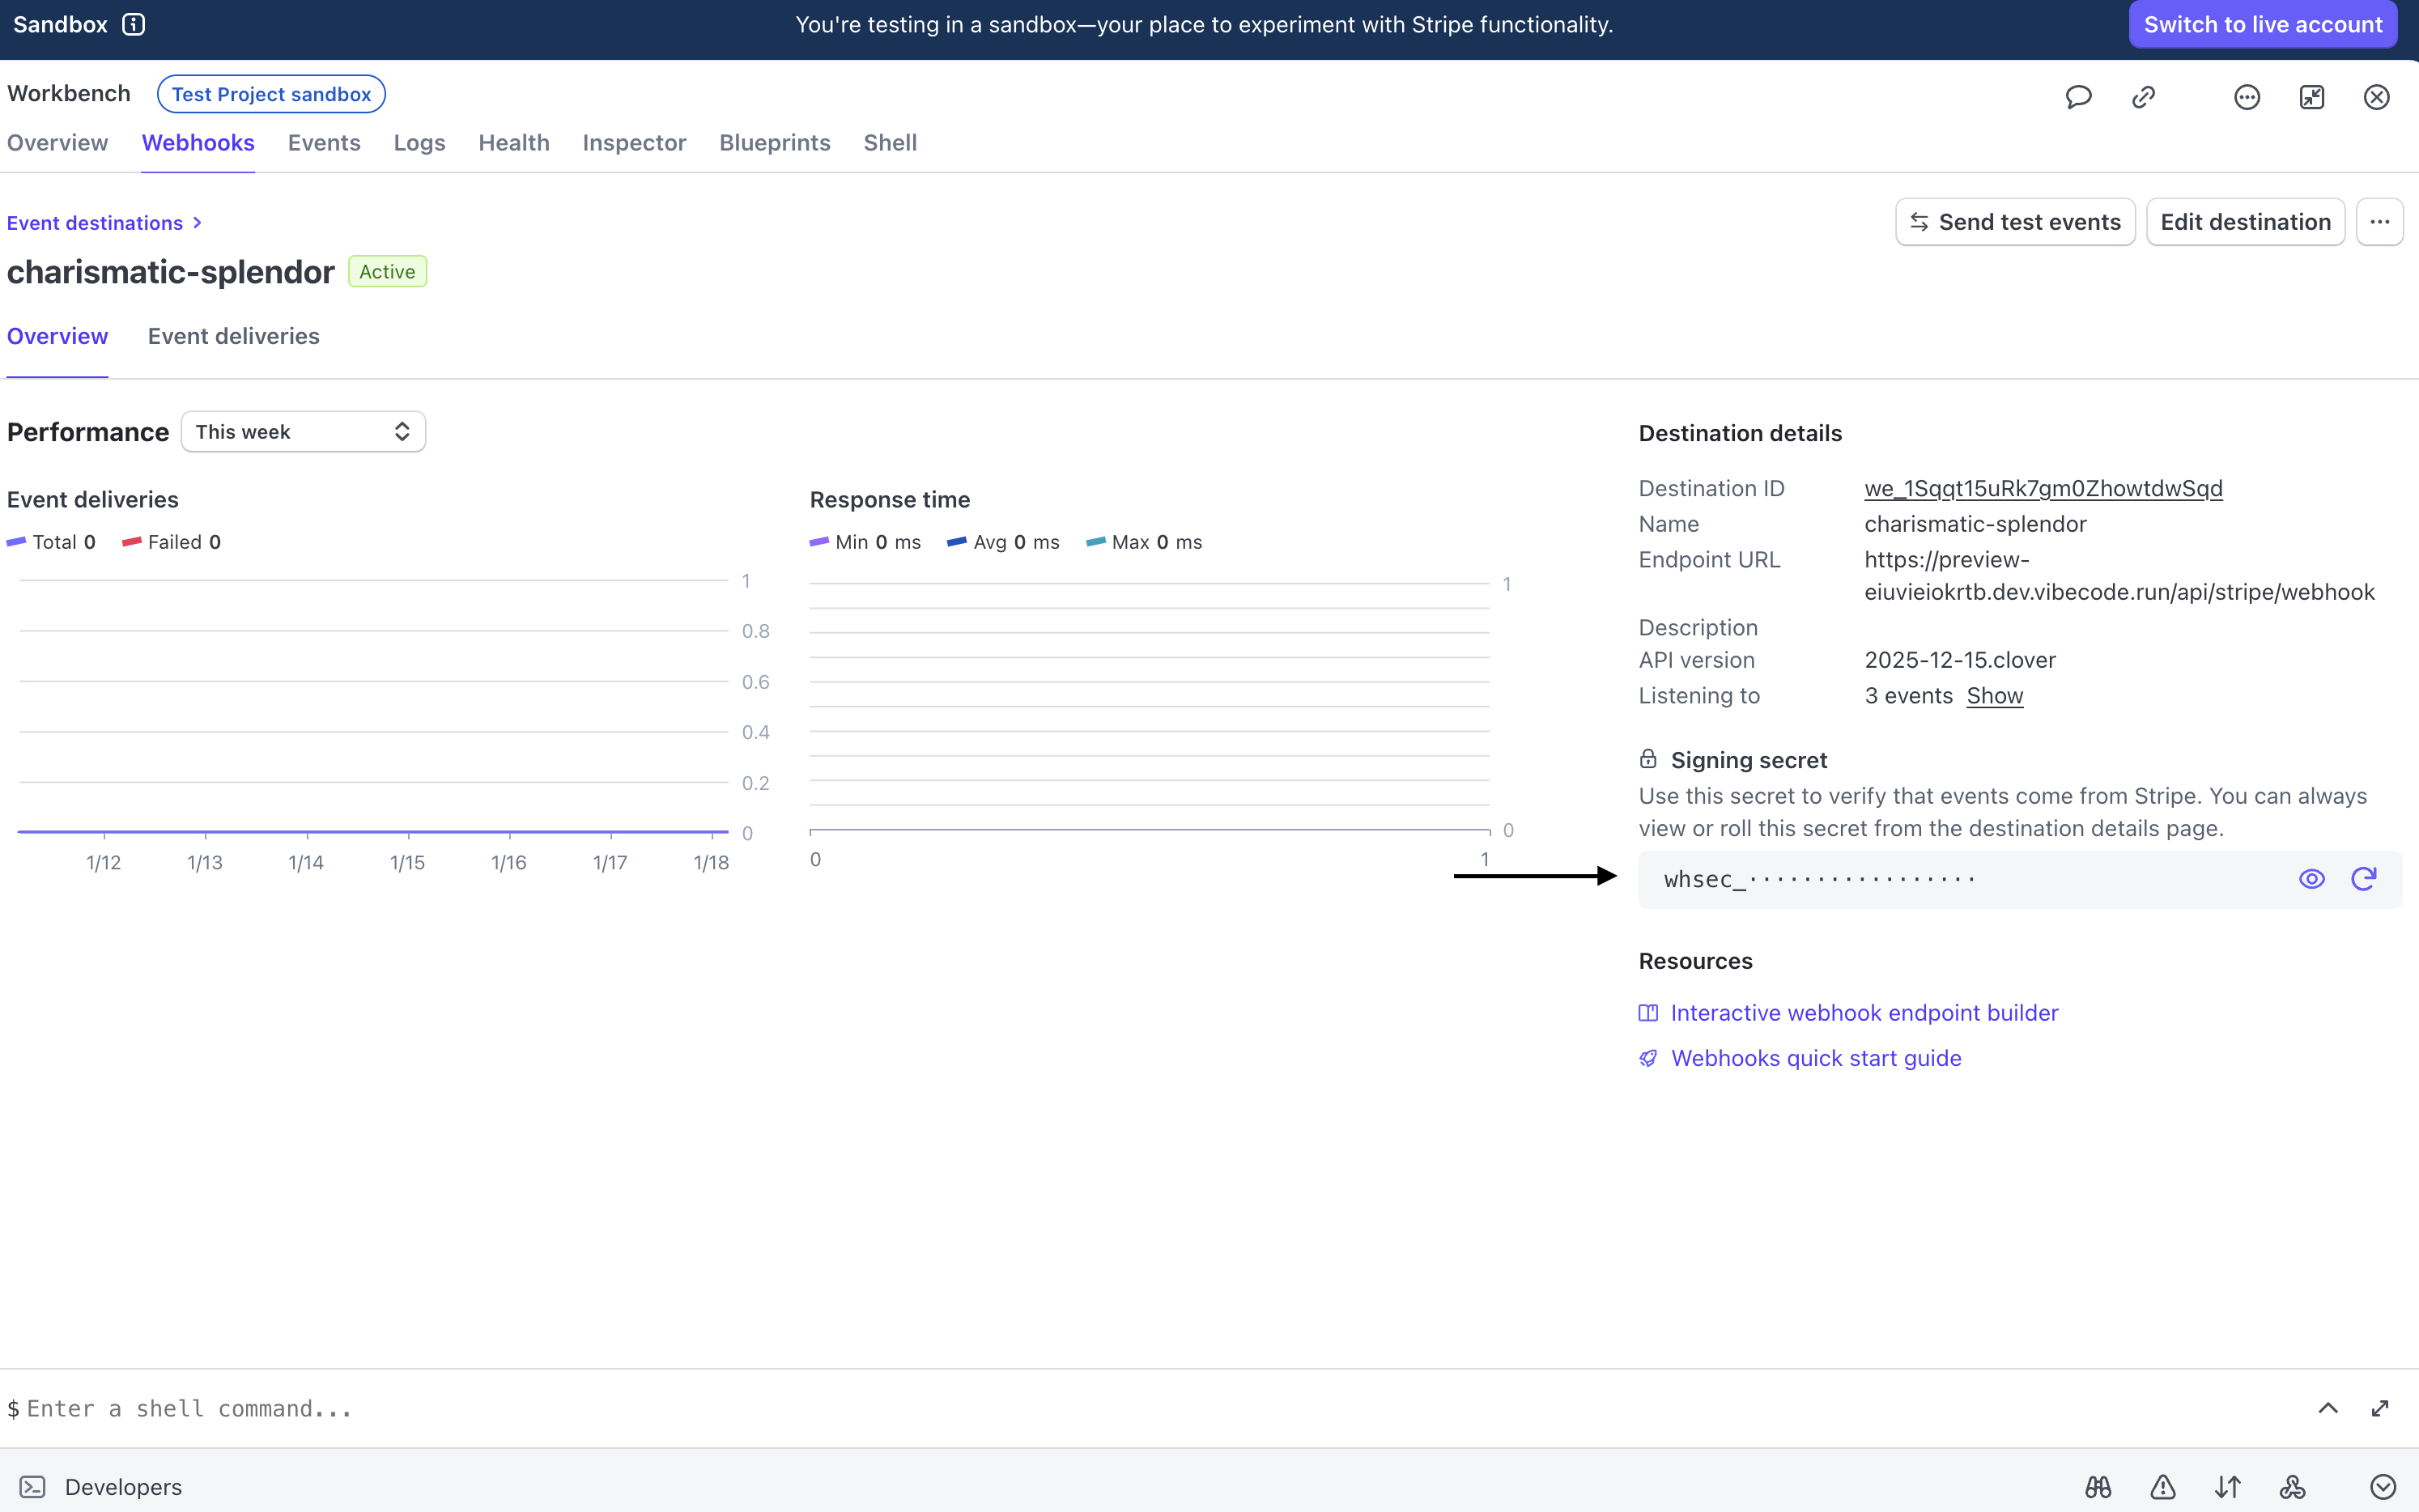
9. Copy the **Signing Secret**
If you offer yearly billing, repeat this using the key `STRIPE_PRICE_ID_YEARLY`.
***
## Step 6: Set Up Webhooks
Webhooks notify your app when something happens in Stripe.
### In Stripe Dashboard
1. Go to **Developers → Webhooks**
2. Click **Add destination**
3. Choose **Your account**
4. Select these events:
* `checkout.session.completed`
* `customer.subscription.updated`
* `customer.subscription.deleted`
5. Click **Continue**
6. Choose **Webhook endpoint**
7. Enter your Vibecode webhook URL
8. Create the destination
9. Copy the **Signing Secret**
 ### Add to Vibecode
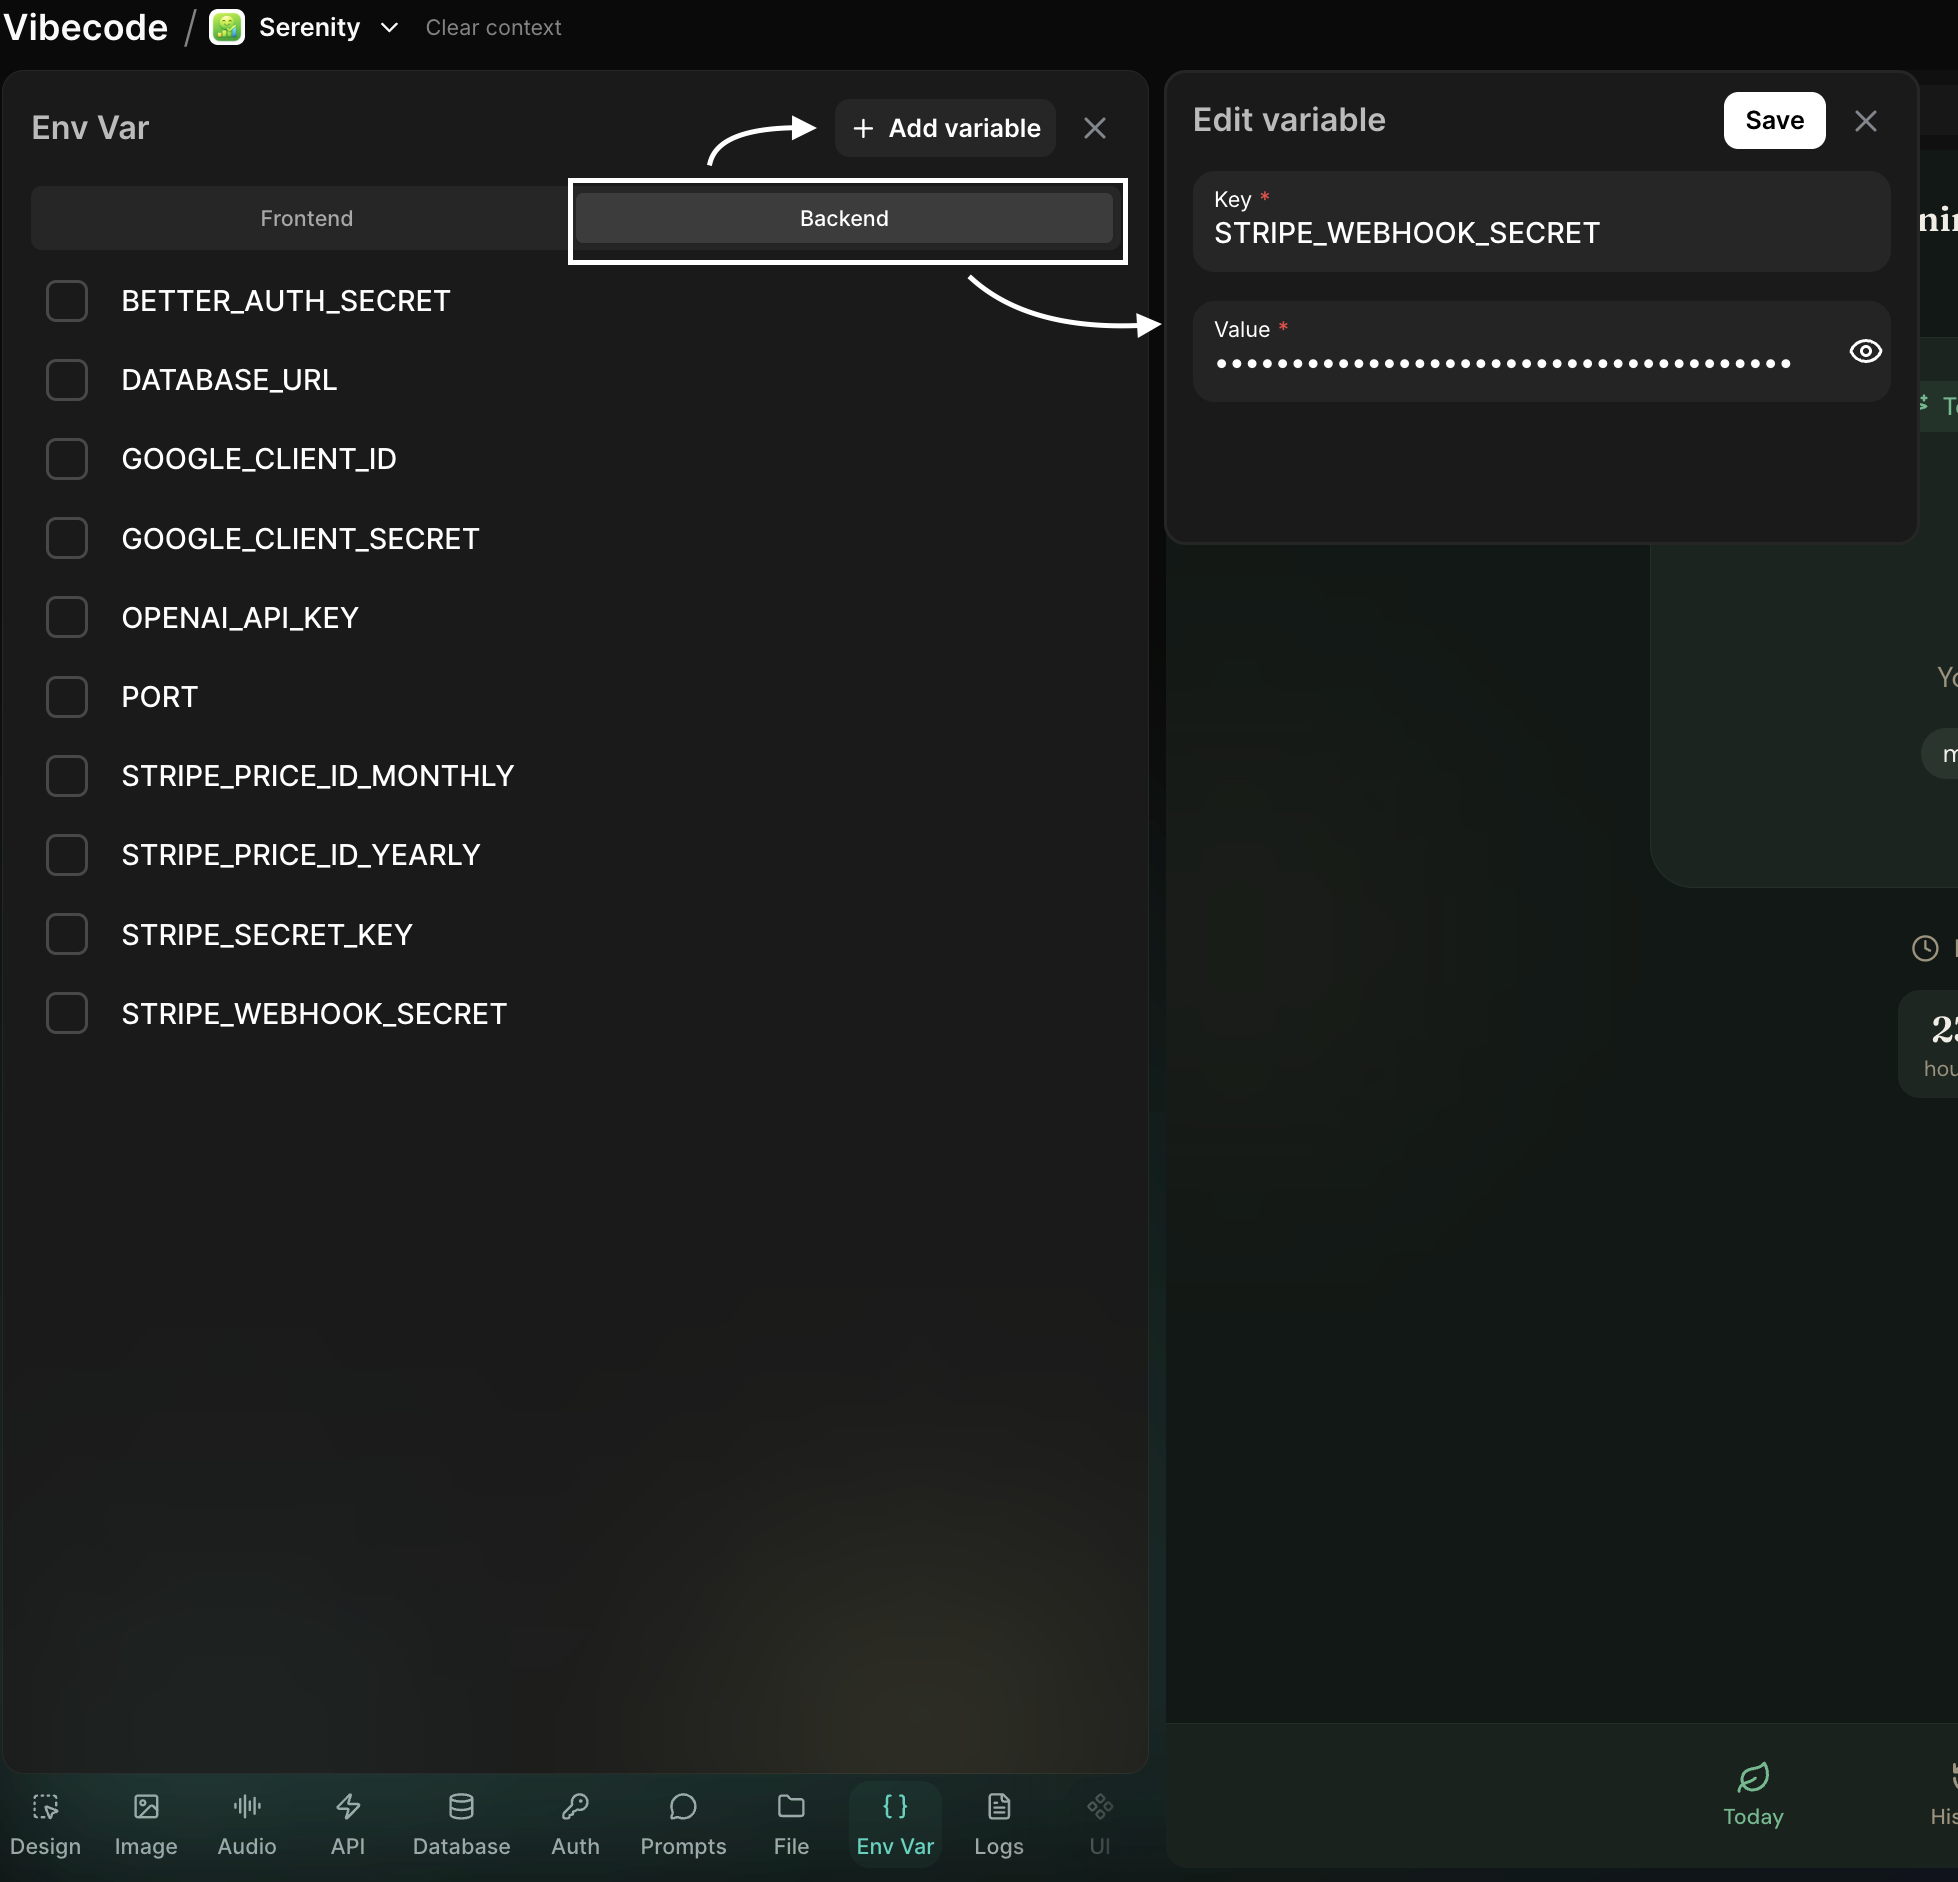
1. Go back to Vibecode
2. Open **Env Var → Backend**
3. Add:
* Key: `STRIPE_WEBHOOK_SECRET`
* Value: the secret you copied (`whsec_...`)
Never expose your webhook secret. Always verify signatures in your webhook handler.
***
## Step 7: Set Up Payments with AI
Ask the Vibecode AI to integrate Stripe into your web app:
**Example prompts:**
```text Checkout Session theme={null}
Add Stripe checkout to my web app
```
```text Subscription Page theme={null}
Create a subscription payment page with monthly and yearly options
```
```text One-Time Payment theme={null}
Add a one-time payment button for my premium feature
```
```text Customer Portal theme={null}
Set up a Stripe customer portal so users can manage their subscription
```
The AI will generate the checkout flow, webhook handler, and subscription management code for you.
***
## Environment Variable Summary
| Name | Location | Example |
| ----------------------------- | -------- | ------------- |
| `VITE_STRIPE_PUBLISHABLE_KEY` | Frontend | `pk_live_...` |
| `STRIPE_SECRET_KEY` | Backend | `sk_live_...` |
| `STRIPE_PRICE_ID_MONTHLY` | Backend | `price_...` |
| `STRIPE_PRICE_ID_YEARLY` | Backend | `price_...` |
| `STRIPE_WEBHOOK_SECRET` | Backend | `whsec_...` |
***
## Troubleshooting
### Cannot find API keys
* Make sure you are in the correct Stripe account
* Ensure Live mode is enabled
* Go to Developers → API keys
### Payments not working
* Verify you are using Live keys
* Check for typos in environment variables
* Make sure the Secret key is in Backend only
* Review Stripe logs
### Webhooks not firing
* Confirm your webhook endpoint URL
* Check that the correct events are selected
* Confirm the webhook secret is correct
* Review delivery logs in Stripe
### Subscription updates not appearing
* Check your webhook handler for `customer.subscription.updated`
* Verify your endpoint is receiving payloads
* Confirm your app logic updates subscription status correctly
***
Need help? Use Vibecode live support or visit Stripe's documentation at stripe.com/docs.
### Add to Vibecode
1. Go back to Vibecode
2. Open **Env Var → Backend**
3. Add:
* Key: `STRIPE_WEBHOOK_SECRET`
* Value: the secret you copied (`whsec_...`)
Never expose your webhook secret. Always verify signatures in your webhook handler.
***
## Step 7: Set Up Payments with AI
Ask the Vibecode AI to integrate Stripe into your web app:
**Example prompts:**
```text Checkout Session theme={null}
Add Stripe checkout to my web app
```
```text Subscription Page theme={null}
Create a subscription payment page with monthly and yearly options
```
```text One-Time Payment theme={null}
Add a one-time payment button for my premium feature
```
```text Customer Portal theme={null}
Set up a Stripe customer portal so users can manage their subscription
```
The AI will generate the checkout flow, webhook handler, and subscription management code for you.
***
## Environment Variable Summary
| Name | Location | Example |
| ----------------------------- | -------- | ------------- |
| `VITE_STRIPE_PUBLISHABLE_KEY` | Frontend | `pk_live_...` |
| `STRIPE_SECRET_KEY` | Backend | `sk_live_...` |
| `STRIPE_PRICE_ID_MONTHLY` | Backend | `price_...` |
| `STRIPE_PRICE_ID_YEARLY` | Backend | `price_...` |
| `STRIPE_WEBHOOK_SECRET` | Backend | `whsec_...` |
***
## Troubleshooting
### Cannot find API keys
* Make sure you are in the correct Stripe account
* Ensure Live mode is enabled
* Go to Developers → API keys
### Payments not working
* Verify you are using Live keys
* Check for typos in environment variables
* Make sure the Secret key is in Backend only
* Review Stripe logs
### Webhooks not firing
* Confirm your webhook endpoint URL
* Check that the correct events are selected
* Confirm the webhook secret is correct
* Review delivery logs in Stripe
### Subscription updates not appearing
* Check your webhook handler for `customer.subscription.updated`
* Verify your endpoint is receiving payloads
* Confirm your app logic updates subscription status correctly
***
Need help? Use Vibecode live support or visit Stripe's documentation at stripe.com/docs.