> ## Documentation Index
> Fetch the complete documentation index at: https://www.vibecodeapp.com/docs/llms.txt
> Use this file to discover all available pages before exploring further.
# RevenueCat Setup
> Add in-app purchases and subscriptions to your Vibecode app with RevenueCat
Ready to monetize your app? Vibecode integrates with [RevenueCat](https://www.revenuecat.com/) to handle in-app purchases and subscriptions. This guide walks you through the complete setup process.
## Before You Start
You'll need the following:
* [**Vibecode Pro Plan**](/getting-started/plans-and-credits) (upgrade in your account settings if needed)
* [**RevenueCat Account**](https://www.revenuecat.com/) (sign up for free)
* [**Apple Developer Program Membership**](https://developer.apple.com/programs/) (\$99/year)
## Step 1: Connect Your RevenueCat Account
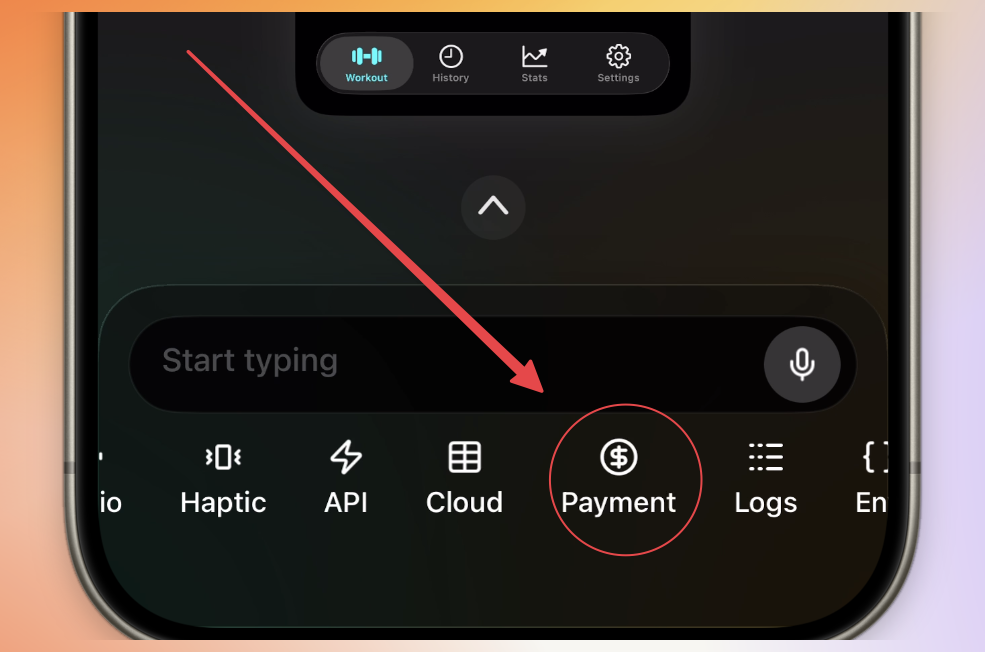
1. Open your project in Vibecode
2. Click the **Payments** tab
3. Click **Connect RevenueCat**
4. Sign into your RevenueCat account in the popup
5. Authorize Vibecode to access your account
6. You'll be redirected back automatically
If the popup is blocked, check your browser's popup settings and try again.
## Step 2: Configure Your App Identity
After connecting, you'll set up your app identity:
1. **Display Name** - Your app's name as it appears on the home screen
2. **Bundle Identifier** - A unique identifier for your app (Vibecode auto-generates one)
Your Bundle Identifier cannot be changed after your first build. Choose carefully!
Click **Continue** to complete the setup.
## Step 3: Configure RevenueCat Credentials
This step is critical! Without these credentials, your in-app purchases will not work.
For RevenueCat to communicate with App Store Connect, you need to set up two API keys in your RevenueCat dashboard:
### App Store Connect API Key
1. Go to [App Store Connect](https://appstoreconnect.apple.com/) → **Users and Access** → **Integrations** → **App Store Connect API**
2. Click **Generate API Key** with "App Manager" access level
3. Download the `.p8` file (you can only download this once!)
4. Note your **Issuer ID** from this page
5. In RevenueCat, go to your app's settings and upload the `.p8` file
6. Enter your Issuer ID and Vendor number (found in App Store Connect under **Payments and Financial Reports**)
Full Guide
### In-App Purchase Key
1. Go to [App Store Connect](https://appstoreconnect.apple.com/) → **Users and Access** → **Integrations** → **In-App Purchase**
2. Click **Generate In-App Purchase Key**
3. Download the `.p8` file (you can only download this once!)
4. In RevenueCat, upload this key in the **In-app purchase key configuration** section
5. Add your Issuer ID and save
In-App Purchase Key Configuration
The In-App Purchase key is required. Without it, transactions will fail to be recorded when using StoreKit 2.
## Step 4: Create Your Product with AI
Ask the Vibecode AI to create your subscription or in-app purchase product:
**Example prompts:**
```text Monthly Subscription theme={null}
Create a monthly premium subscription for $4.99
```
```text Yearly with Trial theme={null}
Add a yearly subscription with a 7-day free trial
```
```text One-Time Purchase theme={null}
Create a one-time purchase to remove ads for $2.99
```
The AI will create the product in RevenueCat for you.
## Step 5: Create a Paywall
Ask the AI to create a paywall screen for your app:
**Example prompts:**
```text Basic Paywall theme={null}
Create a paywall screen showing my subscription options
```
```text Premium Upgrade theme={null}
Add a premium upgrade screen with monthly and yearly options
```
```text Feature Gate theme={null}
Show a paywall when users try to access pro features
```
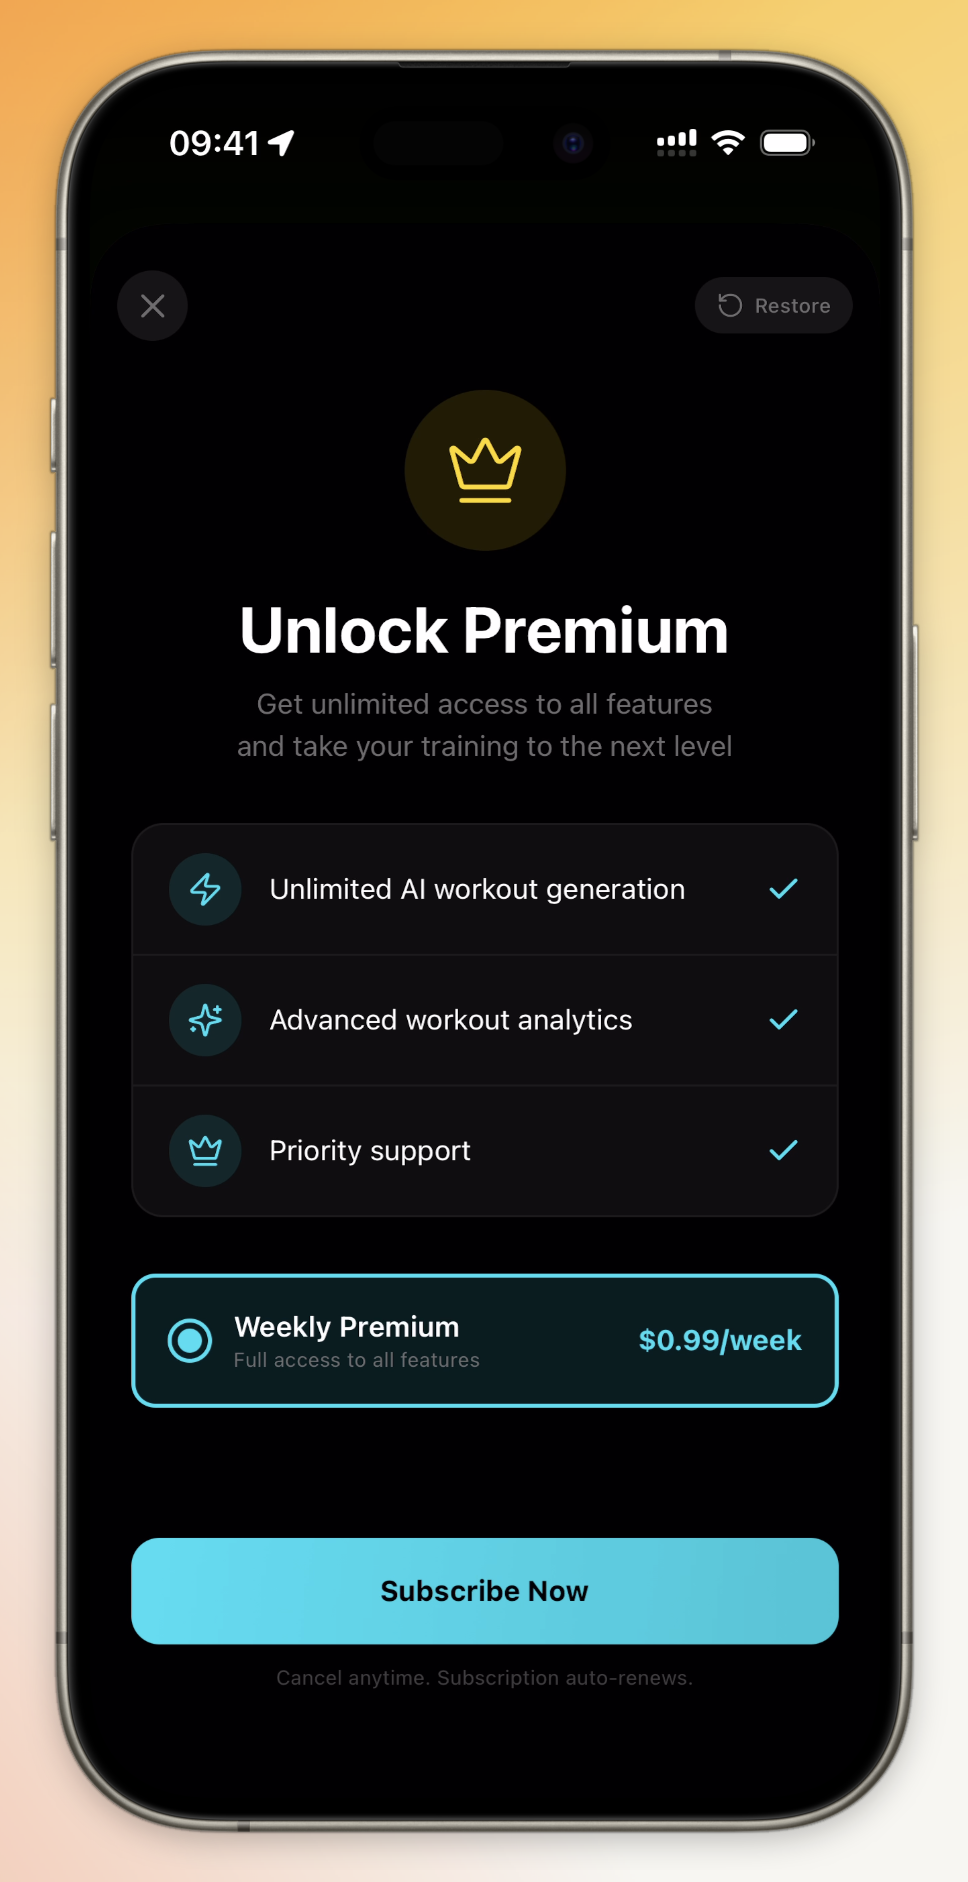
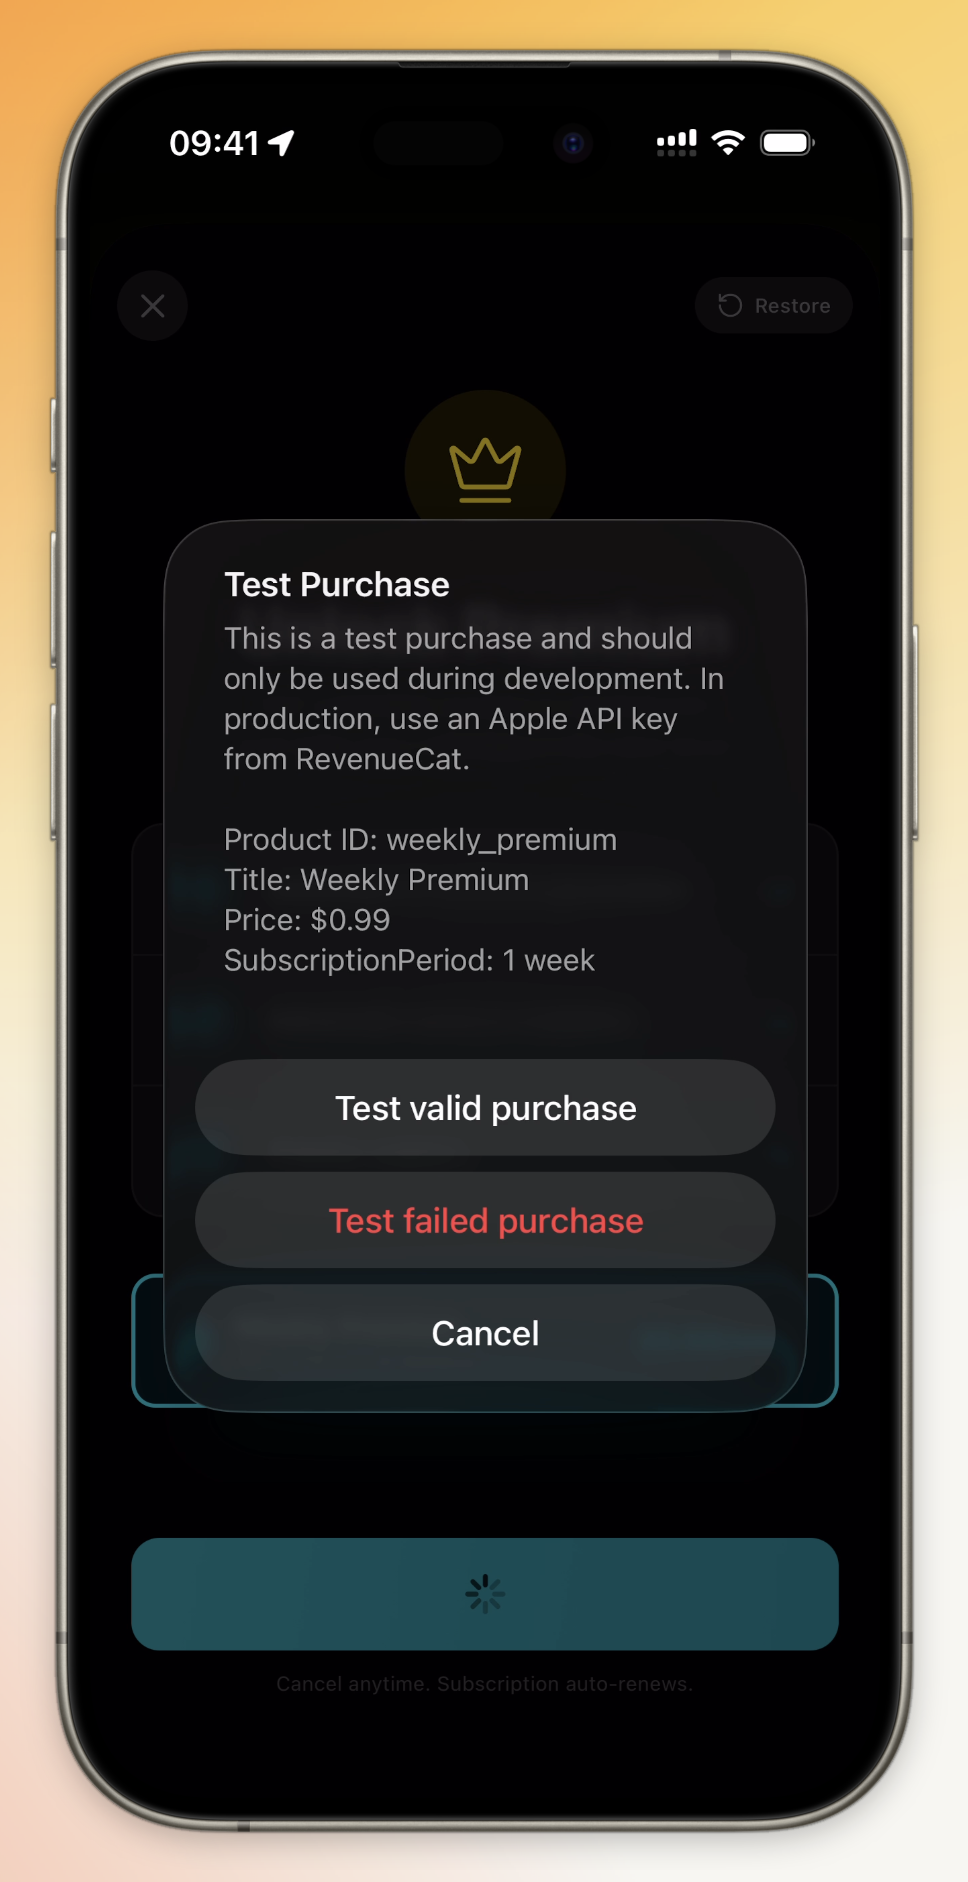
## Step 6: Test in Vibecode
Before publishing, test your paywall inside Vibecode:
1. Preview your app
2. Navigate to where the paywall appears
3. Verify the products display correctly
4. Test the purchase flow
## Step 7: Sync Product with App Store Connect
This step creates your product in App Store Connect. You must complete this before your app can accept real payments.
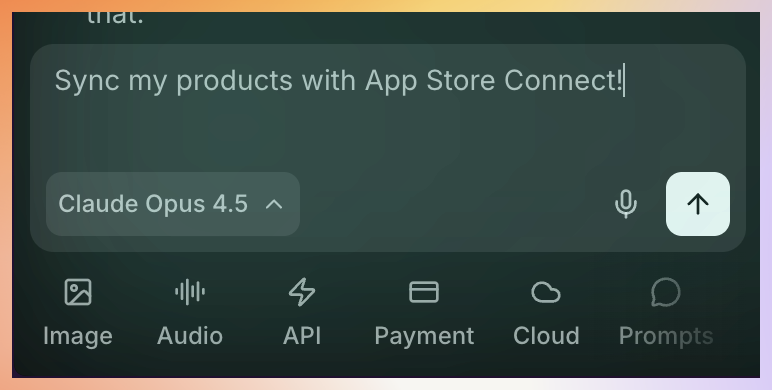
Tell the AI to sync your product with App Store Connect:
**Example prompts:**
```text Sync Products theme={null}
Sync my RevenueCat products with App Store Connect
```
```text Publish Subscription theme={null}
Publish my subscription to App Store Connect
```
This creates the corresponding product in your App Store Connect account.
## Step 8: Complete Product Setup in App Store Connect
Your product was created but needs additional metadata before it can go live:
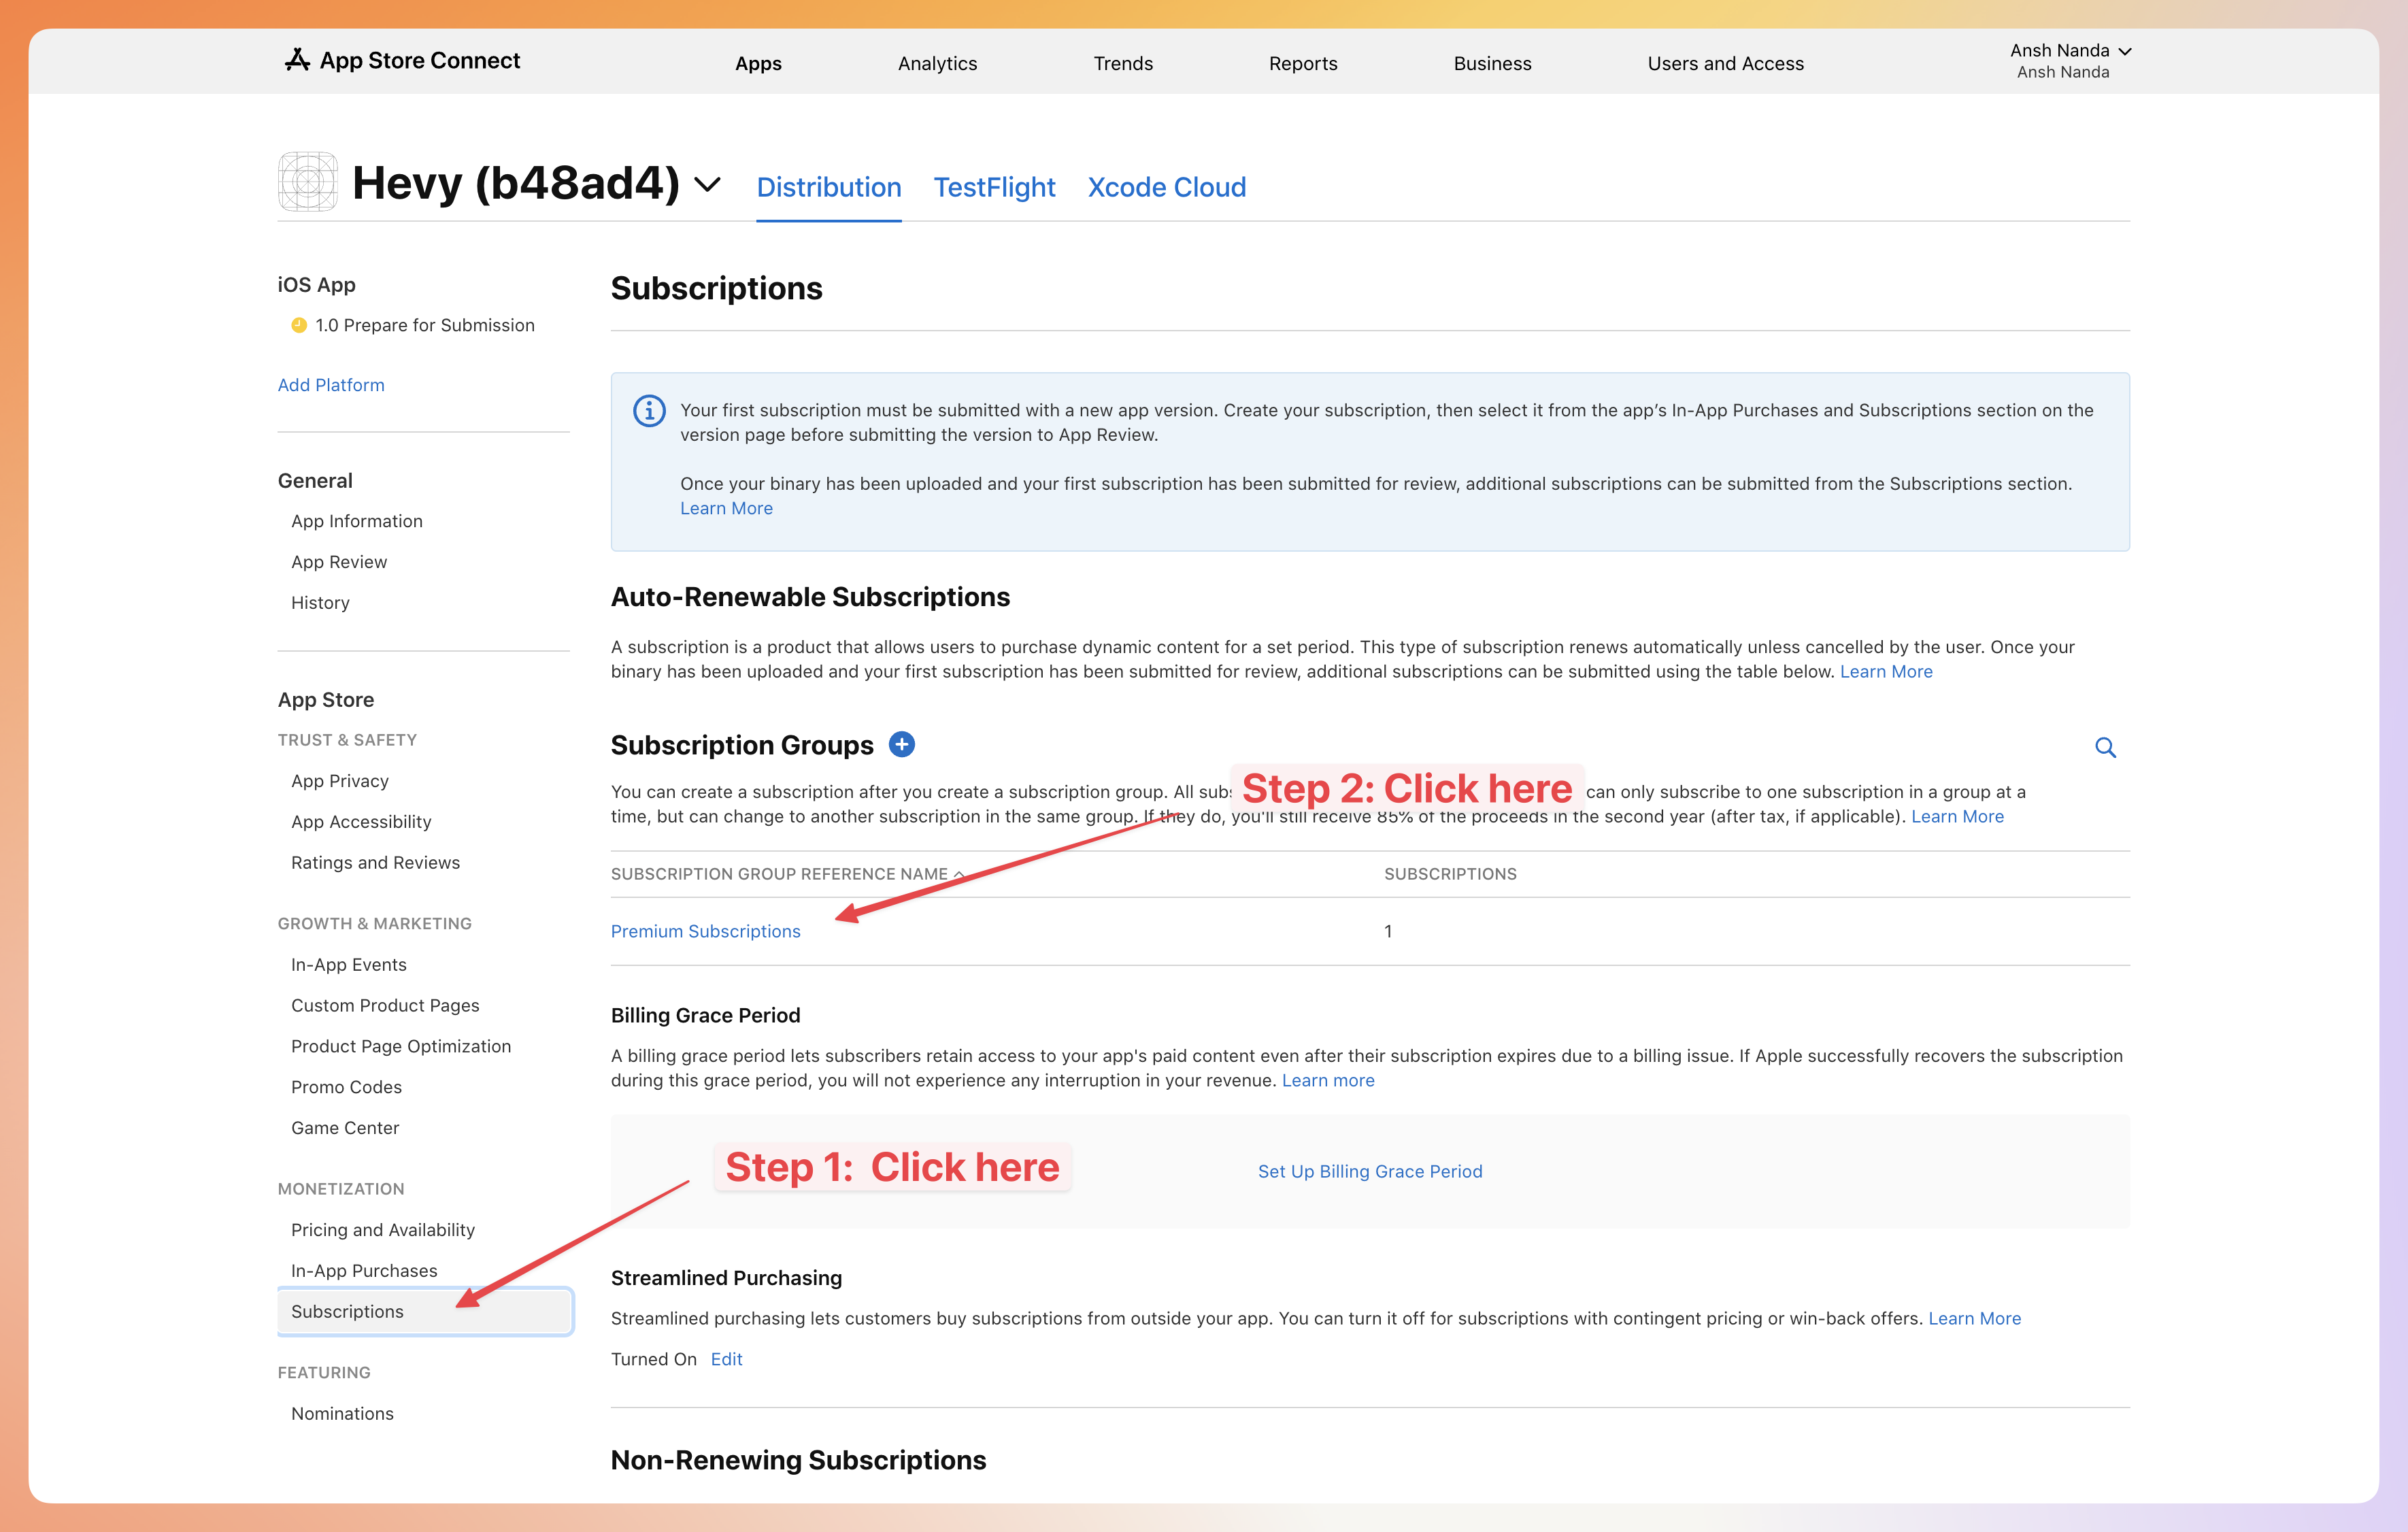
1. Go to [App Store Connect](https://appstoreconnect.apple.com/)
2. Click on your app in the bottom left
3. Navigate to **Monetization** → **Subscriptions** (or **In-App Purchases**)
4. Click on the subscription group that was created
5. Select your product
### Add Required Metadata
For each product, you need to add:
* **Display Name** - What users see during purchase
* **Description** - Explain what the subscription includes
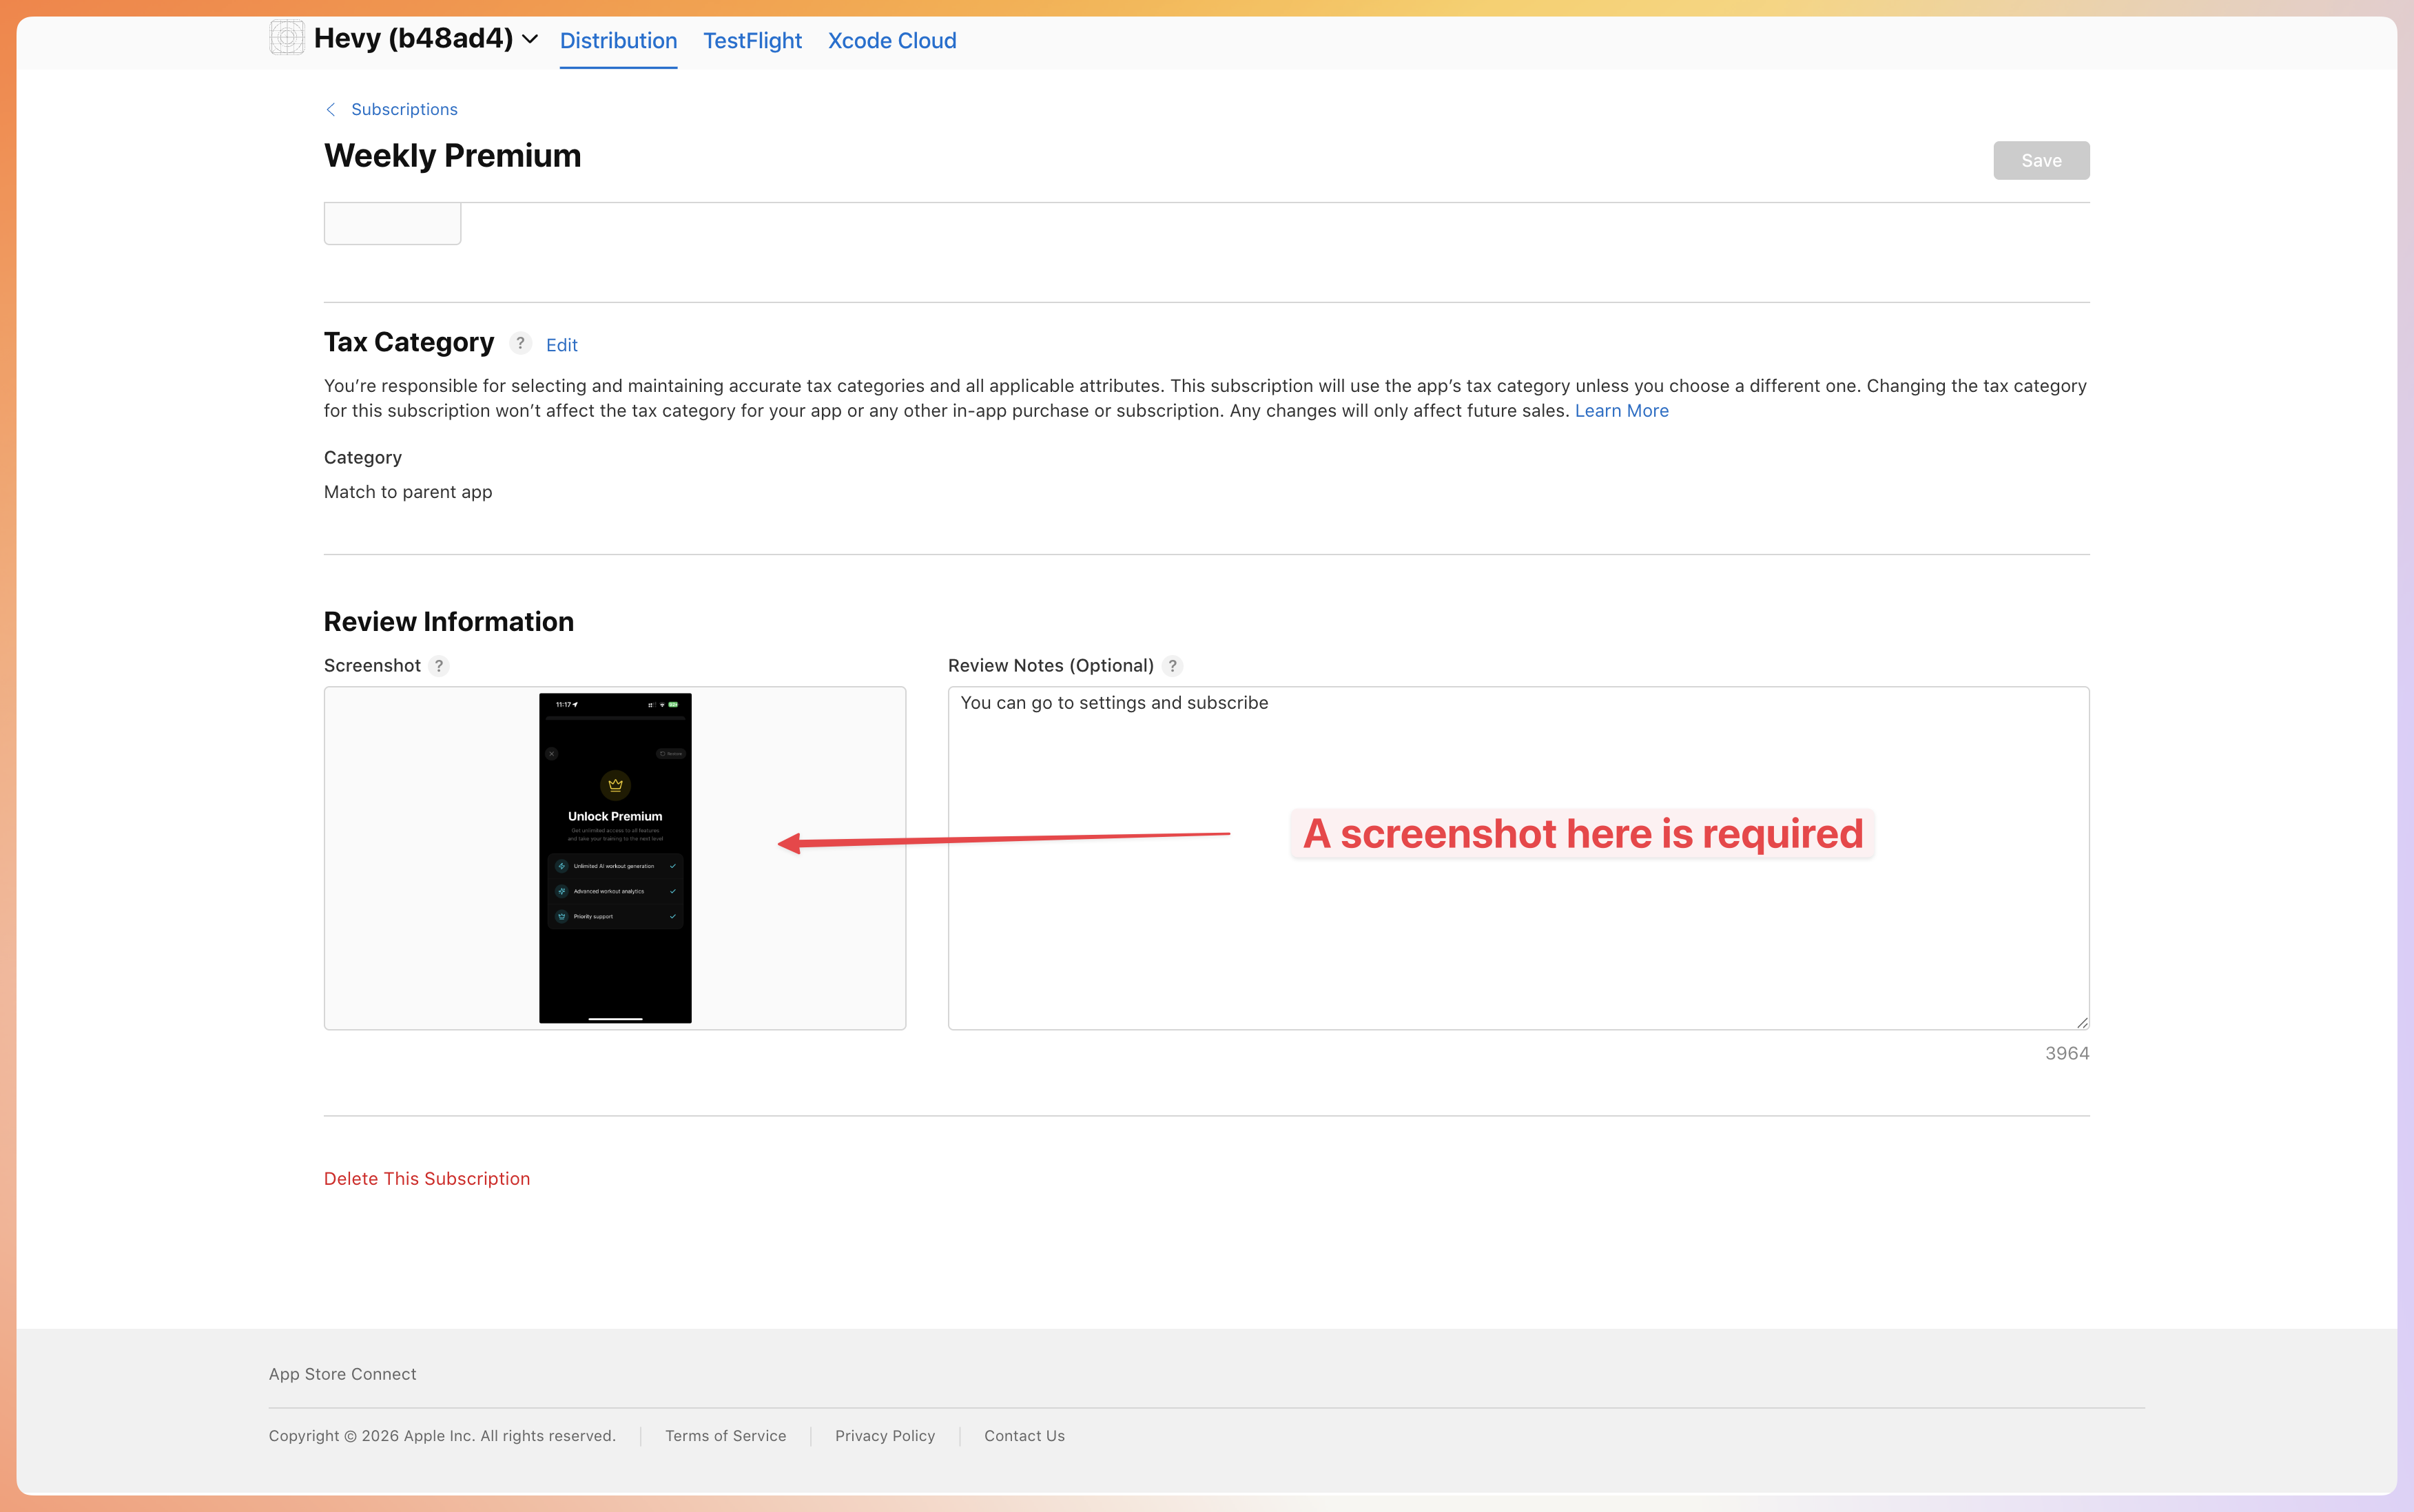
* **Screenshot** - A screenshot showing your subscription in action
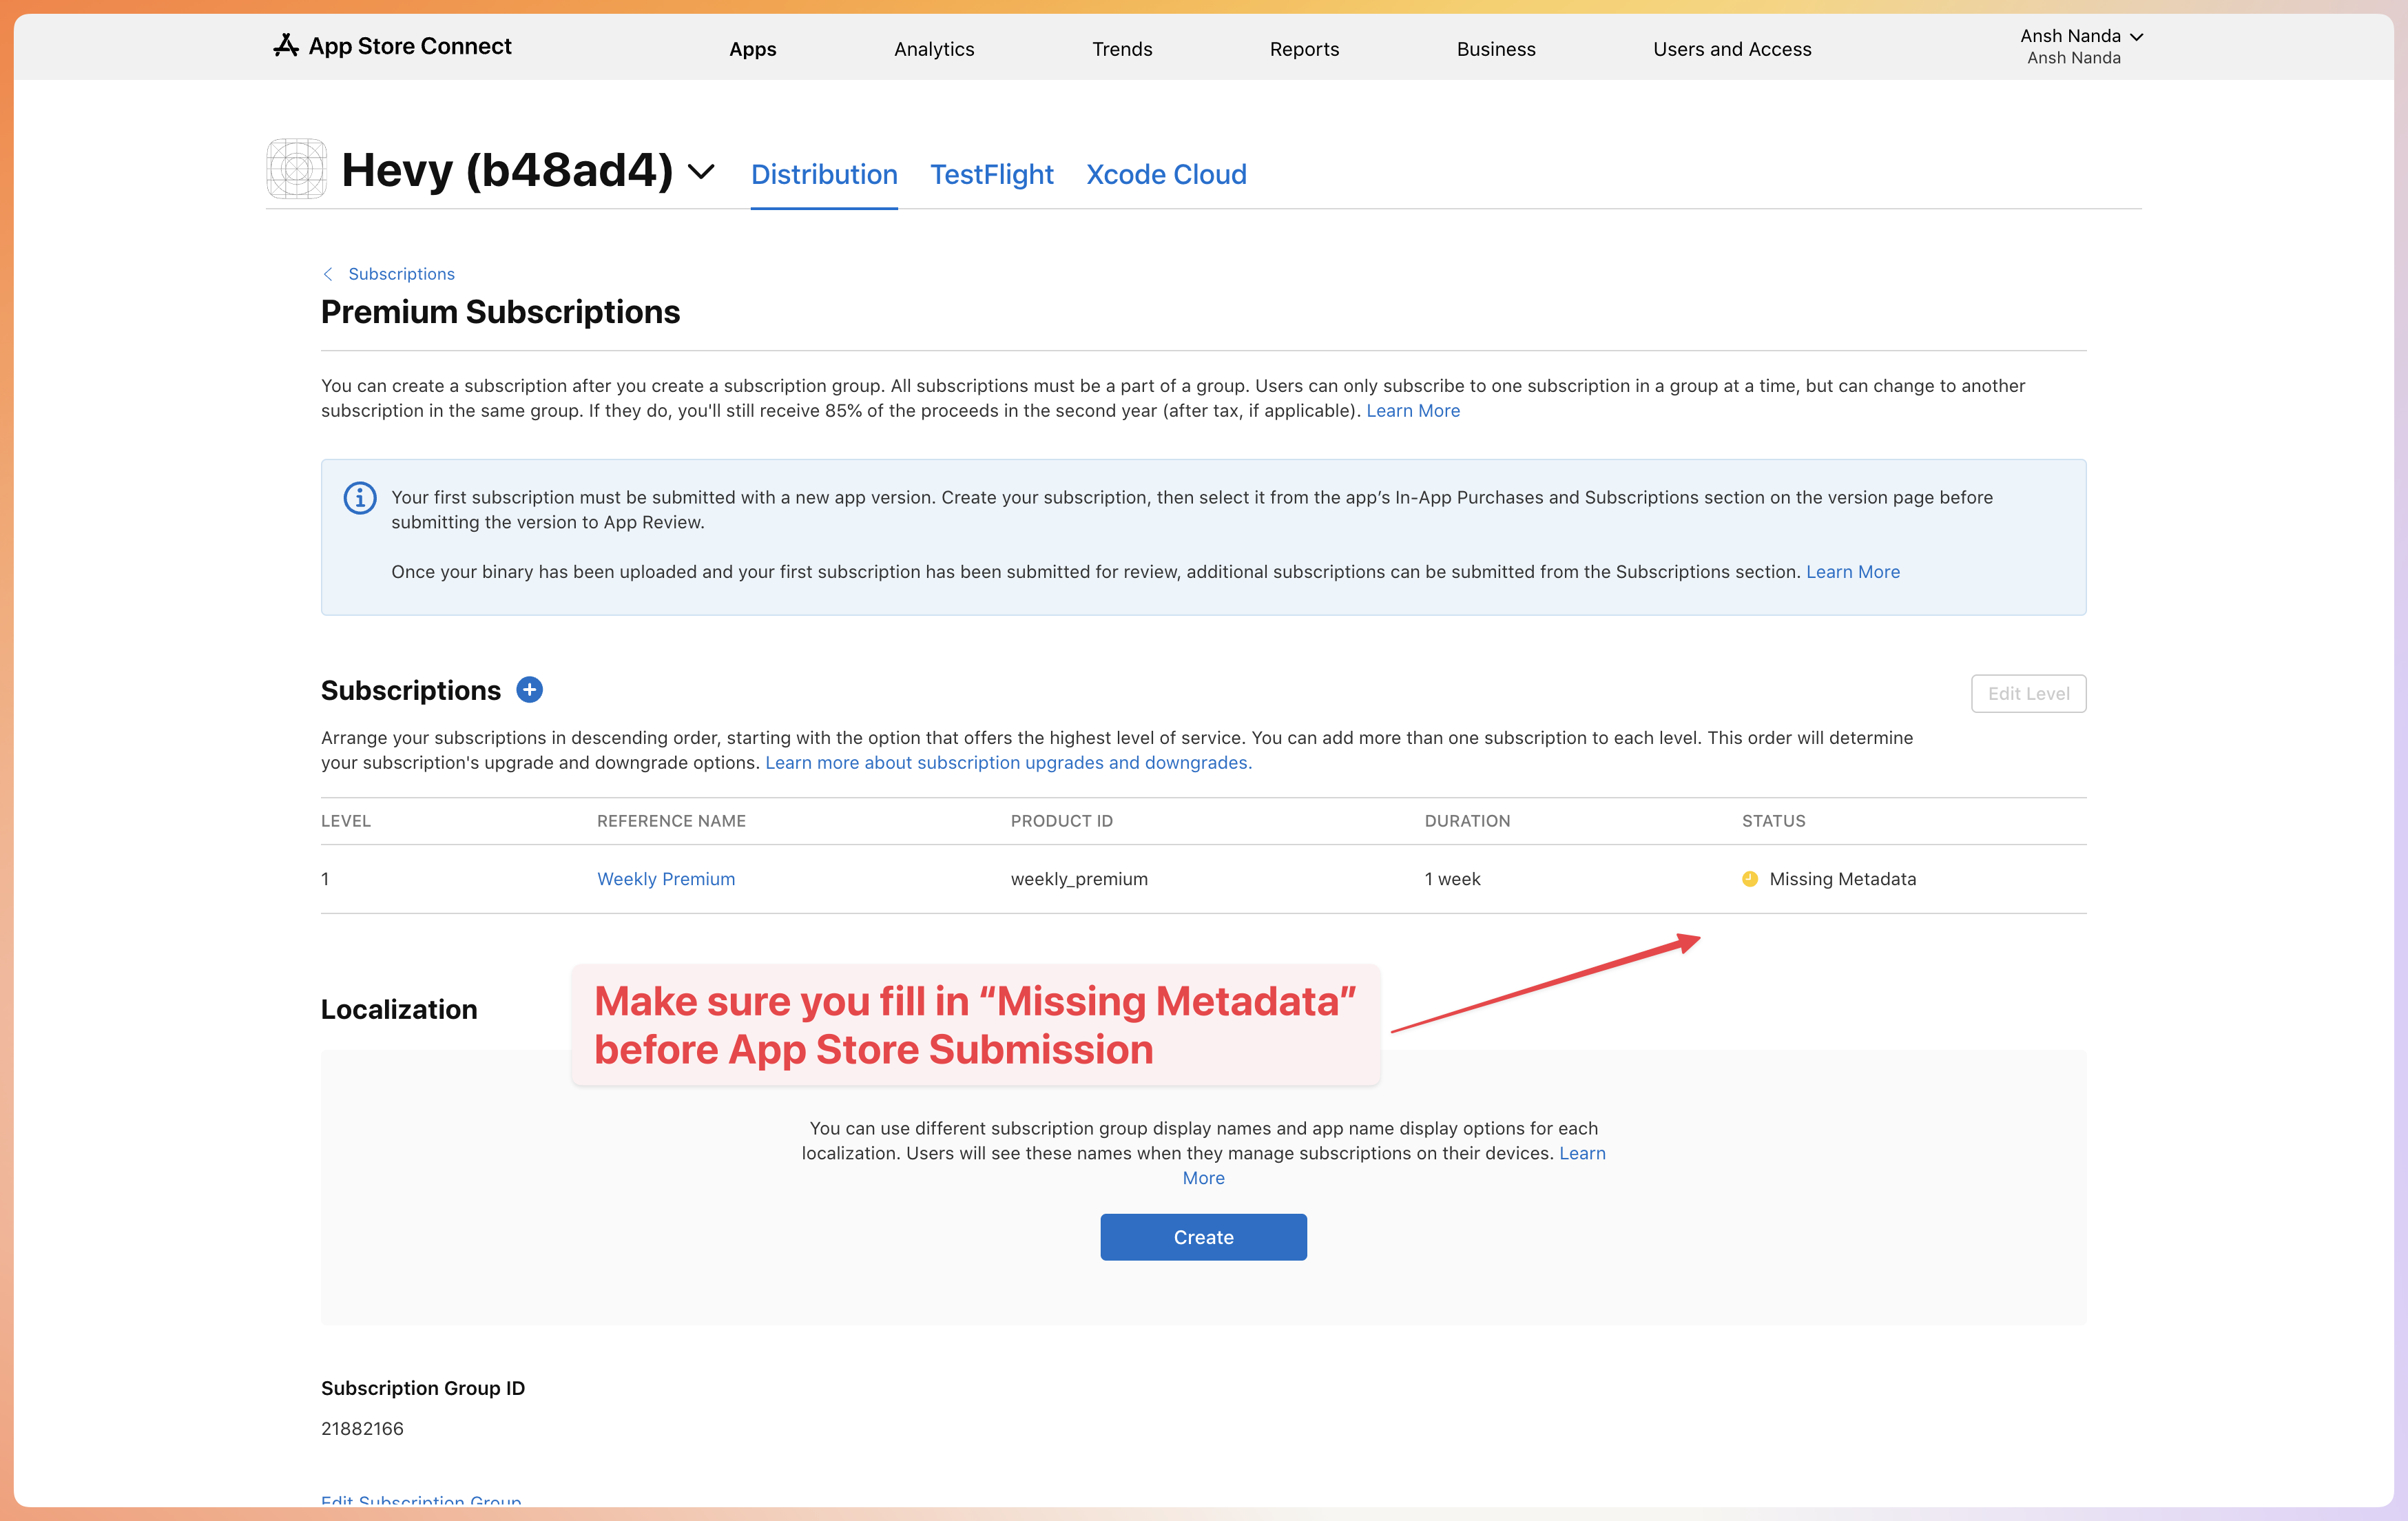
Your product will show "Missing Metadata" status until you add all required information including the screenshot.
Once all metadata is complete, the status will change and your product is ready for submission.
## Troubleshooting
There are many common issues that can prevent your products from working correctly. Please go through all of them and make sure they do not impact you.
**Can't connect to RevenueCat?**
* Check that popups aren't blocked in your browser
* Try refreshing the page and connecting again
* Ensure you're signed into your RevenueCat account
**Products not showing up?**
* Click **Refresh** in the Payment Dashboard
* Verify products are created in both App Store Connect and RevenueCat
* Check that products are linked to the correct app in RevenueCat
**Product shows "Missing Metadata"?**
* Go to App Store Connect and add all required fields
* Make sure to upload a screenshot for the product
* Save your changes and the status will update
**Purchases failing in testing?**
* Ensure you're using a valid Sandbox Tester account
* Sign out of your regular Apple ID first
* Check that your app's bundle ID matches App Store Connect
**Products not appearing in TestFlight?**
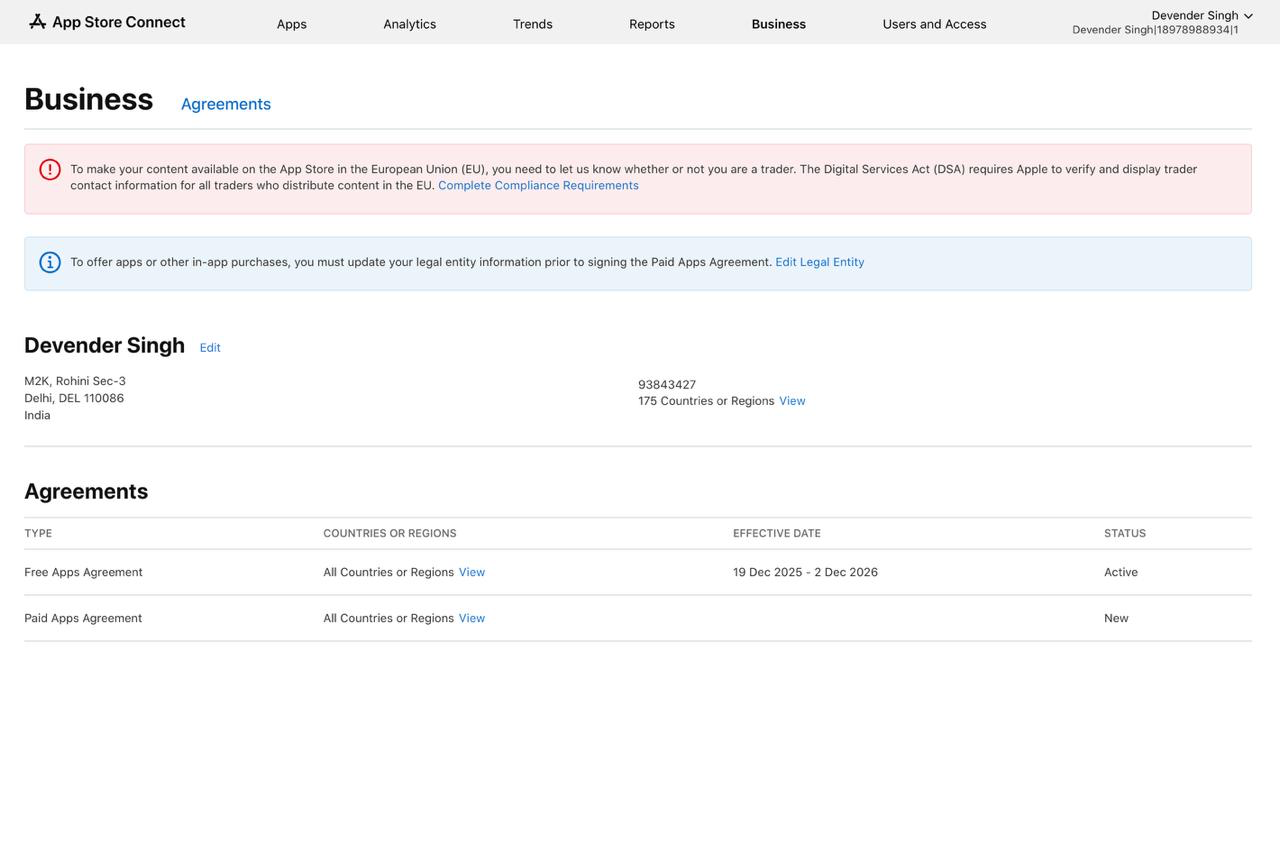
When subscriptions or in-app purchase products don't appear in TestFlight, it's usually due to an incomplete setup in App Store Connect—missing legal entity information and incomplete agreements or tax information.
To fix this:
* Go to [App Store Connect](https://appstoreconnect.apple.com/) → **Business** → **Agreements**
* Ensure your **Paid Apps Agreement** is active (not "New")
* Complete any pending legal entity information
* Fill out all required tax and banking information
* Make sure to also fill out all the metadata for your products in App Store Connect. You can do this by going to App -> Subscriptions -> Your Subscription -> Edit -> Metadata.
**Pending agreements blocking purchases?**
If you see a yellow warning banner in App Store Connect about updated agreements, you must clear all pending agreements before RevenueCat can process purchases.
To fix this:
* The **Account Holder** (not just any team member) must sign in to App Store Connect
* Review and accept any updated license agreements shown in the yellow banner
* Check **Business** → **Agreements** for any other pending agreements
* Once all agreements are accepted, the yellow warning will disappear and purchases will work
 3. Click **Connect RevenueCat**
4. Sign into your RevenueCat account in the popup
5. Authorize Vibecode to access your account
6. You'll be redirected back automatically
3. Click **Connect RevenueCat**
4. Sign into your RevenueCat account in the popup
5. Authorize Vibecode to access your account
6. You'll be redirected back automatically
 ## Step 6: Test in Vibecode
Before publishing, test your paywall inside Vibecode:
1. Preview your app
2. Navigate to where the paywall appears
3. Verify the products display correctly
4. Test the purchase flow
## Step 6: Test in Vibecode
Before publishing, test your paywall inside Vibecode:
1. Preview your app
2. Navigate to where the paywall appears
3. Verify the products display correctly
4. Test the purchase flow
 ## Step 7: Sync Product with App Store Connect
 This creates the corresponding product in your App Store Connect account.
## Step 8: Complete Product Setup in App Store Connect
Your product was created but needs additional metadata before it can go live:
1. Go to [App Store Connect](https://appstoreconnect.apple.com/)
2. Click on your app in the bottom left
3. Navigate to **Monetization** → **Subscriptions** (or **In-App Purchases**)
4. Click on the subscription group that was created
5. Select your product
This creates the corresponding product in your App Store Connect account.
## Step 8: Complete Product Setup in App Store Connect
Your product was created but needs additional metadata before it can go live:
1. Go to [App Store Connect](https://appstoreconnect.apple.com/)
2. Click on your app in the bottom left
3. Navigate to **Monetization** → **Subscriptions** (or **In-App Purchases**)
4. Click on the subscription group that was created
5. Select your product
 ### Add Required Metadata
For each product, you need to add:
* **Display Name** - What users see during purchase
* **Description** - Explain what the subscription includes
* **Screenshot** - A screenshot showing your subscription in action
### Add Required Metadata
For each product, you need to add:
* **Display Name** - What users see during purchase
* **Description** - Explain what the subscription includes
* **Screenshot** - A screenshot showing your subscription in action
 To fix this:
* Go to [App Store Connect](https://appstoreconnect.apple.com/) → **Business** → **Agreements**
* Ensure your **Paid Apps Agreement** is active (not "New")
* Complete any pending legal entity information
* Fill out all required tax and banking information
* Make sure to also fill out all the metadata for your products in App Store Connect. You can do this by going to App -> Subscriptions -> Your Subscription -> Edit -> Metadata.
**Pending agreements blocking purchases?**
If you see a yellow warning banner in App Store Connect about updated agreements, you must clear all pending agreements before RevenueCat can process purchases.
To fix this:
* Go to [App Store Connect](https://appstoreconnect.apple.com/) → **Business** → **Agreements**
* Ensure your **Paid Apps Agreement** is active (not "New")
* Complete any pending legal entity information
* Fill out all required tax and banking information
* Make sure to also fill out all the metadata for your products in App Store Connect. You can do this by going to App -> Subscriptions -> Your Subscription -> Edit -> Metadata.
**Pending agreements blocking purchases?**
If you see a yellow warning banner in App Store Connect about updated agreements, you must clear all pending agreements before RevenueCat can process purchases.
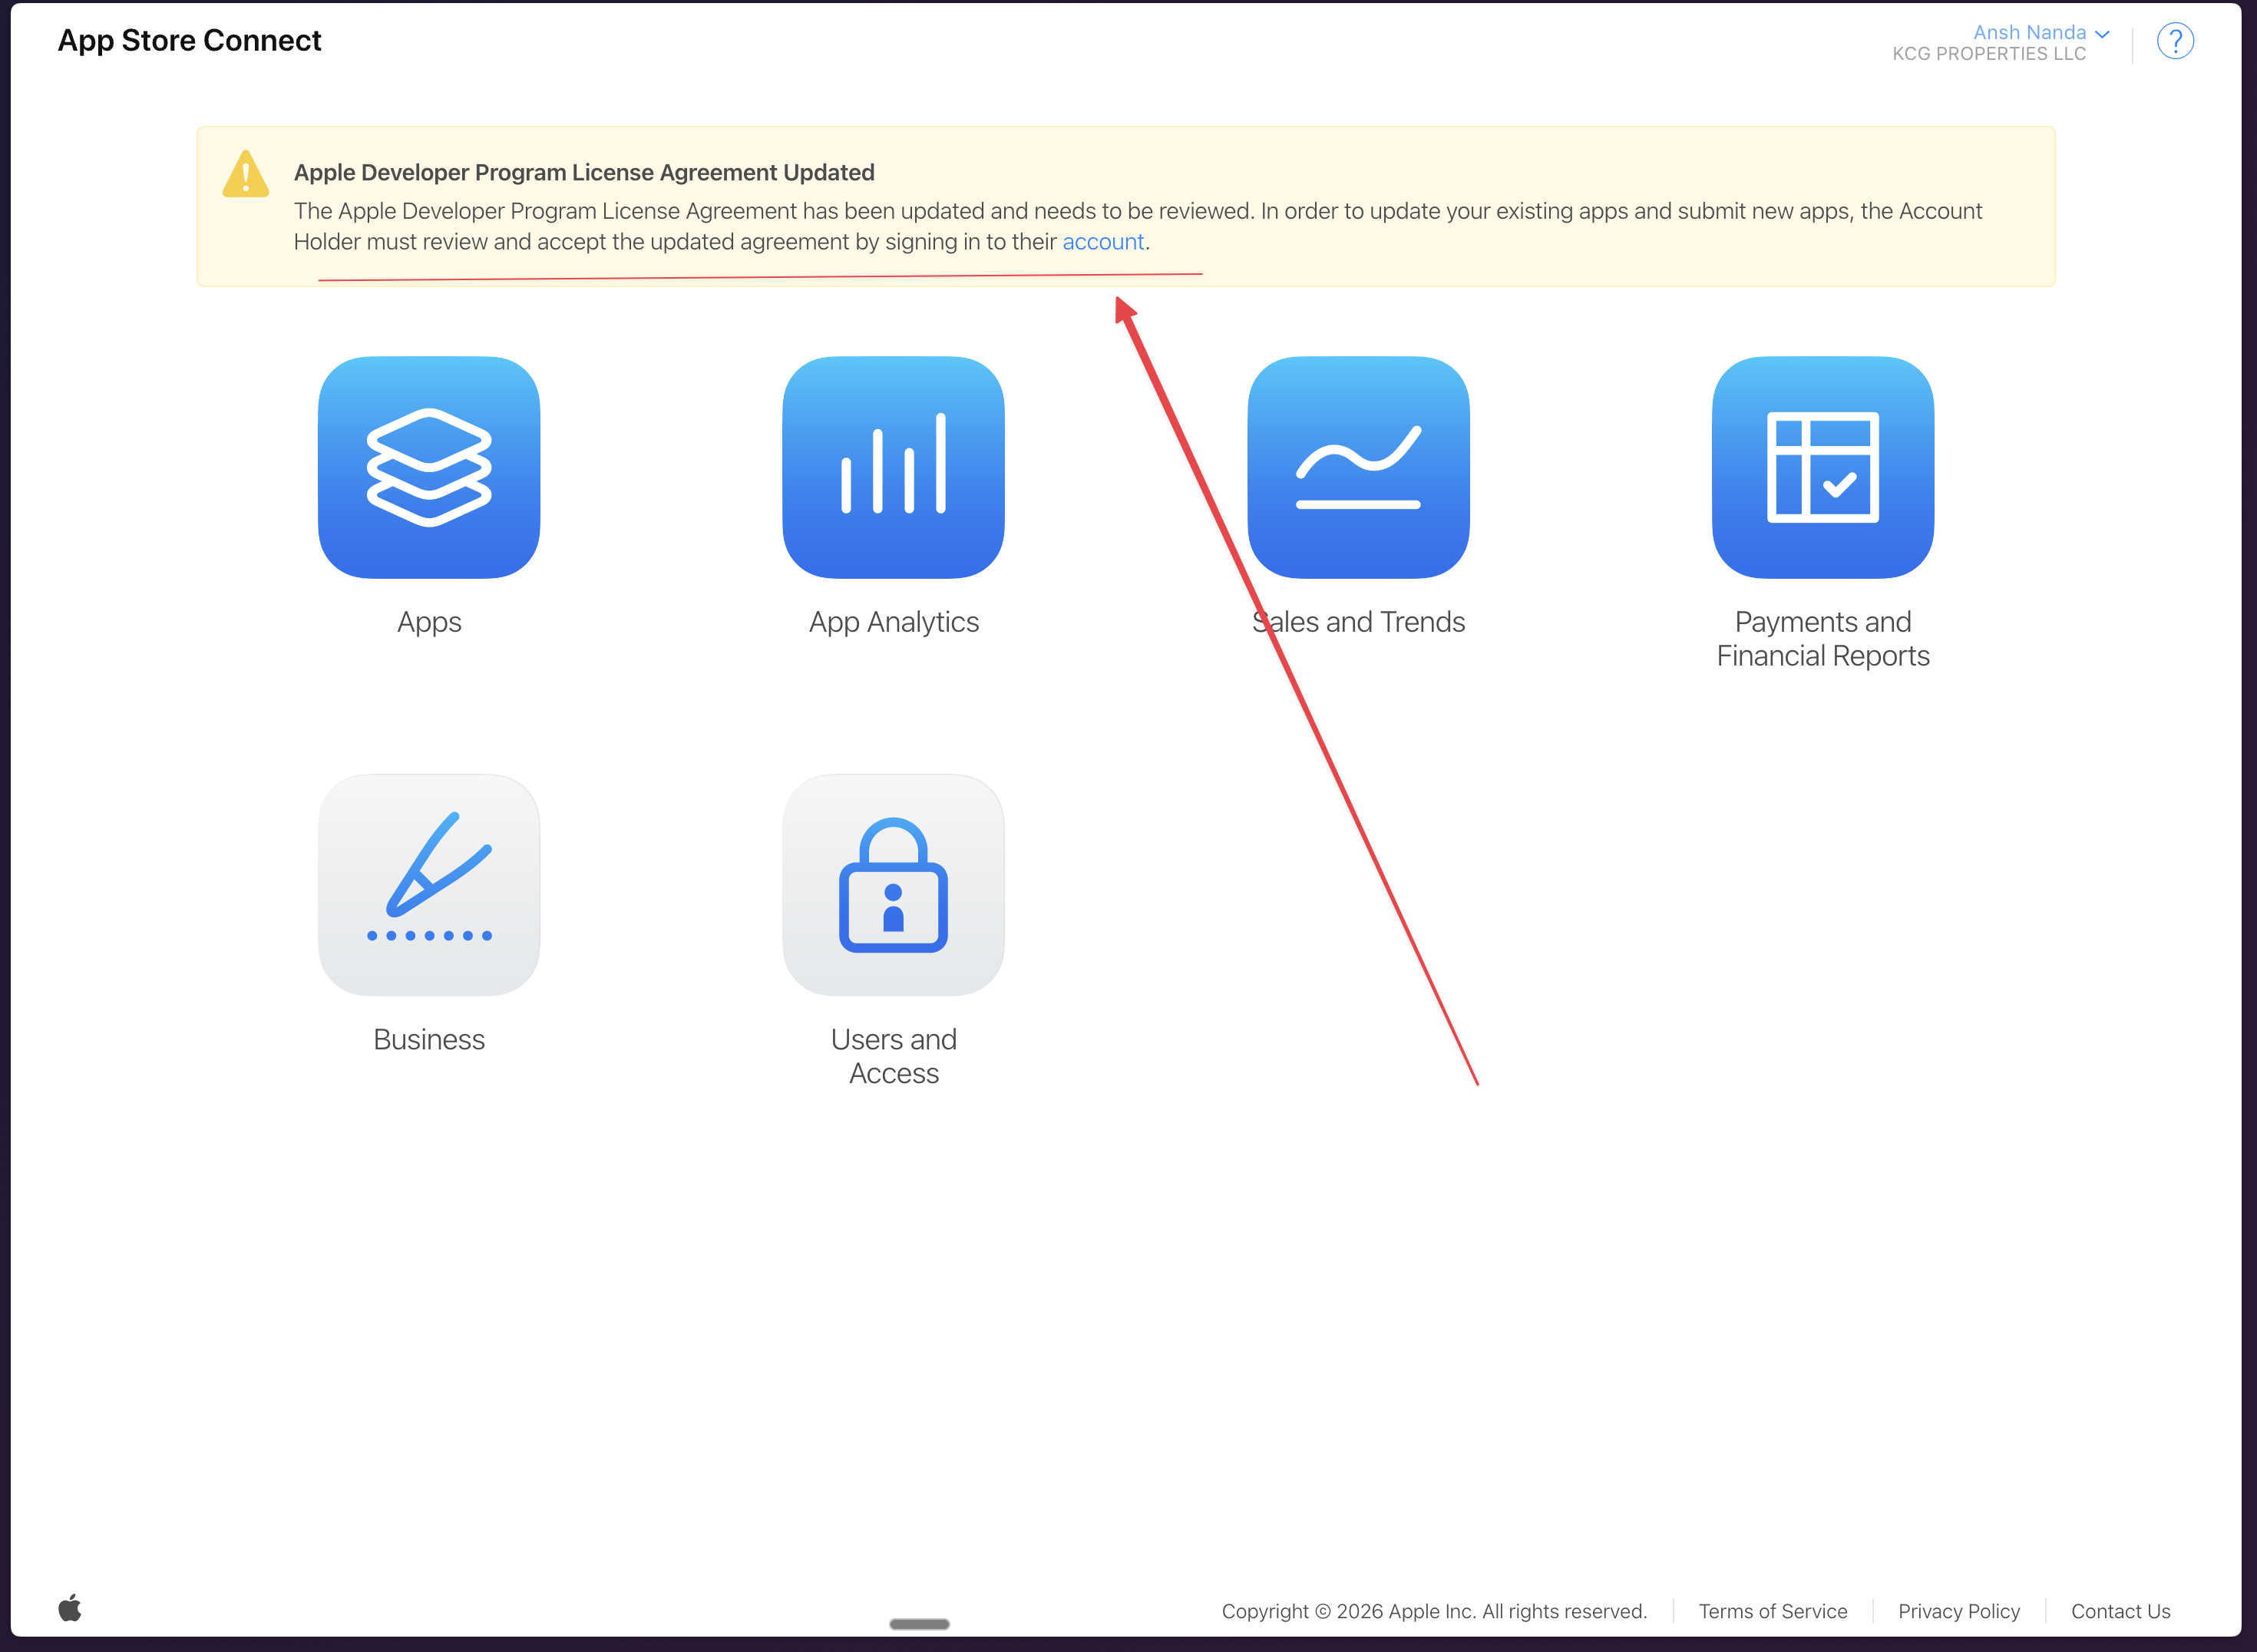 To fix this:
* The **Account Holder** (not just any team member) must sign in to App Store Connect
* Review and accept any updated license agreements shown in the yellow banner
* Check **Business** → **Agreements** for any other pending agreements
* Once all agreements are accepted, the yellow warning will disappear and purchases will work
To fix this:
* The **Account Holder** (not just any team member) must sign in to App Store Connect
* Review and accept any updated license agreements shown in the yellow banner
* Check **Business** → **Agreements** for any other pending agreements
* Once all agreements are accepted, the yellow warning will disappear and purchases will work